These mango mochi are inspirired by my love for mochi and glutinous rice-based desserts growing up in the Philippines. We have a variety of mochi flavours in the Philippines ranging from ube (purple yam), pandan, banana, and of course mango.

These are vegan and gluten-free by default and made in a microwave using a simple mix of glutinous rice flour, fresh Philippine mangoes, sugar, water, and a pinch of salt. These mochi are filled with ripe mangoes for a juicy and chewy bite.

? INGREDIENTS YOU’LL NEED TO MAKE MANGO MOCHI

MOCHI
- mango puree (mine was from fresh mangoes)
- sugar
- water
- salt
- glutinous rice flour , a.k.a. sweet rice flour or mochiko flour
FOR DUSTING
- Corn starch or corn flour
FILLING
- fresh ripe mango
FOR GARNISH (OPTIONAL)
- Mint leaves for topping, optional

? IS GLUTINOUS RICE FLOUR THE SAME AS RICE FLOUR?
The short answer is no. Glutinous rice flour, also known as sweet rice or mochiko flour, is made with glutinous rice so it’s a lot stickier and starchier. Rice flour on the other hand is made with regular white rice.
IS THERE A SUBSTITUTE FOR GLUTINOUS RICE FLOUR?
Unfortunately not. Using glutinous rice flour is the only way to achieve the stretchiness and chewiness of mochi.
??? HOW TO MAKE MOCHI IN A MICROWAVE


- Prepare a large microwave safe bowl.
- Peel and slice the mango. I like to slice a checkered pattern on each mango “cheek” and scoop the flesh out with a spoon. This way, I can easily mash the mangoes using a potato mashed to make a puree.
- Add the mangoes to large bowl and mash until there are no longer any large chunks.
- Add the sugar, pinch of salt, and water into the mango puree. Mix well.
- Add in the glutinous rice flour and mix well to combine with the mango mixture. Once there are no signs of dry flour. Cover your bowl with a microwave safe cover.
- See steps below if you don't have a steamer.
❓WHAT IF I DON’T HAVE A MICROWAVE?
You can steam the mochi for 15 minutes or until cooked and chewy.
For my steamer set-up, I usually prepare a deep pan (like a wok) with some water and use a bamboo steamer lined with parchment paper. Be sure that the water is only grazing the bottom part of the bamboo steamer and doesn't reach the parchment paper and the mochi.
WATERY DOUGH EVEN AFTER MICROWAVING?
- In case you encounter mochi dough after cooking/microwaving that still very wet and not sticky, stretchy, this may be lacking glutinous rice flour to hold it together. This might be due to excess moisture from the fresh mangoes.
- You can add 1-2 tbsp more glutinous rice flour to the dough, mix well to combine, and microwave again for 1 minute or until there are no signs of raw flour. If it's still a bit wet, you can add 1-2 tbsp more glutinous rice flour to the dough, mix well, and microwave again.
?MORE MANGOES FOR THE MOCHI FILLING
- Meanwhile, prepare the mochi filling. I simply used 1 fresh ripe mango and cut each side into 6-8 large chunks to use as filling. You can refrigerate or freeze these if you want these hard. I simply refrigerated mine.
DIVIDE THE MOCHI DOUGH


- Afterwards cooling the mochi dough, dust your flat surface with a generous amount of corn starch. This will prevent the mochi from sticking. Add in the mochi to the corn starch and sprinkle on some corn starch on the top as well.
- You can dust your hands or a spatula with some corn starch before checking underneath that the mochi has not stuck to your surface. If it does, carefully scrape it out and coat with more corn starch.
- Lightly flatten the ball of mochi until around 0.5-inch (1.25 cm) thick. You can do this with your hands and dust with additional corn starch as needed.
- Divide the mochi dough into 8.
SHAPING THE MANGO MOCHI


- Get a piece, carefully flatten it more to stretch. I like to pinch the border/sides so that these are thinner and much easier to pinch together when sealing the mochi.
- Place the mochi wrapper on your palm. Add a chunk of mango in the centre and bring the edges together. From there, pinch the sides together to seal the mochi well.
- Flip over and then place on your palm or on a surface to flatten the base.
- Place the finished mochi on a plate or surface dusted with some corn starch to prevent from sticking.
- Repeat this for the rest. Garnish with a mint leaf, if desired.
SERVE AND ENJOY WHILE FRESHLY MADE

- These are best enjoyed freshly made and consumed within the day. Refrigerating these will cause the mochi to dry up so they won’t be as chewy compared to when they’re freshly made.

REHEATING THE MOCHI (JUST IN CASE!)
I really don't recommend refrigerating your mochi because they will harden but here are some steps just in case you do end up with leftovers.


- I really recommend consuming your mochi within the day but in case you have leftovers or forget to store your mochi properly and they harden, don’t lose hope!
- You can still enjoy your mochi and get it back to its chewy texture by microwaving or even steaming.
- To microwave, place the mochi in a heat proof bowl or plate. Splash a few drops of water and then cover your mochi. Microwave for 10-20 seconds or until it's soft and bouncy to the tough.
- You can leave it covered for 30 more seconds after microwaving to allow the steam to continue soften the mochi. You can also let the mochi cool down a bit since it’s warm after microwaving.
- DO NOT over microwave the mochi because this will turn too soft and will lose its shape -- think of slime/goo.

?OTHER VEGAN DESSERT RECIPES YOU MIGHT LOVE

Easy Mango Mochi
Equipment
- Microwave-safe bowl
- Cover
- OR a steamer
Ingredients
MOCHI
- 5 oz mango puree , from 1 large fresh ripe mango (1/2 cup)
- 1.5 to 2 tbsp sugar (see notes)
- 2 tbsp water
- Pinch salt
- 3.5 oz glutinous rice flour , a.k.a. sweet rice flour or mochiko flour (1 cup) - plus more if needed (SEE NOTES)
FOR DUSTING
- Corn starch or corn flour
FILLING
- 1 fresh ripe mango
FOR GARNISH (OPTIONAL)
- Mint leaves for topping, optional
Instructions
PREPARING THE MOCHI
- You can watch the video or see the photos above to see how these are made.
- Prepare a large microwave safe bowl.
- Peel and slice the mango. I like to slice a checkered pattern on each mango “cheek” and scoop the flesh out with a spoon. This way, I can easily mash the mangoes using a potato mashed to make a puree.
- Add the mangoes to large bowl and mash until there are no longer any large chunks.
- Add the sugar, pinch of salt, and water into the mango puree. Mix well.
- Add in the glutinous rice flour and mix well to combine with the mango mixture. Once there are no signs of dry flour. Cover your bowl with a microwave safe cover.
- See steps below if you don't have a steamer.
COOKING THE MOCHI
- Microwave for 1 minute. Do note that some microwaves can vary in terms of settings. After 1 minute, carefully mix the mango mochi muxture.
- Cover the bowl and microwave for 1 minute again. After microwaving, mix the mochi mixture again.
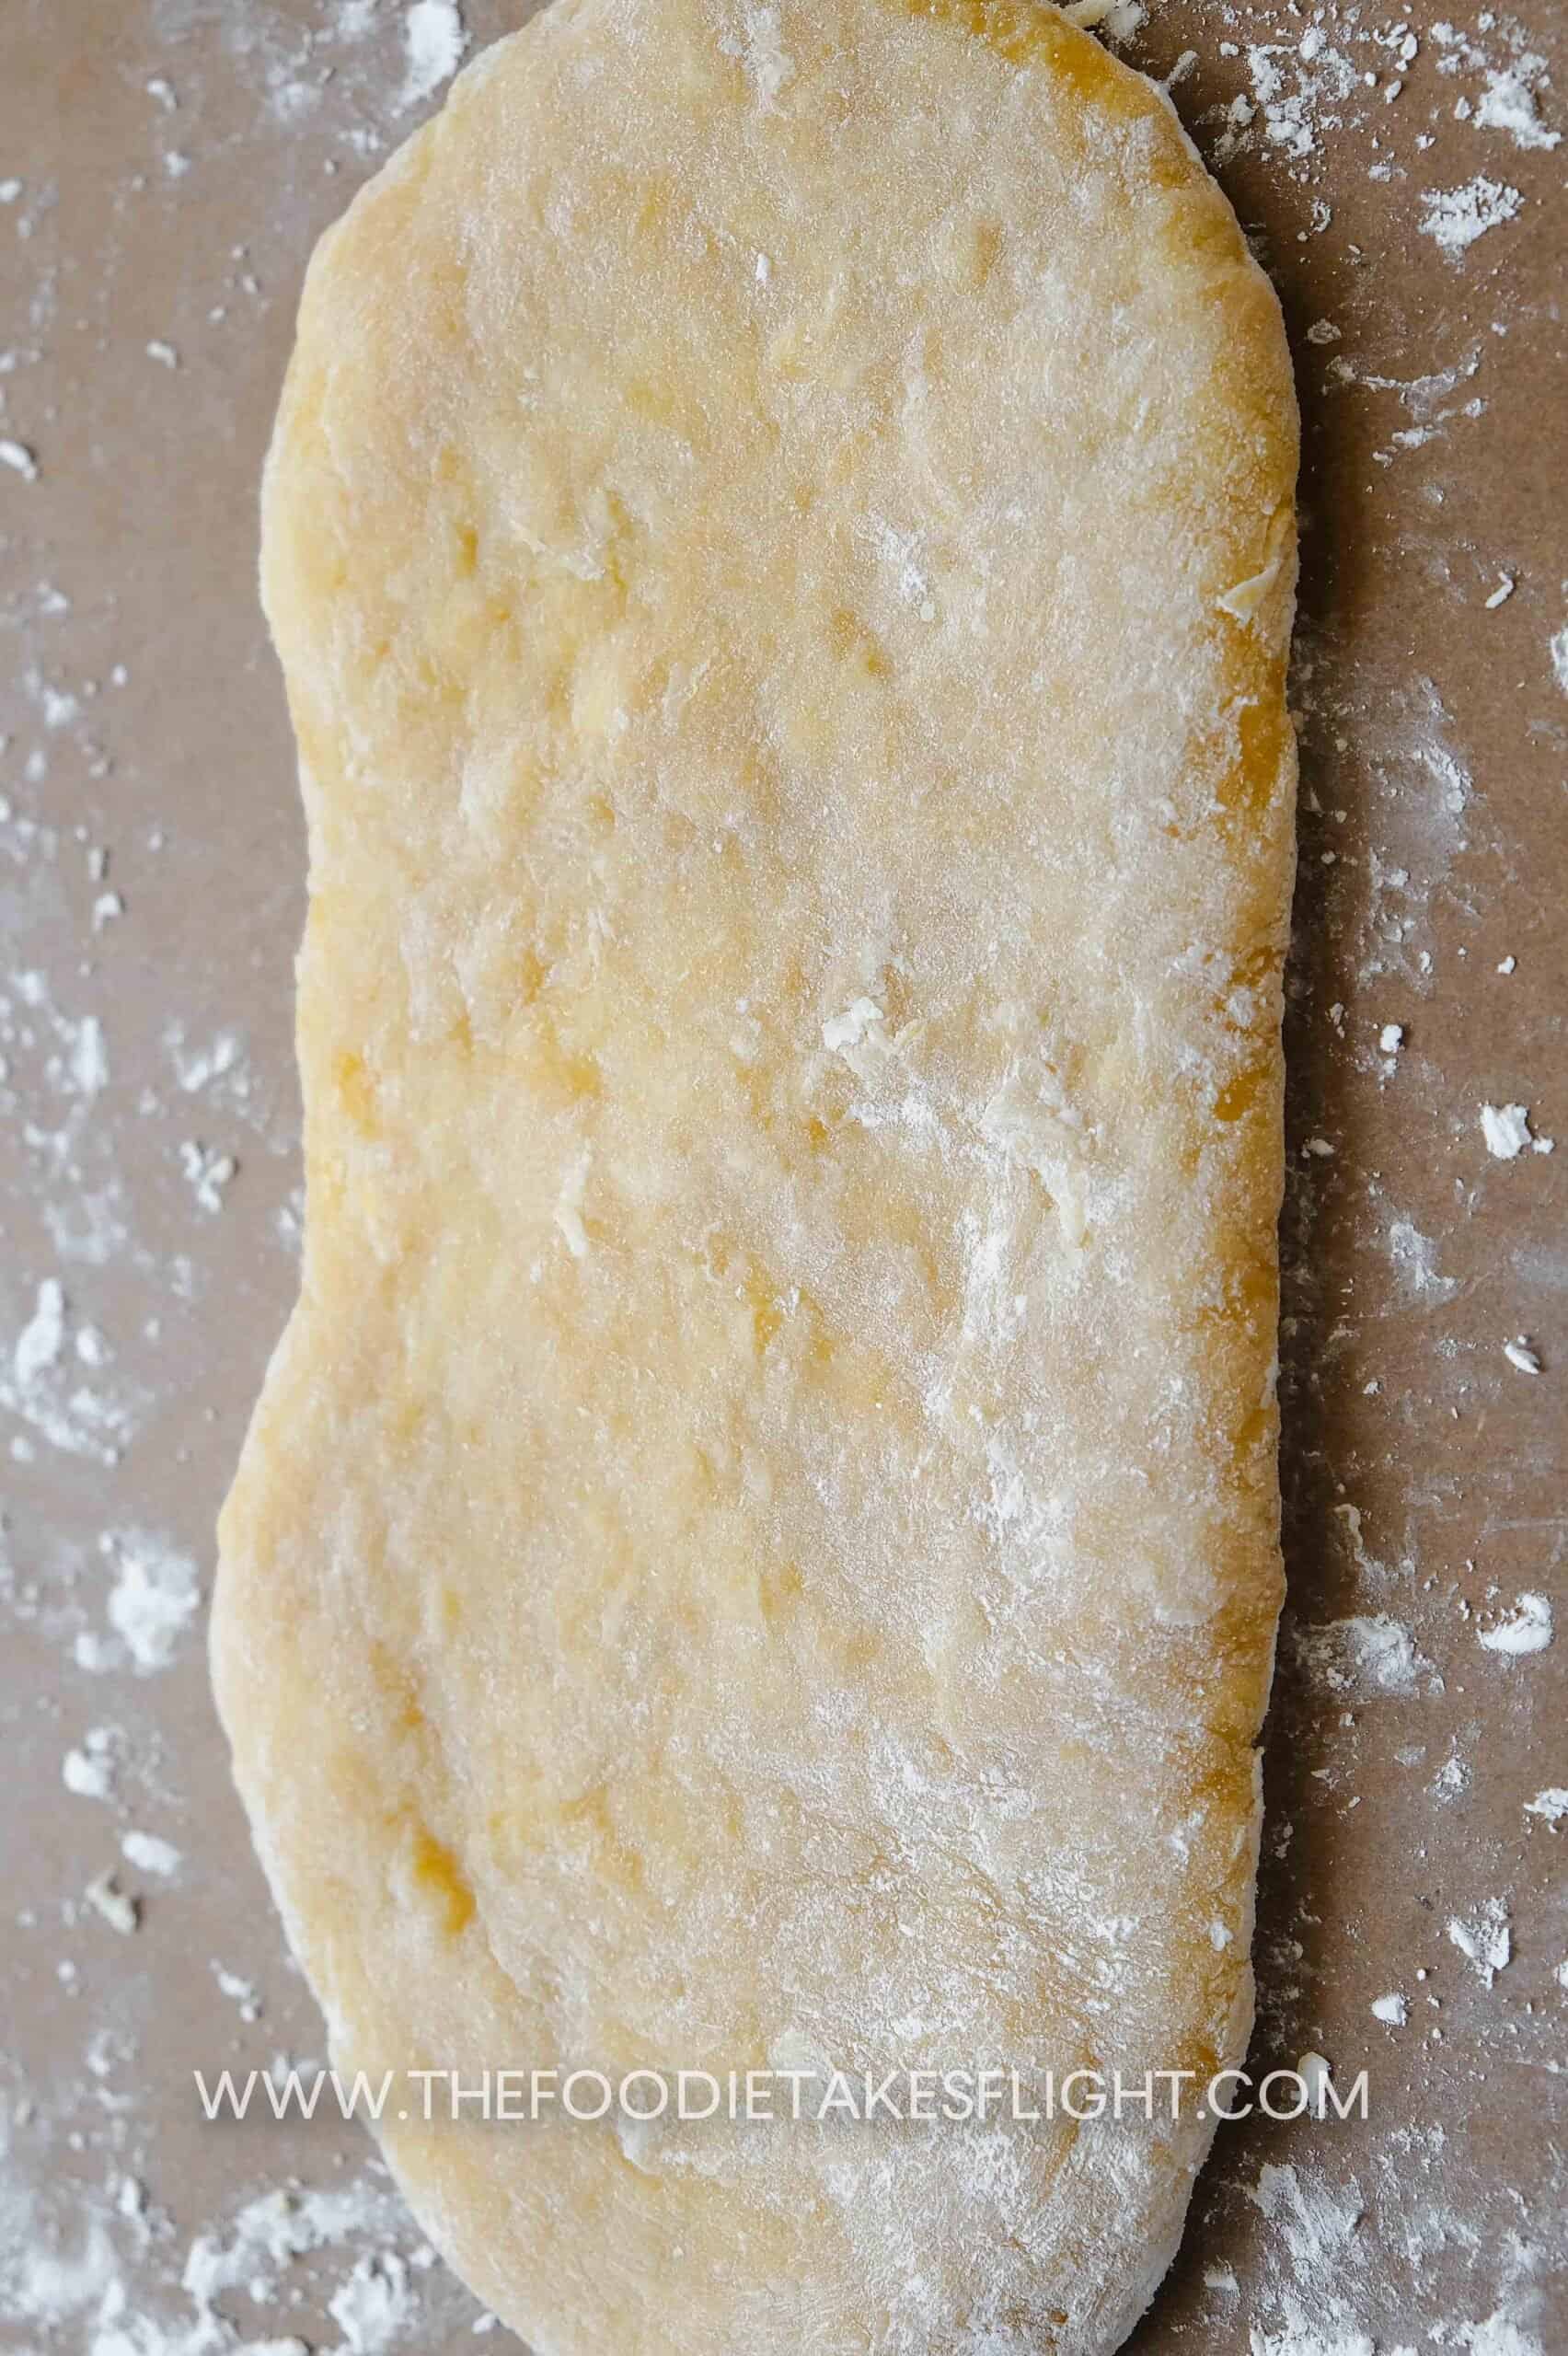
- Cover and then microwave for another 1 minute until very thick and chewy.The colour of the mixture will go from a creamy yellow (like ice cream) to a slightly translucent yellow with no more sign of any creaminess and flour.
- Check the consistency of the dough, it should be thick, very stretchy, and bouncy. If it's still wet, see the notes below.
- Once the mochi is cooked, You can transfer this to a plate or another bowl lightly dusted with corn starch (so it doesn't stick).
- Cover the plate/bowl and then allow the mochi to cool for 30 minutes in a refrigerator. It’ll continue to thicken as it cools and will be a lot easier to work with.
MOCHI FILLING
- Meanwhile, prepare the mochi filling. I simply used 1 fresh ripe mango and cut each side into 6-8 large chunks to use as filling. You can refrigerate or freeze these if you want these hard. I simply refrigerated mine.
SHAPING THE MOCHI
- Afterwards, dust your flat surface with a generous amount of corn starch. This will prevent the mochi from sticking. Add in the mochi to the corn starch and sprinkle on some corn starch on the top as well.
- You can dust your hands or a spatula with some corn starch before checking underneath that the mochi has not stuck to your surface. If it does, carefully scrape it out and coat with more corn starch.
- Lightly flatten the ball of mochi until around 0.5-inch (1.25 cm) thick. You can do this with your hands and dust with additional corn starch as needed.
- Divide the mochi dough into 8.
- Get a piece of dough, carefully flatten it more to stretch. I like to pinch the border/sides so that these are thinner and much easier to pinch together when sealing the mochi.
- Place the mochi wrapper on your palm. Add a chunk of mango in the centre and bring the edges together. From there, pinch the sides together to seal the mochi well.
- Flip over and then place on your palm or on a surface to flatten the base.
- Place the finished mochi on a plate or surface dusted with some corn starch to prevent from sticking.
- Repeat this for the rest. Garnish with a mint leaf, if desired.
- These are best enjoyed freshly made and consumed within the day. Refrigerating these will cause the mochi to dry up so they won’t be as chewy compared to when they’re freshly made.
WHAT IF I DON’T HAVE A MICROWAVE?
- You can steam the mochi for 15 minutes or until cooked and chewy.
- For my steamer set-up, I usually prepare a deep pan (like a wok) with some water and use a bamboo steamer lined with parchment paper. Be sure that the water is only grazing the bottom part of the bamboo steamer and doesn't reach the parchment paper and the mochi.
REHEATING THE MOCHI
- I really recommend consuming your mochi within the day but in case you have leftovers or forget to store your mochi properly and they harden, don’t lose hope! You can still enjoy your mochi and get it back to its chewy texture by microwaving or even steaming.
- To microwave, place the mochi in a heat proof bowl or plate. Splash a few drops of water and then cover your mochi. Microwave for 10-20 seconds or until it's soft and bouncy to the tough.
- DO NOT over microwave the mochi because this will turn too soft and will lose its shape -- think of slime/goo.
- You can leave it covered for 30 more seconds after microwaving to allow the steam to continue soften the mochi. You can also let the mochi cool down a bit since it’s warm after microwaving.
WATCH Video
Notes
SUGAR
- My mangoes were very ripe and sweet so I used 1.5 tbsp sugar. You can use 2 tbsp sugar if want more sweetness.
WATERY DOUGH EVEN AFTER MICROWAVING?
- In case you encounter mochi dough after cooking/microwaving that still very wet and not sticky, stretchy, this may be lacking glutinous rice flour to hold it together. This might be due to excess moisture from the fresh mangoes.
- You can add 1-2 tbsp more glutinous rice flour to the dough, mix well to combine, and microwave again for 1 minute or until there are no signs of raw flour. If it's still a bit wet, you can add 1-2 tbsp more glutinous rice flour to the dough, mix well, and microwave again.

These are amazing!! I love mochi and make it quite often and wanted to try some different flavors. This is by far the best one I’ve tried. 10/10! Will definitely be making them again in the future.
So so happy you liked it! And thank you so much! ◡̈
Went well for me, even if I didn’t use filling! Since we didn’t have mangoes on-hand, I used leftover mango jam from Pan de Manila. I just wish I’d sifted my flour, haha! But this is really good and easier than I thought it would be! Would definitely do again.
Mango jam is a good idea! Should try it out soon ◡̈ thanks Regina!
Perfect recipe!!! It turned out just so perf idk what to say ? I don’t usually leave reviews
Glad it turned out great. Thanks Jessi 🙂
It did taste good, but the mochi skin didn’t come out well. By us it felt chunky, but the end result on the internet went perfect. Could you please make an easier recipe?