These Vegan Peach Mango Pies are my vegan take on Jollibee’s pies! These really take me back because I used to enjoy Jollibee’s peach mango pies before I went vegan.
INSPIRATION: JOLLIBEE'S PEACH MANGO PIES
Jollibee is a local Filipino fast food chain with branches across the world and they’ve various pie offerings from buko, tuna, and more but these for me are probably the most iconic because I love mangoes and the Philippines has some of the best and sweetest mangoes (at least in my opinion!)

These pies are wrapped in a homemade sweetened dough filled with, of course, a delicious balance of peach and mangoes before being fried to a crispy. These are traditionally fried until golden brown and you get that delicious, crispy bite—especially at the edges! I really love these and I’m proud to say my mom and sister approve, too, and they both love Jollibee’s pies!


PEACH MANGO FILLING
What you'll need:
- yellow ripe peach halves (I used those from a can in light syrup)
- ripe mango
- sugar, add more or less depending on to desired sweetness (see notes)
- pinch of salt
- light syrup from peaches or 1 tbsp water see notes
The full recipe is in the recipe card below! ◡̈
What to do:
- Slice your peaches and mangoes into 1/2 to 3/4-inch (1.25 to 1.9 cm) chunks.
- Heat a medium saucepan over medium heat. Once hot, add in the peach and mango chunks, some sugar, pinch of salt, and syrup from the peaches or water (if not using frozen fruit).
- Mix well and allow the sugar to dissolved and fruits to cook down for 3-5 minutes over medium heat, mixing every minute or so to prevent the fruits from burning.
- Meanwhile, mix together the corn starch and water in a small bowl until the corn starch has dissolved.
- You can break down some of the chunks and leave some as-is. I prefer my filling with a good balance of chunks for a good bite and some of the more broken down pieces (like a jam-consistency). Taste your filling and feel free to add more sugar, to sweeten, if desired.
- Lower the heat and then pour in the corn starch slurry. Mix well and allow the filling to thicken from the starch.
- Turn off the heat and transfer the filling to a container. Allow this to cool.


PREPARING THE FILLING IN ADVANCE
- Preparing in advance: You can prefer this filling a day advance and store it in the refrigerator until ready to use.
- Leftover filling: You can use the leftover filling as a spread for your toast, mixed in with oatmeal, or enjoyed as is.

THE PIE DOUGH
Dry Mixture

Wet Mixture
- brown sugar
- olive oil or other oil of choice
- room temperature water
You'll find the full recipe below! ◡̈

HOW TO PREPARE THE DOUGH
- Mix the flour, salt, baking powder in a large bowl. Mix.
- In a separate bowl, dd in the sugar, oil, and water. Note that you can use 4 tbsp sugar if your filling is already a bit sweet (see notes). Mix well until the sugar has dissolved and make sure there aren’t any sugar clumps.
- You can knead the mixture with your hands or you can also use a stand mixer. You can flour your hands, if needed, and continue to knead the mixture until it forms a dough, around 4-5 minutes. If the dough is a bit dry from 1/3 cup water, add 1-2 tbsp more water if needed.The dough will be a pale brown/beige colour from the brown sugar. If the ball of dough no longer sticks to your hands, place the dough back in the bowl and cover with a towel.
- Leave the dough to sit for at least 15 minutes.


MAKE THE PEACH MANGO PIES
- Flour your work surface as well as your rolling pin.
- Place the ball of dough on the surface, then punch a hole in the middle with your finger. Pull apart the dough until you have large ring.
- Divide the dough into 12 pieces. Each piece will be around 40 grams. Shape each piece into a small ball.
- Place the dough back into the ball and cover these to prevent from drying.

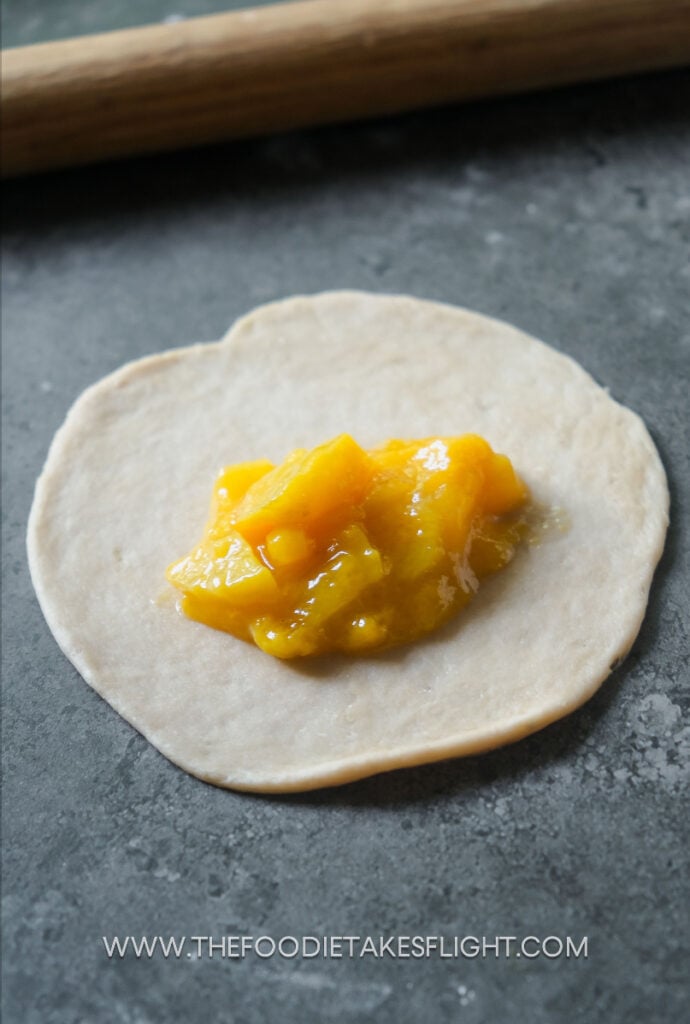
- Get 1 piece of dough, place it on a floured surface flatted with your palm, and then roll out with your rolling pin until you have a round-ish shape that’s thick like a tortilla—don’t worry because it doesn’t have to be perfect! Make sure not to roll the dough too thin because the filling can leak out.

- Add 1-1.5 tbsp of the filling on the centre of your wrapper. Make sure you do not add too much filling to keep the edges clean so that your pie will seal well. If the filling gets to the edges of your wrapper, it’ll be much harder to seal these.
- Fold the dough in half. Press down the edges with your finger and then press a little harder, to seal around, by using a fork.
- Carefully remove the pie from your surface and transfer it on a tray or plate.
- Repeat this for the rest until you have all your pies.


FRYING THE PIES
- For baking steps, see the recipe card below.
- If deep frying, heat a large frying pan or skillet over medium high heat.
- Add in enough oil to submerge at least half of the pies.
- When the oil is very hot (you should see small bubbles), you can add a small piece of dough and it should immediately sizzle. Add in a few pies. Make sure these are evenly spaced apart.
- Allow to cook for a few minutes over medium high heat until golden brown. You may need to flip yours over if your oil is a bit shallow.
- Once golden brown throughout, remove the pies from the pan and drain any excess oil. Don’t place these on paper towels since they can get soggy. I placed mine on a strainer.
- Cook the remaining pies.


BAKED VS FRIED PIES
One noticeable difference is the colour. The baked pies don't turn out as beautifully golden and evenly brown as the fried ones. They also lacked that crunch for me. They're still good but I really prefer and recommend frying them!
Photo below: (bottom left) baked pie, (top right) fried pie

STORAGE TIPS
- You can keep your cooked pies in the refrigerator and just reheat in your oven toaster. I kept mine in my stasher bag.
- You can also freeze the cooked pies for up to 1 month and just thaw and reheat in the oven toaster until nice and crisp.

ENJOY YOUR PEACH MANGO PIES
These are best enjoyed while hot!

OTHER VEGAN DESSERTS YOU MIGHT LOVE:
Looking for more Vegan recipes?
You can get a copy of my upcoming cookbook, Vegan Asian!
If you crave vegan-friendly versions of classic Asian dishes, this cookbook is packed with Southeast and East Asian dishes inspired by those I grew up enjoying at home and those I’ve tried from my travels. From iconic Thai dishes to piping-hot Japanese fare and everything in between, the recipes in this will take your palate on a delicious food trip across Asia, and hopefully keep you coming back for more!


Vegan Peach Mango Pies (Jollibee-Inspired!)
Equipment
- Fork
- Standmixer (optional)
Ingredients
Filling
- 3 large yellow ripe peach halves makes 1 heaping cup chunks (I used those from a can in light syrup)
- 3 large ripe mango “cheeks” or halves makes 1 heaping cup chunks (see notes)
- 2 tbsp sugar add more or less depending on to desired sweetness (see notes)
- Pinch of salt
- 2 tbsp light syrup from peaches or 1 tbsp water see notes
Corn starch slurry
- 1 tbsp corn starch
- 2 tbsp room temperature water
Dough
Dry Mixture
- 2 cups all purpose flour (270 g)
- 1/2 tsp salt
- 1 tsp baking powder
Wet Mixture
- 4-5 tbsp brown sugar (60-75 g, see notes)
- 1/4 cup olive oil or other oil of choice
- 1/3 cup room temperature water plus 1-2 tbsp more if needed (see notes)
To Prepare and Cook Pies
- All-purpose flour for dusting
- Neutral oil for frying or baking/air-frying (see notes)
Instructions
- You can watch the video below for a complete step-by-step on how to make these pies.
Prepare the Filling
- Slice your peaches and mangoes into 1/2 to 3/4-inch (1.25 to 1.9 cm) chunks.
- Heat a medium saucepan over medium heat. Once hot, add in the peach and mango chunks, some sugar, pinch of salt, and syrup from the peaches or water (if not using frozen fruit).
- Mix well and allow the sugar to dissolved and fruits to cook down for 3-5 minutes over medium heat, mixing every minute or so to prevent the fruits from burning.
- Meanwhile, mix together the corn starch and water in a small bowl until the corn starch has dissolved.
- You can break down some of the chunks and leave some as-is. I prefer my filling with a good balance of chunks for a good bite and some of the more broken down pieces (like a jam-consistency). Taste your filling and feel free to add more sugar, to sweeten, if desired.
- Lower the heat and then pour in the corn starch slurry. Mix well and allow the filling to thicken from the starch.
- Turn off the heat and transfer the filling to a container. Allow this to cool.
- Preparing in advance: You can prefer this filling a day advance and store it in the refrigerator until ready to use.
- Leftover filling: You can use the leftover filling as a spread for your toast, mixed in with oatmeal, or enjoyed as is.
Prepare the dough
- Mix the flour, salt, baking powder in a large bowl. Mix.
- In a separate bowl, dd in the sugar, oil, and water. Note that you can use 4 tbsp sugar if your filling is already a bit sweet (see notes). Mix well until the sugar has dissolved and make sure there aren’t any sugar clumps.
- You can knead the mixture with your hands or you can also use a stand mixer. You can flour your hands, if needed, and continue to knead the mixture until it forms a dough, around 4-5 minutes. If the dough is a bit dry from 1/3 cup water, add 1-2 tbsp more water if needed.The dough will be a pale brown/beige colour from the brown sugar. If the ball of dough no longer sticks to your hands, place the dough back in the bowl and cover with a towel.
- Leave the dough to sit for at least 15 minutes.
Making the pies
- Flour your work surface as well as your rolling pin.
- Place the ball of dough on the surface, then punch a hole in the middle with your finger. Pull apart the dough until you have large ring.
- Divide the dough into 12 pieces. Each piece will be around 40 grams. Shape each piece into a small ball.
- Place the dough back into the ball and cover these to prevent from drying.
- Get 1 piece of dough, place it on a floured surface flatted with your palm, and then roll out with your rolling pin until you have a round-ish shape that’s thick like a tortilla—don’t worry because it doesn’t have to be perfect! Make sure not to roll the dough too thin because the filling can leak out.
- Add 1-1.5 tbsp of the filling on the centre of your wrapper. Make sure you do not add too much filling to keep the edges clean so that your pie will seal well. If the filling gets to the edges of your wrapper, it’ll be much harder to seal these.
- Fold the dough in half. Press down the edges with your finger and then press a little harder, to seal around, by using a fork.
- Carefully remove the pie from your surface and transfer it on a tray or plate.
- Repeat this for the rest until you have all your pies.
Cooking Option 1: Frying (Recommended!)
- For baking steps, see the next portion below.
- If deep frying, heat a large frying pan or skillet over medium high heat.
- Add in enough oil to submerge at least half of the pies.
- When the oil is very hot (you should see small bubbles), you can add a small piece of dough and it should immediately sizzle. Add in a few pies. Make sure these are evenly spaced apart.
- Allow to cook for a few minutes over medium high heat until golden brown. You may need to flip yours over if your oil is a bit shallow.
- Once golden brown throughout, remove the pies from the pan and drain any excess oil. Don’t place these on paper towels since they can get soggy. I placed mine on a strainer.
- Cook the remaining pies.
- These are best enjoyed while hot!
Cooking Option 2: Baking
- Preheat your oven to 380F/200C.
- Place the pies on a lined baking tray and generously brush or spray with oil. Do note that the baked pies won’t be as beautifully golden brown as those that are fried.
- Leave to bake for 30-35 minutes or until lightly brown and crisp on the edges. You can flip the pies halfway through cooking.
- These are best enjoyed while hot!
Storage Tips
- You can keep your cooked pies in the refrigerator and just reheat in your oven toaster.
- You can also freeze the cooked pies for up to 1 month and just thaw and reheat in the oven toaster until nice and crisp.
WATCH Video
Notes
FILLING
Mangoes/Peaches
- If using frozen mangoes or peaches, you can add water instead to help cook the fruits down on the saucepan.
- Start with 1 tbsp water first since frozen fruit can continue to release more liquid as it cooks down.
Sugar
- I used canned peaches in syrup so mine were already sweetened.
My mangoes were already very sweet so I just used 2 tbsp sugar. You can add more, if needed. Do note that the pie wrapper is also sweetened so if you have a very sweet filling, it can be overpowering.
DOUGH
Water
- You can start with 1/3 cup water. If the dough is still a bit dry and breaks apart easily, you can add 1-2 tbsp more and continue to knead until a stretchy dough forms.
Sugar
- I used 5 tbsp (75 g) sugar for my dough. The dough is on the sweeter side because I wanted to balance it out with my filling. If your filling is on the sweet side, I recommend to use less sugar.
NUTRITIONAL INFO
You can pin these images: