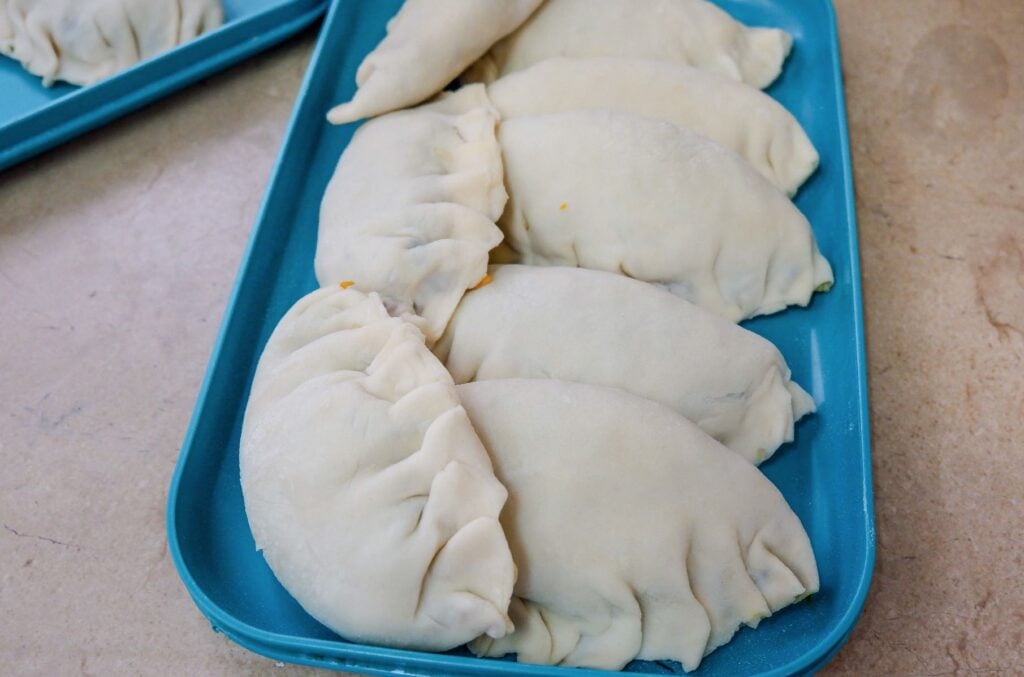
These Chinese Chive Pies or Pockets are what I like to call giant dumplings filled with Chinese chives, vermicelli or bean thread noodles, and some vegetables. These are simply irresistible and remind me of my love for pan-fried buns I enjoyed in Taipei but in pie/dumpling version. It has a very crispy exterior but really chewy dough inside. I really think freshly made dough makes a BIG DIFFERENCE.
Freshly made wrappers from homemade dough turn out so much chewier, they also don't easily break apart when you fill them with your choice of veggies and noodles.

CHINESE CHIVE POCKETS OR "BOXES", 韭菜盒子
韭菜盒子 Jiǔ cài hé zi literally translate to Chinese chive boxes. Chinese chives are garlic chives and have long, flat dark green leaves. I have a few garlic chive plants at home and in Chinese cooking, we use chives (or kuchay) as a vegetables instead of garnishing like we would with spring onions or scallions.
These are the garlic chives or kuchay (as we like to call them), growing in my garden:


You'll find garlic chives being used a lot in Chinese cooking in the form of stir-fries, with egg, and as filling for these pockets.
These pies turned out so good and they're so fun to snack on too.
For my version of these pies, I actually pleated them differently from how they usually are which make them look like giant dumplings even more!

ANOTHER FOLDING METHOD
You can also of course pleat these pies in the more traditional way. I like to call this the 'pinch and fold' method, like how empanadas are wrapped.

MAKING THE DOUGH
What you'll need:
- warm water
- all-purpose flour
- neutral oil
- salt
WHAT TO DO
- Add in 2 cups of flour into a mixing bowl.
- Create a well in the center of the bowl.Pour in the warm water.Use a wooden spoon or spatula to mix the flour and water. Once the dough starts to come together, add in 1 tsp of oil.
- Use your hands to mix the bits of dough. You can also transfer the dougn mixture to a floured surface. But I preferred to knead mine in a bowl for easier clean-up!
- Knead together for several minutes. If the dough is a bit dry, add a splash of water.
- Keep kneading until the dough no longer sticks to your clean hand and is slightly smooth.
- Shape the dough into a ball, then place it in the bowl.Cover the dough with a damp towel and let it rest for 30 minutes


HOMEMADE DOUGH AND WRAPPERS FOR THE CHIVE POCKETS
They do take a lot of time to make because of the homemade dough but it's really so worth it when you end up with 12 pies that you can enjoy for the coming days.
CAN I PREPARE THE DOUGH IN ADVANCE?
- Yes you can! I prepare my dough and knead it until smooth before shaping it into a ball. I wrap the ball of dough with some plastic or cling wrap and then place it in an airtight container in the fridge overnight. When ready to use, I let it sit in room temperature for 1-2 hours before rolling out into wrappers.


ROLLING OUT THE WRAPPERS


CHINESE CHIVES, NOODLES, AND VEGETABLE FILLING
Though Chinese chive pockets or pies are commonly made with egg in the filling, this is a vegan version uses a simple mix of noodles, chives, vegetables, and mushrooms.
I also like to add extra firm tofu that I use in replacement of egg and season this with some turmeric powder (for a bit of colour) and black salt (for an egg-y taste).


Vermicelli noodles or mung bean threads are very neutral in flavour so be generous with your seasoning and adjust it to your taste.
HOW TO MAKE THE CHIVE PIES FILLING
- For the noodles, I simply soaked them in boiling hot water until cooked through yet still chewy. Chop the noodles into small ½ inch pieces. Drain excess water and set aside.
- Prepare the rest of the veggies for the filling.
- Heat a large pan over high heat. Add in 1 tbsp neutral oil. When the oil is hot, crumble the tofu with your hands and then add in the the pan. Season with turmeric for colour and black salt, to taste. Leave the tofu to cook for 2-3 minutes to let any excess water evaporate.
- Add in the chives, carrots, and mushrooms. Cook over medium high heat for 4-5 minutes until the carrots are tender. Add in noodles. Pour in the soy sauce, salt, vegetarian oyster sauce (if using), five spice powder, and sesame seeds. Season to taste as needed. Mix well with a wooden spoon or spatula and cook for another 2-3 minutes over medium heat.
- Turn off the heat. Finish with sesame oil and mix well.
- Transfer the filling in a bowl then set aside to cool while you prepare the wrappers.


HOW TO MAKE THESE CHINESE CHIVE PIES OR POCKETS
DUMPLING PLEAT METHOD
- Take a rolled out piece of wrapper.
- Place around ¼-⅓ cup of filling into the center. Press down the filling to make sure it’s compact.Fold the dough in half and seal by pressing the ends together. You will end up with a pie shape but you can also use your fingers to pinch small pleats on the sides if you’d like.
- Since we’re using fresh dough, we don’t need to seal the edges with water.
- To make the pleats, hold down the edges of the pie with your thumb and pointer finger, while you use your other hand to push down the sides.Press the wrapper together to seal the pleats well and avoid the filling from seeping out.
- Repeat this around the pie until you’ve pleated it all the way through.Repeat this for the rest of the wrappers until you have all your pies!
Note: I actually pleated my pockets like large dumplings. Feel free to seal them in the more traditional seal and pinch method (like empanadas!).


Check out a step-by-step below on how these pies are made from the wrappers all the way to cooking them! You'll also find the full recipe below!
You can also check out my pan-fried buns video below for an idea on how to make the wrappers.
PINCH AND PRESS FOLDING METHOD


COOKING THE CHIVE POCKETS
- Heat a pan (similar one with a lid here), add in 1 tbsp of oil (for every 3 pies).
- When hot, add in the pies and lightly press down. Leave to cook over medium heat for 4-5 minutes until it has a golden brown crust. Flip over and leave to cook for another 4-5 until golden brown.
- Prepare the lid of your pan. Using the lid as protection, carefully pour 3 tbsp of water into the pan and then immediately cover to prevent it from splashing due to the heat.
- Leave to cook in the steam, until the water has evaporated, around 5-6 minutes. Take out the pies and repeat this step for the remaining ones.Enjoy while hot!


SERVE AND ENJOY!

STORAGE FOR LEFTOVER PIES/MAKING AHEAD
- Place the cooked pies in an air-tight container and refrigerate for up to 5 days. To reheat, you can pan fry them again with a splash of water or oven-toast in low heat.
- Frozen: freeze the cooked pies on a tray for 5 to 6 hours until hard. Make sure they are properly spaced apart to avoid from sticking. Afterwards, transfer them to freezer safe bags or containers. Reheat them from frozen (no need to thaw!) by pan-frying them on a pan with a splash of water before covering. Alternatively, you can also wrap them in a damp paper towel and microwave on high until cooked through (around 1 minute).
Are you looking for more delicious, vegan recipes?
You can get a copy of my cookbook, Vegan Asian! If you crave vegan-friendly versions of classic Asian dishes, this cookbook is packed with Southeast and East Asian dishes inspired by those I grew up enjoying at home and those I’ve tried from my travels. From iconic Thai dishes to piping-hot Japanese fare and everything in between, the recipes in this will take your palate on a delicious food trip across Asia, and hopefully keep you coming back for more!

VEGAN CHINESE RECIPES YOU MIGHT LOVE:

Vegan Chinese Chive Pies or Pockets (韭菜盒子)
Ingredients
For the Dough
- ¾ cup + 1 tbsp warm water (see notes)
- 2 cups all-purpose flour plus more for dusting
- 1 tsp neutral oil
- ½ tsp salt
For the Filling
- 3.5 oz dry vermicelli noodles, makes 2 cups rehydrated noodles
- 2 cups chopped Chinese or garlic chives (100g)
- 1 medium carrot , shredded (makes 1 cup)
- 1 cup diced shiitake mushrooms* (150g), see notes
- 1 tbsp neutral oil for cooking
- 7 oz extra firm tofu , drained and pressed
- Pinch turmeric powder
- 1/4 tsp black salt or sub with more regular salt (black salt adds an 'eggy' flavor)
- 1/2 to 1 tsp salt or more to taste
- 1 tbsp soy sauce or more to taste
- 1 tbsp vegetarian oyster sauce or more to taste (you can sub this with more soy sauce)
- 1/2 tsp Chinese five spice powder
- 1 tbsp sesame seeds
- ½ tbsp sesame oil
For Cooking
- 12 tbsp water divided into 4 batches of 3 tbsp each*, see notes
- 4 tbsp neutral oil divided into 4 batches of 1 tbsp each*, see notes
Instructions
MAKE THE DOUGH
- Add in 2 cups of flour into a mixing bowl.

- Create a well in the center of the bowl.

- Pour in the warm water.
- Use a wooden spoon or spatula to mix the flour and water. Once the dough starts to come together, add in 1 tsp of oil.
- Use your hands to mix the bits of dough. You can also transfer the dougn mixture to a floured surface. But I preferred to knead mine in a bowl for easier clean-up!
- Knead together for several minutes. If the dough is a bit dry, add a splash of water.

- Keep kneading until the dough no longer sticks to your clean hand and is slightly smooth.
- Shape the dough into a ball, then place it in the bowl.
- Cover the dough with a towel and let it rest for 30 minutes


PREPARING THE DOUGH IN ADVANCE
- If preparing the dough ahead, I wrap the ball of dough with some plastic or cling wrap and then place it in an airtight container in the fridge overnight. When ready to use, I let it sit in room temperature for 1-2 hours before rolling out into wrappers.

PREPARE THE FILLING
- For the noodles, I simply soaked them in boiling hot water until cooked through yet still chewy. Chop the noodles into small ½ inch pieces. Drain excess water and set aside.
- Prepare the rest of the veggies for the filling.
- Heat a large pan over high heat. Add in 1 tbsp neutral oil. When the oil is hot, crumble the tofu with your hands and then add in the the pan. Season with turmeric for colour and black salt, to taste. Leave the tofu to cook for 2-3 minutes to let any excess water evaporate.
- Add in the chives, carrots, and mushrooms. Cook over medium high heat for 4-5 minutes until the carrots are tender. Add in noodles. Pour in the soy sauce, salt, vegetarian oyster sauce (if using), five spice powder, and sesame seeds. Season to taste as needed. Mix well with a wooden spoon or spatula and cook for another 2-3 minutes over medium heat.
- Turn off the heat. Finish with sesame oil and mix well.
- Transfer the filling in a bowl then set aside to cool while you prepare the wrappers.


ROLLING OUT WRAPPERS
- Add some flour on your work surface. Take the dough out of the bowl and knead 2-3 times.
- I like to divide the dough by punching a hole in the ball of dough then carefully pulling towards the sides to make a large donut.
- Divide into 2 long longs, and then dividing into 6 pieces each.
- Slice the dough into 12 pieces. Each piece will be around 38 to 40 grams.
- Roll or shape each piece of dough into a ball.
- To make a wrapper, press down on the ball of dough and lightly flatten it over the surface. You can also check out my pan-fried buns video here to see how I roll out my wrappers.
- Sprinkle a little flour on top and lightly coat your rolling pin with some flour as well. While holding both ends of the rolling pin, roll out the dough by moving the pin forward and backward.
- Rotate the dough 90 degrees and repeat the movement. Continue to roll out the dough until you have a wrapper that’s around 4 ½ inches in diameter. If you can’t make them into a perfectly round shape, that’s okay! Mine weren’t perfect but I was still able to properly fold the pies together. It really takes some time and practice to get a hang of making wrappers.
- Place the rolled out wrappers on a tray and cover with a dry towel to prevent them from drying out. Roll out the rest of the dough.


MAKING THE CHIVE PIES
- Take a rolled out piece of wrapper.
- Place around ⅓ cup of filling into the center. Press down the filling to make sure it's compact.


PINCH & PRESS METHOD (LIKE EMPANADAS)
- Note: You can also opt to just seal these or fold them like empanadas (pinch and press).
- For the pinch and press method, fold the wrapper into half. Try to get as much air out as possible. Pinch to seal the edges. No need for water since the dough is freshly made.
- Start pleating from one side to the other. I like to start with the right side. Pinch with your thumb then fold towards the center.
- Repeat this around the pie.
- Be sure to seal and press tight. Repeat this for the rest of the pleats until completed.
DUMPLING FOLD
- Fold the dough in half and seal by pressing the ends together. You will end up with a pie shape but you can also use your fingers to pinch small pleats on the sides if you’d like. Since we're using fresh dough, we don't need to seal the edges with water.
- To make the pleats, hold down the edges of the pie with your thumb and pointer finger, while you use your other hand to push down the sides.
- Press the wrapper together to seal the pleats well and avoid the filling from seeping out.
- Repeat this around the pie until you've pleated it all the way through.
- Repeat this for the rest of the wrappers until you have all your pies!
- This will take patience and some practice at the start, but trust me, it's worth it!
- Afterwards, place back the pie on the tray and cover with a dry towel to prevent it from drying out.


COOKING THE PIES
- Heat a pan (similar one with a lid here), add in 1 tbsp of oil (for every 3 pies). When hot, add in the pies and lightly press down.
- Leave to cook over medium heat for 4-5 minutes until it has a golden brown crust. Flip over and leave to cook for another 4-5 until golden brown.
- Prepare the lid of your pan. Using the lid as protection, carefully pour 3 tbsp of water into the pan and then immediately cover to prevent it from splashing due to the heat.
- Leave to cook in the steam, until the water has evaporated, around 5-6 minutes. Take out the pies and repeat this step for the remaining ones.
- Enjoy while hot!


Storage and Reheating Cooked Pies
- Place the cooked pies in an air-tight container and refrigerate for up to 5 days. To reheat, you can pan fry them again with a splash of water or oven-toast in low heat.
- Frozen: freeze the cooked pies on a tray for 5 to 6 hours until hard. Make sure they are properly spaced apart to avoid from sticking. Afterwards, transfer them to freezer safe bags or containers. Reheat them from frozen (no need to thaw!) by pan-frying them on a pan with a splash of water before covering. Alternatively, you can also wrap them in a damp paper towel and microwave on high until cooked through (around 1 minute).
WATCH Video
Notes
Warm Water:
- in a microwave-safe measuring cup or bowl, microwave the water on high for 30 seconds. Make sure to use warm water and not boiling water because the dough can lose its elasticity.
Shiitake Mushrooms:
- If using dried shiitake mushrooms, you will need around 7-8 large pieces.
- I used dried shiitake mushrooms and simply soaked these in hot water for 30 to 45 minutes.
Water and Oil:
- For every 3 pies that fit in your pan, you will need 2 tbsp of water and 1 tbsp of oil. If 6 pies fit in your pan then you need to double the water and oil.
CAN I PREPARE THE DOUGH IN ADVANCE?
- Yes you can! I prepare my dough and knead it until smooth before shaping it into a ball. I wrap the ball of dough with some plastic or cling wrap and then place it in an airtight container in the fridge overnight. When ready to use, I let it sit in room temperature for 1-2 hours before rolling out into wrappers.
NUTRITIONAL INFO
You can pin these images:


Amazing!
Easy to make, loved the taste, And Super Kudos: My husband LOVED them! He is a meat a tater guy from Scotland
Thanks Kim! Rly happy to hear this!! ❤️
These were delicious although they didn’t look pretty, think my folding skills need some practice.
Hey Pauline, thanks for giving them a try! The folding definitely takes some time to get used to 🙂