
Anyone here love potstickers or dumplings? Because I do!
One of the many amazing dishes I grew up with were a variety of dumplings. A personal favourite are potstickers--pan-fried with nice, golden brown crisp bottoms.

Potstickers are dumplings cooked in a certain way--they're pan-fried to create beautiful crisp crust before being left to cook/steam after this crust is achieved!

These potstickers are made with a deliciously thin and chewy dough filled with generous amounts of filling!

HOMEMADE DUMPLING WRAPPERS
I also made my own dumpling wrappers from scratch for these ones and making your own really makes a huge difference.
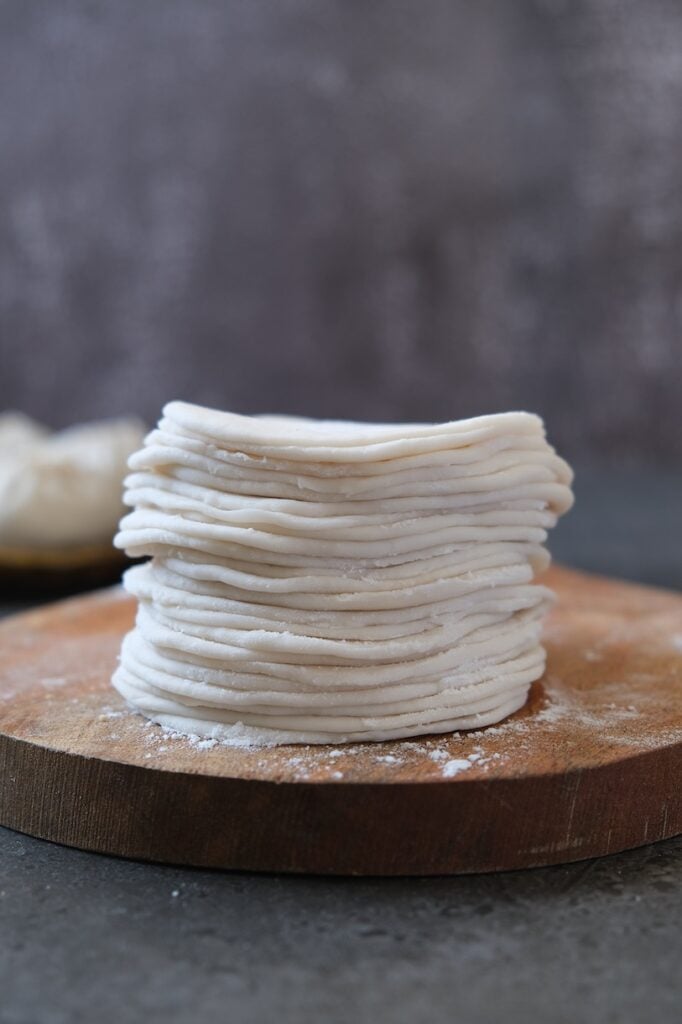
Freshly made dumplings wrappers are much more pliable than frozen pre-made ones and don't break apart easily!
It takes getting used to rolling out your own dumplings wrappers but it's really rewarding when your try them out and cook them afterwards! It also helps to use a tapered rolling pin that's usually thinner than regular rollings and a lot lighter and easier to use too. I can no longer find the exact one I use but bamboo one works too.
STORAGE AND MAKE-AHEAD TIPS FOR THE WRAPPERS
Storing dumpling wrappers:
Though homemade wrappers are best used when freshly made, if you plan to make them ahead of time, here’s how to store them:
- Add around ¼ to ½ tsp of potato or cornstarch to each wrapper then spread it around to coat both sides. Repeat this for the next wrapper and then stack it on top of the wrapper until you have all wrappers coated in starch and stacked. This is to prevent them from sticking to one another when stacked.
- Divide the wrappers into 7 stacks of 5 pieces each. I like to divide the wrappers in smaller stacks so I can work on them by batch. Wrap the dumpling wrappers tightly in some plastic wrap and then place them in an air-tight container before placing them in the refrigerator or freezer.
- The wrappers can be kept in the refrigerator for up to 2 days or in the freezer for up to 1 month. To use, let them come to room temperature before carefully separating and using. Please note that since these wrappers have been coated in starch, you will need water to seal them when using.
SHAPING AND FOLDING THE DUMPLINGS
You can also watch my wrapping video below to see 5 ways on how you can wrap your dumplings.
One of the many things I love about homemade wrappers is being able to stuff them with LOTS of filling!

There are many ways to shape and fold dumplings, but the one below is my go-to!


Here are other folds I love to do as well:

Find the full recipe and steps for these dumplings below.
You can also try these dumplings with the best dumpling dipping sauce!

MORE RECIPES YOU MIGHT LOVE

Homemade Vegetable Potstickers or Dumplings (Vegan Recipe)
Equipment
- Dumpling rolling pin
Ingredients
Dough
- 2 ¼ cups all-purpose flour (310 g)
- ¾ cup + 1 tbsp warm water
- ¾ tsp salt
- Corn starch for storing wrappers
Filling
- 8.5 oz extra firm tofu
- 15 pieces dried shiitake mushrooms (makes 1 1/4 cup minced rehydrated) or fresh mushrooms
- 1 lb head raw cabbage , makes 2 1/2 cup minced (from 1 small)
- 2 small carrots , makes 2 1/2 cup minced (200g total)
- 1 small onion diced
- 3 cloves garlic minced
- 2 tsp salt or to taste
- 1 tbsp toasted sesame oil
- 2 1/2 tbsp cornstarch
For cooking
- 1 cup water divided into ¼ cup water for each batch*
- 4 tbsp neutral oil divided into 1 tbsp for each batch*
Dipping sauce
- 3 tbsp soy sauce
- ½ tbsp rice vinegar or distilled white vinegar
- ½ tbsp sugar
- 1 tsp chili garlic sauce , adjust according to desired spice
- 1 tsp roasted sesame seeds
Instructions
Preparing the Dough
- Add in 2 ¼ cups of all purpose flour and salt into a mixing bowl. Mix well. See my video below on how to roll out and wrap dumplings in 5 different ways!

- Create a well in the center of the bowl and pour in the warm water.

- Use a spatula or chopsticks to mix the flour and water.
- Once the dough starts to come together, you can use your hands to mix the bits of dough. Knead together for several minutes. If the dough is a bit dry, add a splash of warm water.

- Shape the dough into a ball, then place it in a bowl. Cover it with a damp towel and let it rest for 15 minutes.
- Knead the dough a few more times until it’s well incorporated and no longer stick to your hands. Return it to the bowl then cover with a towel. Let it rest for an additional 15 minutes.


Cooking the Filling
- Rehydrate the dried mushrooms by soaking them in hot water for at least 15 minutes. Using a food processor, quickly process the carrots. Repeat this for the cabbage, mushrooms, and onions, and garlic.

- Heat a pan. Add in 1 ½ tbsp canola or other neutral oil. When the oil is hot, add in the garlic and onions. Saute for a few minutes until aromatic. Saute the mashed tofu for 6-7 minutes until lightly brown and resembles minced ‘meat’, Add in the cabbage, carrots, and mushrooms.
- Cook over medium high heat for 4-5 minutes until the carrots are tender. Season with 2 tsp salt, or to taste. Mix in the sesame oil. Cook for another 2-3 minutes over medium heat.
- Transfer to a strainer to drain excess liquid from the vegetables. Return the cooked vegetables to a bowl. Mix in the 2 ½ tbsp cornstarch until well incorporated. Set aside to cool while you prepare the wrappers.


Preparing the Dumpling Dough
- See my video below on how to roll out and wrap dumplings in 5 different ways!
- Flour your surface. Remove the dough from the bowl. Knead it 2-3 times then reshape it into a ball.
- Punch your thumb into the center to create a hole.

- Slowly pinch and form the sides to create a larger hole before slowly pulling apart the sides.
- Slowly you’ll have a very large ring (see photos).
- Sprinkle the dough with some flour.
- Using a knife, slice the ring of dough into 14 to 15-gram pieces, making around 35 pieces.
- Place the pieces in a bowl and cover with a towel to prevent them from drying while you work on the wrappers.


Rolling the Wrappers
- See my video below on how to roll out and wrap dumplings in 5 different ways.
- Flour your surface. Get a piece of dough and then roll it into a ball.
- Lightly flatten it with your palm.
- Sprinkle a little flour on top of the dough and lightly coat your rolling pin with some flour as well. While holding both ends of the rolling pin, roll out the dough by moving the pin forward and backward.
- Rotate the dough 90 degrees and repeat the movement.
- Continue to roll out the dough until you have a wrapper that’s around 3 to 3.5 inches. If you can’t make them into a perfectly round shape, that’s okay!
- You can also roll out the dough using a rotating movement if you have a small, thinner dumpling rolling pin. Using one hand, hold the small rolling pin and then hold the dough on the other hand. While you’re moving the pin with your right hand, you are also rolling the dough 90 degrees counterclockwise. Keep moving the pin and rotating until you have wrappers that are around 3 to 3.5 inches in diameter. It took me a while to get used to this movement since a lot of the pros do it very quickly but once you get your coordination, it’s much easier to roll out the dough.
- Repeat either step for the rest of the dough until you have rolled them all out into wrappers.
- Rub some corn starch on each wrapper before stacking them. This will prevent them from sticking to one another.Keep the wrappers covered with a towel while you fill add each piece with filling.


Dipping Sauce
- Simply mix everything together and adjust according to desired taste. You can also check out the best dumpling dipping sauce recipe here!
Pleating the Dumplings
- Get 1 piece of wrapper.
- Add in 1 to 1 ½ tbsp of the filling. Compress the filling.
- Place it on your palm and then carefully fold the wrapper from the bottom to the top, while using your finger to push the filling in.
- Carefully seal the wrapper with your fingers by pressing both ends together.
- From there, you can pleat the edges of the dumplings. You can refer to the my video here for how I pleat mine and 5 different ways you can fold your dumplings!
- Repeat this for the rest of the dumplings. Cover the dumplings to avoid them from drying out.


Cooking the dumplings
- Heat non-stick pan with a lid--find a similar one here. Add in 1 tbsp* of oil.
- When hot, place 8-9 pieces of dumplings, or more depending on the size of your pan. Make sure that there is space between each dumpling. Leave to cook over medium heat for 7-8 minutes or until a nice golden brown crust has formed underneath. Flip the dumplings.
- Prepare the lid of your pan. Using the lid as protection, carefully pour ¼ cup of water* into the pan and then immediately cover to prevent it from splashing due to the heat.
- Leave to cook in the steam or until the water has evaporated, around 5-6 minutes. Take out the dumplings and repeat this step for the remaining ones.Garnish with some chopped green onions and sesame seeds. Enjoy while hot and try it with the best dumpling dipping sauce!


STORAGE AND MAKE-AHEAD TIPS
- See more storage tips for homemade dumpling wrappers in the notes below.
- Freezing dumplings: Place uncooked dumplings on a lined tray and then freeze for a few hours until hard. Transfer to a resealable bag and keep in the freezer until ready to use.
- Cooking frozen dumplings: Do NOT thaw. Cook directly from frozen to avoid dumplings from getting soggy. Place the frozen dumplings on a hot pan with some oil and leave to cook over medium until a lightly brown crust has formed. Add the water and cover to cook in the steam.
WATCH Video
Notes
STORAGE AND MAKE-AHEAD TIPS
Storing dumpling wrappers:
Freezing dumplings
Place uncooked dumplings on a lined tray and then freeze for a few hours until hard. Transfer to a resealable bag and keep in the freezer until ready to use.Cooking frozen dumplings
Do NOT thaw. Cook directly from frozen to avoid dumplings from getting soggy. Place the frozen dumplings on a hot pan with some oil and leave to cook over medium until a lightly brown crust has formed. Add the water and cover to cook in the steam.NUTRITIONAL INFO
Pin these Images:


We made both the filling and the from-scratch wrappers, and it all turned out fantastic! The flavors and textures were all great; it’s by far the best vegan dumpling we’ve had. We will definitely make this one again. Thanks for the recipe 🙂
Oh wow so so happy to hear this. Thanks so much Autumn 🙂
I made these with some leftover pork I diced up instead of tofu, since that was what I had on hand. Thank goodness for the food processor, it made quick work of the filling. I made the wrappers as well, I will need to work on wrapping them, not the prettiest presentation, but they were delicious! Also made your best dumpling sauce and it was fabulous!
Thank you for the great videos and write ups, made it a lot easier.
Hey Sally, really appreciate you leaving this review. Glad they turned out well and the video helped 🙂
Absolutely love this recipe! The homemade potstickers turned out delicious and were surprisingly easy to make. I appreciate the vegan twist and the creative filling options. Can’t wait to try them with different veggies next time! Thanks for sharing such a wonderful recipe!
Thank you so so much!! Enjoy your dumplings 🙂
These homemade vegetable potstickers look absolutely delicious! I love that they’re vegan and packed with fresh ingredients. Can’t wait to try this recipe—definitely adding it to my meal prep for the week! Thanks for sharing!
Let me know when you get to try it! 🙂
I just tried making these vegetable potstickers and they turned out amazing! The filling was so flavorful, and the tips for folding were super helpful. Can’t wait to share them with my friends. Thanks for the great recipe!
Ahh thank you too, glad you liked it! 🙂