These Roasted Garlic, Miso & Cheese Flatbread are made with a few simple ingredients yet pack so much flavour with layers of the umami-packed & aromatic roasted garlic miso and that delicious richness and saltiness from vegan cheese.

These are best enjoyed freshly made with the crisp outside and can be savoured as-is, or served with a bowl of soup for a really comforting meal.


INGREDIENTS FOR THIS GARLIC MISO AND CHEESE FLATBREAD
You'll find the full printable recipe in the card below!
ROASTED GARLIC
- 2 heads garlic
- Olive oil
YEAST MIXTURE
- 3/4 cup warm water
- 2 tsp sugar
- 1 tsp instant yeast
- 2 tbsp oil
DRY MIX
- 2 cups all-purpose flour 265 g
- 1 tsp salt
FOR THE FLATBREAD FILLING
- Olive oil for brushing
- 2 heads roasted garlic
- 1 tbsp white miso paste
- Pinch sugar
- 1 cup grated vegan cheese
TO COOK


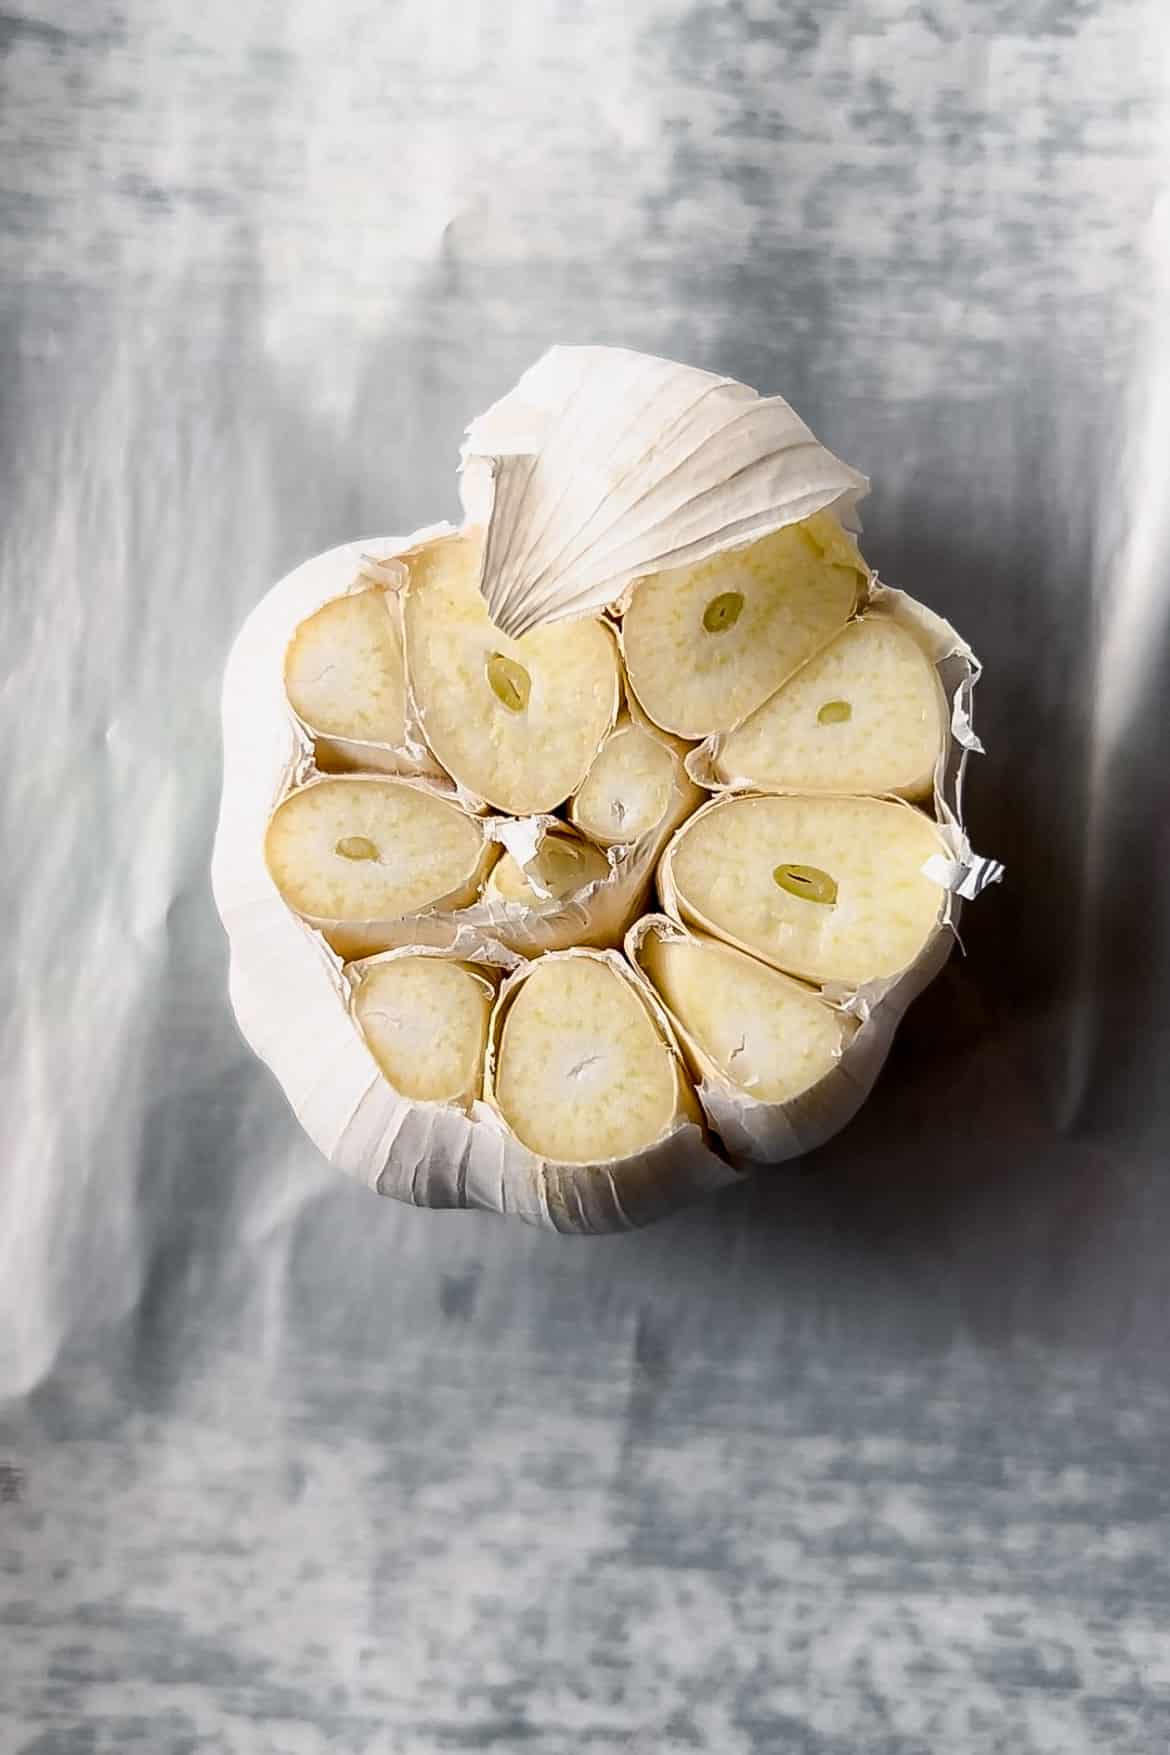
PREPARE THE ROASTED GARLIC
- Preheat your oven or air fryer to 180C/350F.
- Prepare a small sheet of aluminium foil enough to fully wrap the garlic. Chop the top 1/2-inch of the garlic head to reveal the cloves. Place it on the aluminum foil and carefully scrunch up the sides.
- Drizzle some olive oil on the cloves and add a pinch of salt. Wrap the aluminium foil to completely cover the garlic. Make sure it’s sealed shut.
- Place the garlic in your oven or air fryer. I air fried mine for around 30-35 minutes until the top edges of the cloves are golden brown. This may take slightly longer in an oven.
- Leave to cool before squeezing out the cloves of garlic.


MAKE THE ROASTED GARLIC MISO PASTE
- Squeeze out the garlic cloves from the whole head.
- Place in a bowl. Add in the miso paste and sugar. Mix everything until smooth and combined. Set aside.


YEAST MIXTURE
- In a measuring cup or bowl, mix together the warm water, sugar, and yeast. Mix well and set aside.
- Leave the mixture for 5 minutes to allow the yeast to foam up. After it foams up, mix in the oil.


PREPARE THE DOUGH
- Meanwhile, add the flour and salt in a large mixing bowl. Mix well.
- Create a well in the centre and add in the yeast mixture. With a pair of chopsticks or spatula, mix everything together to create a dough.
- You can also use a stand mixer for this. I simply used my hands to knead everything together.
- Knead everything for 5-6 minutes or until you have a ball of dough that no longer sticks to your hands. Don’t forget to scrape the sides of the bowl for excess flour.
- Place the ball of dough in the bowl.
- Cover the bowl with a towel. Leave the dough to rest in a warm place for at least 1 hour until it has doubled in size.
- You can check out the steps under ‘Making the Dough in Advance’ below if you plan to make the dough in advance and store it in the refrigerator.


MAKING THE DOUGH IN ADVANCE
- If making the dough in advance, leave it to rise first. Afterwards, brush some oil on the container or bowl with a lid. Place the dough in the container and cover it tightly. Refrigerate it until ready to use.
- Before you use your refrigerated dough, make sure to put it out at room temperature a few hours before you intend to knead it. This way the dough can rest and come to room temperature. It may also rise a little bit more. It’ll also be easier to work with.
- Overall, I find that the dough I made in advance was a little harder to work with, I needed to flour my work surface and rolling pin heavily to prevent the dough from sticking.
- But results wise, the flatbreads turned out just as good.
SHAPE THE FLATBREAD
- You can watch the video for a complete step-by-step.
- Lightly flour your work surface.
- Place the ball of dough on the surface.
- Lightly flour your rolling pin. From there, roll out the ball of dough.
- Keep rolling until you have a large rectangular sheet of dough that’s roughly 14 by 9” (36 x 22 cm). It doesn’t have to be a perfect rectangle, so don’t worry. The dough should be around 1/3-inch thick (less than 1 cm).


ADD THE FILLING
- When you have the rolled out dough, spread the miso-garlic paste over the dough. Then brush a thin layer of oil.
- Evenly distribute the grated cheese.
- Once all the toppings are set, roll the dough from one end.
- You will end up with a log, similar to how you make a cinnamon roll.
- Pinch the edges to seal completely.
- Divide the long roll into half.
- From there roll 1 piece of dough inwards, creating a spiral shape (like a snail). Tuck the ends underneath.
- Repeat this for the other piece of dough. Cover the flatbread to prevent them from drying out.


ROLL OUT THE FLATBREAD
- Lightly flour your board or surface.
- Place a piece of rolled dough on the surface. Lightly flour your rolling pin if needed.
- Press down on the dough then roll out the dough into an 8” circle. And don’t worry, it doesn’t have to be a perfect round shape!
- Leave the piece of flatbread on the board or transfer it to a plate. Cover it with a towel and leave it to rest in a warm spot for at least 20-25 minutes before cooking. The dough will continue to rise from the yeast.
- Repeat this rolling out process for the remaining piece of rolled dough until you have two 8-inch flat breads.


COOKING THE FLATBREAD (WITH OIL)
- Heat a large non-stick or cast iron pan over medium heat. If you prefer to cook this with no additional oil, see the steps below.
- Add some oil to coat the surface of the pan. Once the oil is hot, place the flatbread on the pan. Leave to cook over medium heat for 4-5 minutes or until golden brown and crisp.
- Carefully flip the flatbread over and then cover your pan. This will help to cook the insides since the flatbread is quite thick. Leave the flatbread to cook and the remaining side to crisp up for another 4-5 minutes.
- You will notice that the flatbread will fluff up and rise a bit more due to the yeast.
- Remove the cover and check on the remaining side. If it’s golden brown and crisp, you can flip if over and crisp the other side more, if you’d like. Both sides should be golden brown.
- Carefully tap on the flatbread with your finger or spatula. It should sound crisp and hollow on the outside.
- Remove the flatbread from the pan and transfer to a plate or chopping board. Leave to cool for 2-3 minutes before slicing.
- Repeat this cooking step for the remaining one.


COOKING THE FLATBREAD WITH NO OIL
- Heat a large non-stick pan over medium heat.
- Once hot, lower the heat then place the flatbread on the pan. Leave it to crisp over medium low to low heat for around 4 to 5 minutes or until golden brown and crisp. Keep an eye out for the flatbread to make sure it doesn't burn.
- Carefully flip the flatbread over and then cover your pan. This will help to cook the insides since the pancake is quite thick. Leave the flatbread to cook and the remaining side to crisp up for another 4-5 minutes.
- You will notice that the flatbread will fluff up and rise a bit more due to the yeast.
- Remove the cover and check on the remaining side. If it’s golden brown and crisp, you can flip if over and crisp the other side more, if you’d like. Both sides should be golden brown.
- Carefully tap on the flatbread with your finger or spatula. it should sound crisp and hollow on the outside.
- Remove the flatbread from the pan and transfer to a plate or chopping board. Leave to cool for 2-3 minutes before slicing.
- Repeat this cooking step for the remaining flatbread until both pieces are cooked.
- Note: this oil-free cooking process yields crispy pieces of flatbread too but I find them a little bit more dry compared to those cooked with oil.
SLICE AND SERVE
- For the flatbread, I simply sliced each piece into 4 pieces each. So I ended up with 8 pieces in total.
- Enjoy your flatbread while they’re hot so they’ll still be crispy on the outside and really fluffy and aromatic on the inside.


STORAGE AND REHEATING
- You can store the cooked flatbread at room temperature for 2 days and in the refrigerator for up to 2 weeks (or even longer). To reheat, simply pan-fry until crisp on both sides. You can also reheat it in an oven or air fryer.
- To freeze, simply place the flatbread in a container to resealable bag. To reheat, simply pan-fry until crisp on both sides. You can also reheat it in an oven or air fryer.
MORE VEGAN RECIPES YOU MIGHT LOVE
Roasted Garlic, Miso & Cheese Flatbread (No Bake, Vegan)
These Roasted Garlic, Miso & Cheese Flatbread are made with a few simple ingredients yet pack so much flavour with layers of the umami-packed & aromatic roasted garlic miso and that delicious richness and saltiness from vegan cheese. These are best enjoyed freshly made with the crisp outside and can be savoured as-is, or served with a bowl of soup for a really comforting meal.
Ingredients
Roasted Garlic
- 2 heads garlic
- Olive oil
Yeast Mixture
- 3/4 cup warm water
- 2 tsp sugar
- 1 tsp instant yeast
- 2 tbsp oil
Dry Mix
- 2 cups all-purpose flour 265 g
- 1 tsp salt
Filling
- Olive oil for brushing
- 2 heads roasted garlic
- 1 tbsp white miso paste
- Pinch sugar
- 1 cup grated vegan cheese (see notes)
To Cook
Instructions
- You can watch the video or the see the step by step photos above to see how to make these.
Prepare the Roasted Garlic
- Preheat your oven or air fryer to 180C/350F.
- Prepare a small sheet of aluminium foil enough to fully wrap the garlic. Chop the top 1/2-inch of the garlic head to reveal the cloves. Place it on the aluminum foil and carefully scrunch up the sides.
- Drizzle some olive oil on the cloves and add a pinch of salt. Wrap the aluminium foil to completely cover the garlic. Make sure it’s sealed shut.
- Place the garlic in your oven or air fryer. I air fried mine for around 30-35 minutes until the top edges of the cloves are golden brown. This may take slightly longer in an oven.
- Leave to cool before squeezing out the cloves of garlic.
Roasted Garlic Miso Paste
- Squeeze out the garlic cloves from the whole head.
- Place in a bowl. Add in the miso paste and sugar. Mix everything until smooth and combined. Set aside.
Yeast Mixture
- In a measuring cup or bowl, mix together the warm water, sugar, and yeast. Mix well and set aside.
- Leave the mixture for 5 minutes to allow the yeast to foam up. After it foams up, mix in the oil.
Preparing the Dough
- Meanwhile, add the flour and salt in a large mixing bowl. Mix well.
- Create a well in the centre and add in the yeast mixture. With a pair of chopsticks or spatula, mix everything together to create a dough.
- You can also use a stand mixer for this. I simply used my hands to knead everything together.
- Knead everything for 5-6 minutes or until you have a ball of dough that no longer sticks to your hands. Don’t forget to scrape the sides of the bowl for excess flour.
- Place the ball of dough in the bowl.
- Cover the bowl with a towel. Leave the dough to rest in a warm place for at least 1 hour until it has doubled in size.
- You can check out the steps under ‘Making the Dough in Advance’ below if you plan to make the dough in advance and store it in the refrigerator.
Shaping the Flatbread
- You can watch the video for a complete step-by-step.
- Lightly flour your work surface.
- Place the ball of dough on the surface.
- Lightly flour your rolling pin. From there, roll out the ball of dough.
- Keep rolling until you have a large rectangular sheet of dough that’s roughly 14 by 9” (36 x 22 cm). It doesn’t have to be a perfect rectangle, so don’t worry. The dough should be around 1/3-inch thick (less than 1 cm).
- When you have the rolled out dough, spread the miso-garlic paste over the dough. Then brush a thin layer of oil.
- Evenly distribute the grated cheese.
- Once all the toppings are set, roll the dough from one end.
- You will end up with a log, similar to how you make a cinnamon roll.
- Pinch the edges to seal completely.
- Divide the long roll into half.
- From there roll 1 piece of dough inwards, creating a spiral shape (like a snail). Tuck the ends underneath.
- Repeat this for the other piece of dough. Cover the flatbread to prevent them from drying out.
Rolling Out the Flatbread
- Lightly flour your board or surface.
- Place a piece of rolled dough on the surface. Lightly flour your rolling pin if needed.
- Press down on the dough then roll out the dough into an 8” circle. And don’t worry, it doesn’t have to be a perfect round shape!
- Leave the piece of flatbread on the board or transfer it to a plate. Cover it with a towel and leave it to rest in a warm spot for at least 20-25 minutes before cooking. The dough will continue to rise from the yeast.
- Repeat this rolling out process for the remaining piece of rolled dough until you have two 8-inch flat breads.
Cooking with Oil
- Heat a large non-stick or cast iron pan over medium heat. If you prefer to cook this with no additional oil, see the steps below.
- Add some oil to coat the surface of the pan. Once the oil is hot, place the flatbread on the pan. Leave to cook over medium heat for 4-5 minutes or until golden brown and crisp.
- Carefully flip the flatbread over and then cover your pan. This will help to cook the insides since the flatbread is quite thick. Leave the flatbread to cook and the remaining side to crisp up for another 4-5 minutes.
- You will notice that the flatbread will fluff up and rise a bit more due to the yeast.
- Remove the cover and check on the remaining side. If it’s golden brown and crisp, you can flip if over and crisp the other side more, if you’d like. Both sides should be golden brown.
- Carefully tap on the flatbread with your finger or spatula. It should sound crisp and hollow on the outside.
- Remove the flatbread from the pan and transfer to a plate or chopping board. Leave to cool for 2-3 minutes before slicing.
- Repeat this cooking step for the remaining one.
Cooking the Flatbread with No Oil (Using a non-stick pan)
- Heat a large non-stick pan over medium heat.
- Once hot, lower the heat then place the flatbread on the pan. Leave it to crisp over medium low to low heat for around 4 to 5 minutes or until golden brown and crisp. Keep an eye out for the flatbread to make sure it doesn't burn.
- Carefully flip the flatbread over and then cover your pan. This will help to cook the insides since the pancake is quite thick. Leave the flatbread to cook and the remaining side to crisp up for another 4-5 minutes.
- You will notice that the flatbread will fluff up and rise a bit more due to the yeast.
- Remove the cover and check on the remaining side. If it’s golden brown and crisp, you can flip if over and crisp the other side more, if you’d like. Both sides should be golden brown.
- Carefully tap on the flatbread with your finger or spatula. it should sound crisp and hollow on the outside.
- Remove the flatbread from the pan and transfer to a plate or chopping board. Leave to cool for 2-3 minutes before slicing.
- Repeat this cooking step for the remaining flatbread until both pieces are cooked.
- Note: this oil-free cooking process yields crispy pieces of flatbread too but I find them a little bit more dry compared to those cooked with oil.
Slicing and Serving
- For the flatbread, I simply sliced each piece into 4 pieces each. So I ended up with 8 pieces in total.
- Enjoy your flatbread while they’re hot so they’ll still be crispy on the outside and really fluffy and aromatic on the inside.
Storage and Reheating Tips
- You can store the cooked flatbread at room temperature for 2 days and in the refrigerator for up to 2 weeks (or even longer). To reheat, simply pan-fry until crisp on both sides. You can also reheat it in an oven or air fryer.
- To freeze, simply place the flatbread in a container to resealable bag. To reheat, simply pan-fry until crisp on both sides. You can also reheat it in an oven or air fryer.
Making the Dough in Advance
- If making the dough in advance, leave it to rise first. Afterwards, brush some oil on the container or bowl with a lid. Place the dough in the container and cover it tightly. Refrigerate it until ready to use.
- Before you use your refrigerated dough, make sure to put it out at room temperature a few hours before you intend to knead it. This way the dough can rest and come to room temperature. It may also rise a little bit more. It’ll also be easier to work with.
- Overall, I find that the dough I made in advance was a little harder to work with, I needed to flour my work surface and rolling pin heavily to prevent the dough from sticking.
- But results wise, the flatbreads turned out just as good.
WATCH Video
Notes
VEGAN CHEESE
- I used grated vegan gouda from the brand Good Planet Foods. You're free to use any vegan cheese of your choice!
NUTRITIONAL INFO
Serving: 18-inch flat bread | Calories: 894kcal | Carbohydrates: 137g | Protein: 22g | Fat: 28g | Saturated Fat: 5g | Polyunsaturated Fat: 5g | Monounsaturated Fat: 9g | Trans Fat: 0.1g | Sodium: 2055mg | Potassium: 434mg | Fiber: 9g | Sugar: 5g | Vitamin A: 12IU | Vitamin C: 17mg | Calcium: 168mg | Iron: 8mg
DID YOU MAKE THIS RECIPE?Please leave a rating or comment and share a photo on Instagram, and tag me @thefoodietakesflight or use #thefoodietakesflight :)
YOU CAN PIN THIS IMAGE: