Growing up, I've always loved dim sum (actually still do!) most especially rice noodle rolls. I always find myself craving dim sum and rice noodle rolls so I wanted to be able make some at home.

For these rice noodle rolls or cheung fun, I cooked them in a microwave!
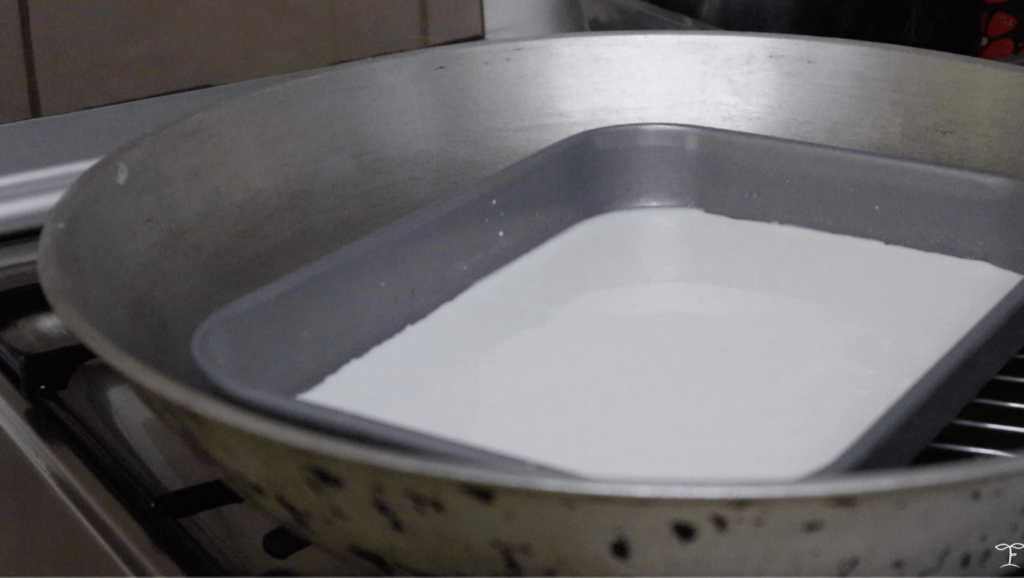
You'll of course need a microwave safe dish. I used a pyrex dish for mine.
You also have an option of steaming these if you don't have a microwave. The steps for the alternative cooking method is also down below!
Anyway, my dad was initially not happy about me cooking these in a microwave, mainly because they're traditionally cooked in a steamer, and because he saw a lot of my failed test batches. BUT I finally figured out how to successfully cook them in a microwave and got his seal of approval after he tried them!

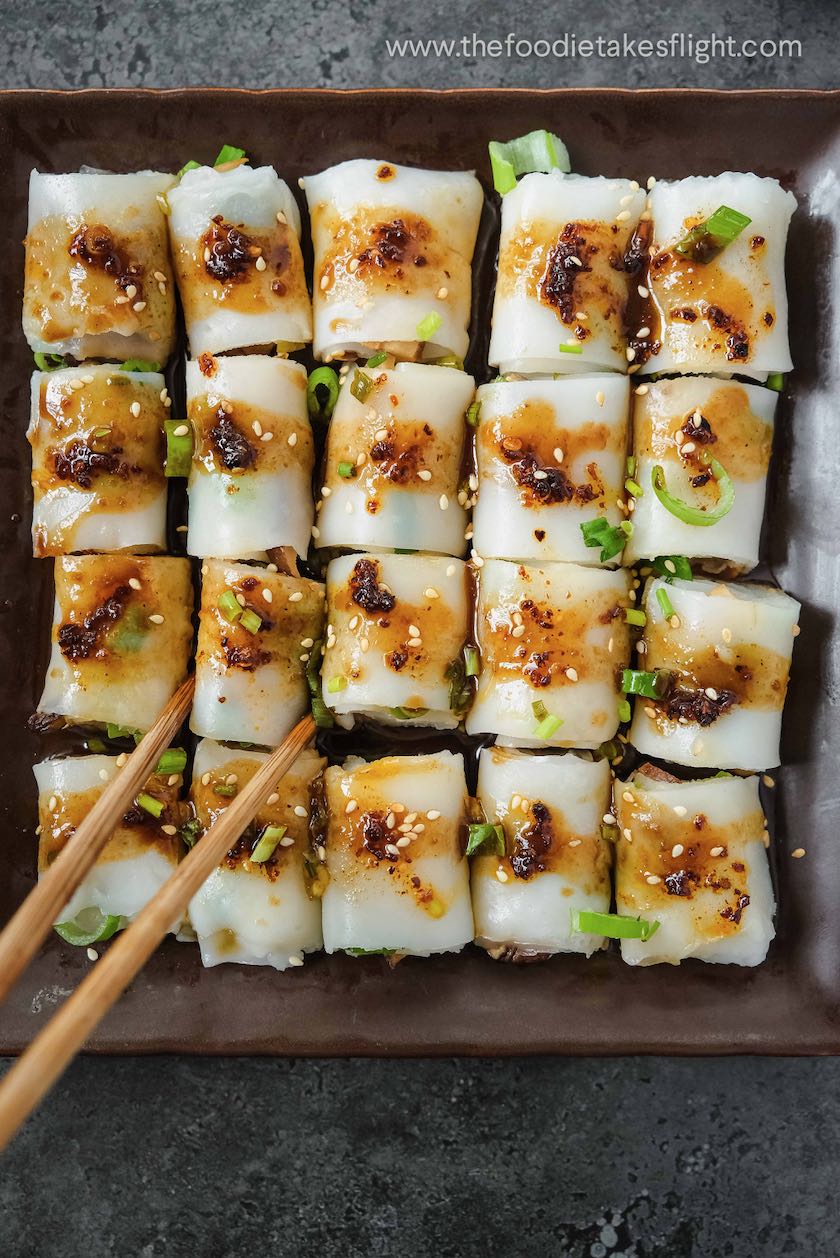
So yes, these are Microwave Mushroom Cheung Fun or rice noodle rolls filled with some sautéed mushrooms and scallions.
This recipe can also be made gluten-free by substituting the soy sauce with tamari. The rice noodle roll itself is gluten-free!
MUSHROOMS FOR THE FILLING
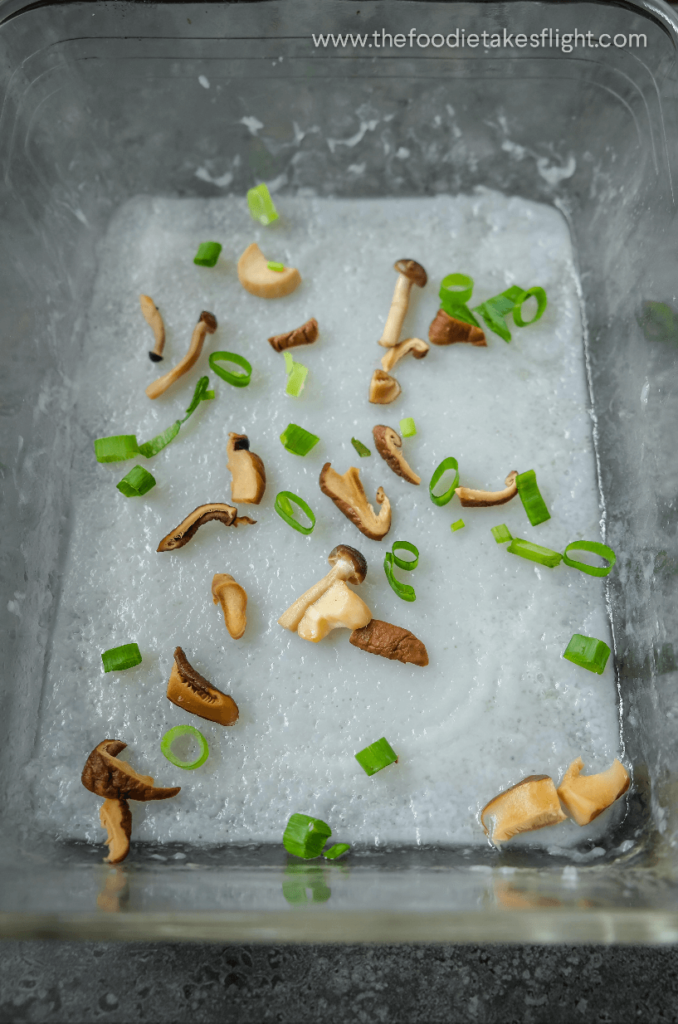
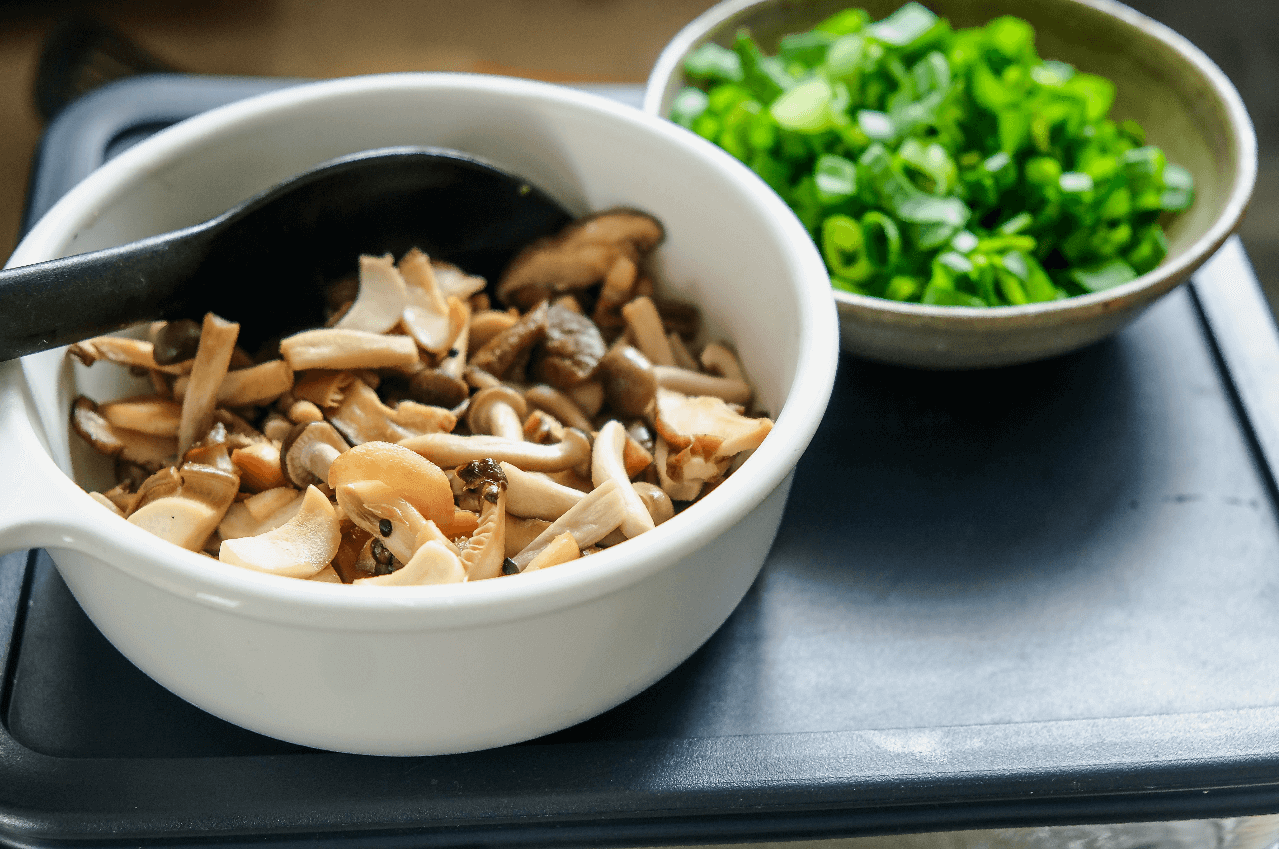
For the mushrooms, I used a mix of king oyster, shiitake, and shimeji but it's totally up to you what you'd like.

I simply sautéed and seasoned the mushrooms then chopped the scallions to use for the filling.

THE BATTER
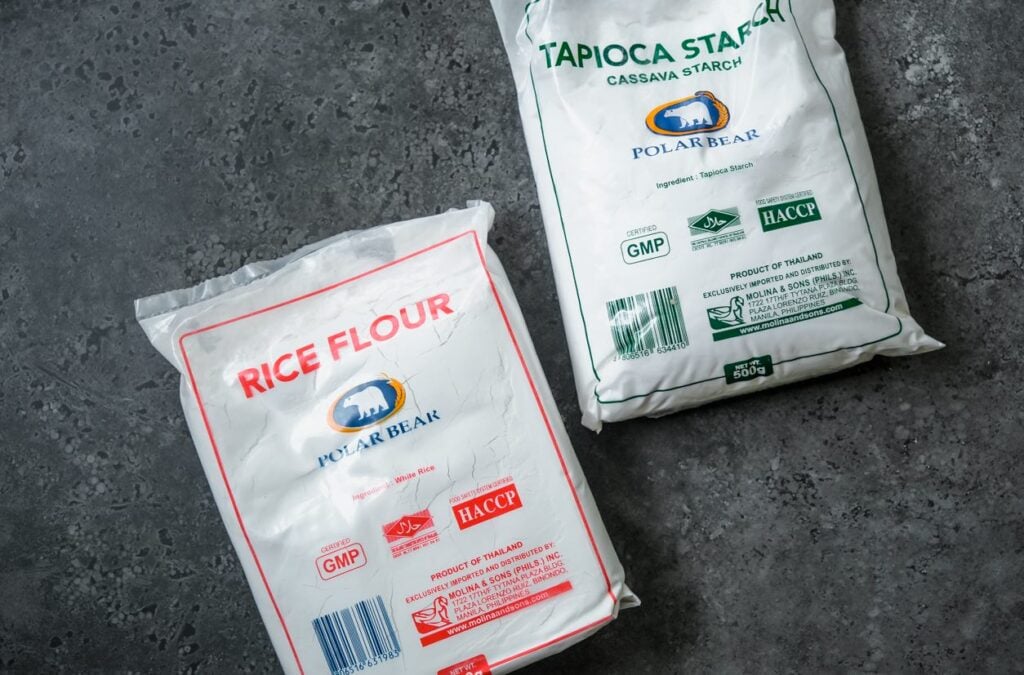
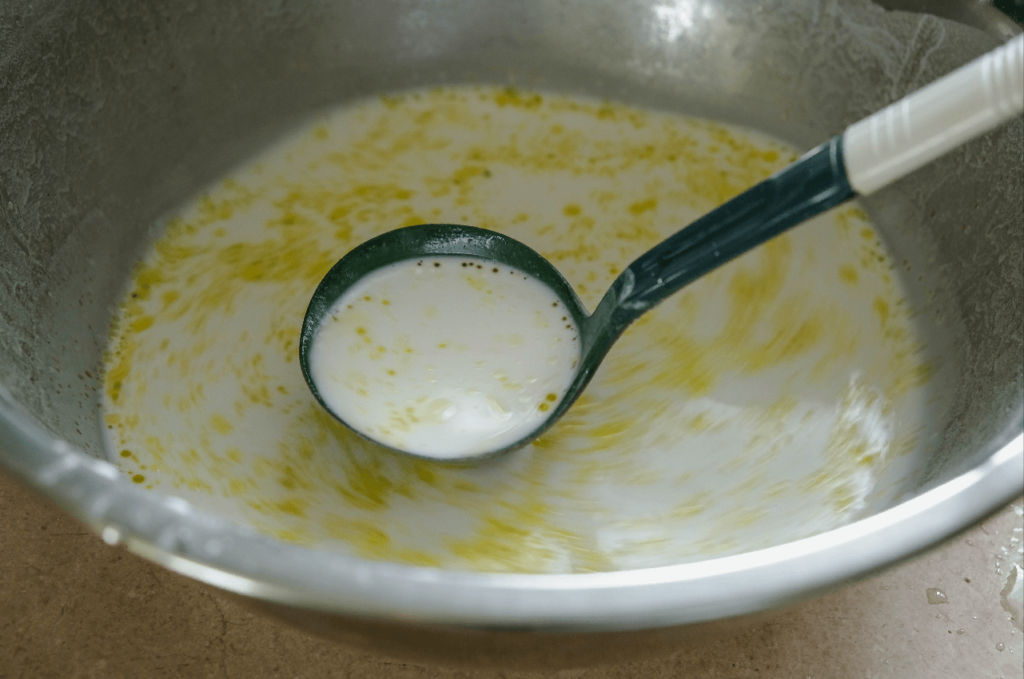
The batter is a very simple mix of rice flour, tapioca starch, cornstarch, salt, sugar, water, and oil.
It's also very runny and you'll need to mix it well before every batch since the starch sticks at the bottom of the bowl.
COOKING THE CHEUNG FUN
I highly recommend having at least 2 microwave safe dishes.
This way the process is faster since you can use both while one is cooking and the other is cooling.
Throughout my rice roll-making process my dad kept stressing that I needed to steam them.. but I went ahead and microwaved them anyway being the obedient daughter that I am. ??


ROLLING THE CHEUNG FUN


It took me a few failed test batches (4 to be exact) to figure out how to successfully cook these in a microwave since they’re traditionally steamed. So I'm really so happy these turned out well at the end!

Here's a plate from one of my first few attempts where I soaked my rolls in the sauce!
MICROWAVE VS. TRADITIONAL STEAMED VERSION
Also, it's important to note that these of course aren’t as thin as traditionally made cheung fun, that are steamed.

They’re a bit thicker, yet really chewy and still satisfied my dimsum cravings—so this, I’m very pleased with. Plus, these are something I can easily make at home and just leave the microwave to do its thing.


WHAT IF I DON'T HAVE A MICROWAVE?
You can opt to steam these (which is actually the traditional way!). I've made rice noodles from scratch by steaming them.

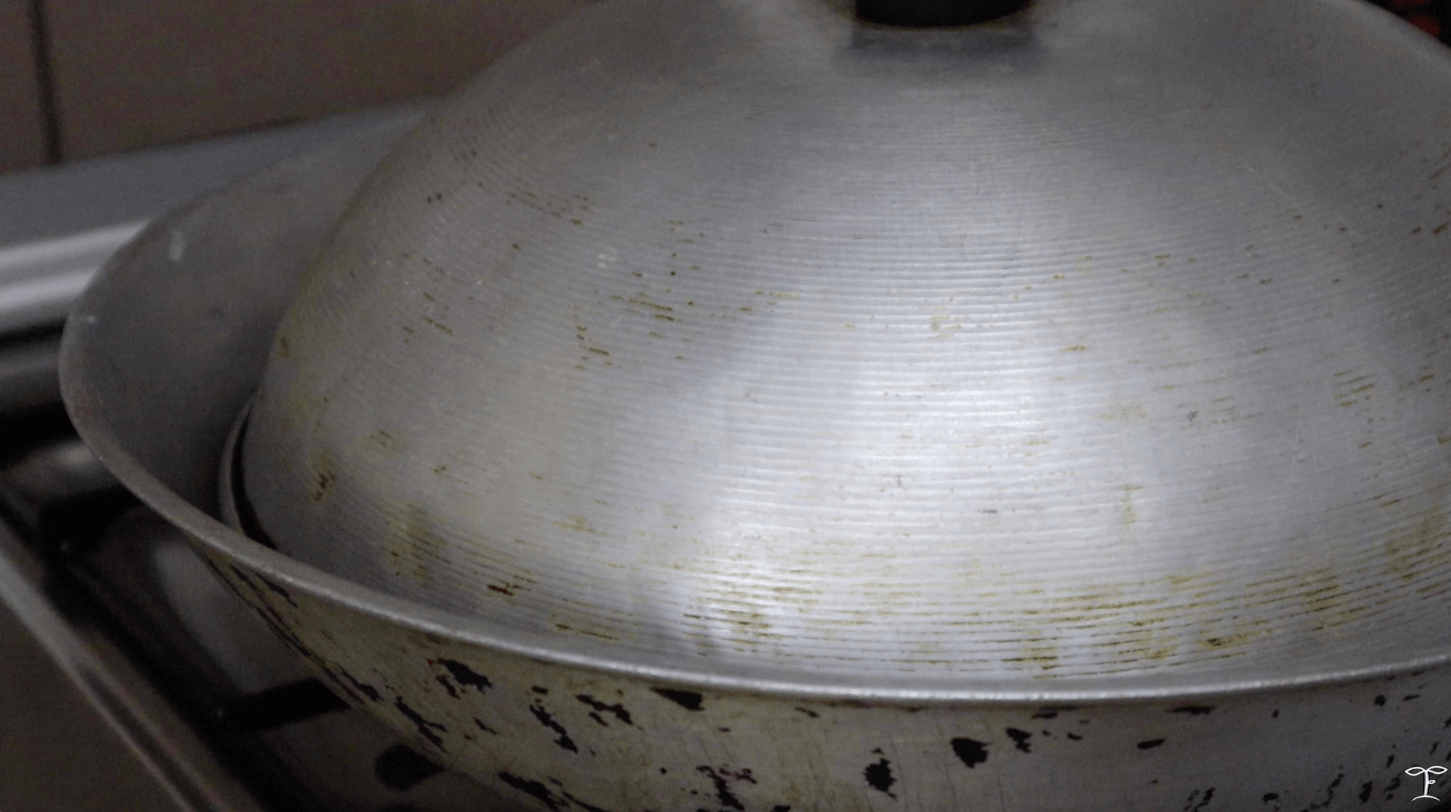
I simply set up a large wok with a metal base for the tray to stand on and a lid to cover it. You can watch the video below or here to see my set-up!
The pan is basically sitting on a metal rack and there's water underneath. Make sure the water is in a running boil before you scoop the batter into the pan.
I covered the wok to cook the rice noodle. It'll take around 1-2 minutes to steam and turn translucent as well.
You can check out my rice noodles video here.
TROUBLESHOOTING + TIPS
Figuring out the cooking time can be tricky at first since this will depend on your microwave so the first few batches may turn out dry and crack when you roll them.
DRY MIDDLE + CRACKS: Not cooked enough--so you'll need to cook it longer!

What to do?
If you encounter a dry base that cracks when you roll it, this means that your mix wasn't cooked through enough. You can splash some water, cover the container, and then micrwave it again for 30 seconds until cooked through.

From here, you can adjust the cooking time and see what works with your microwave since each one can differ in terms of heat and cooking settings.
TO FINISH
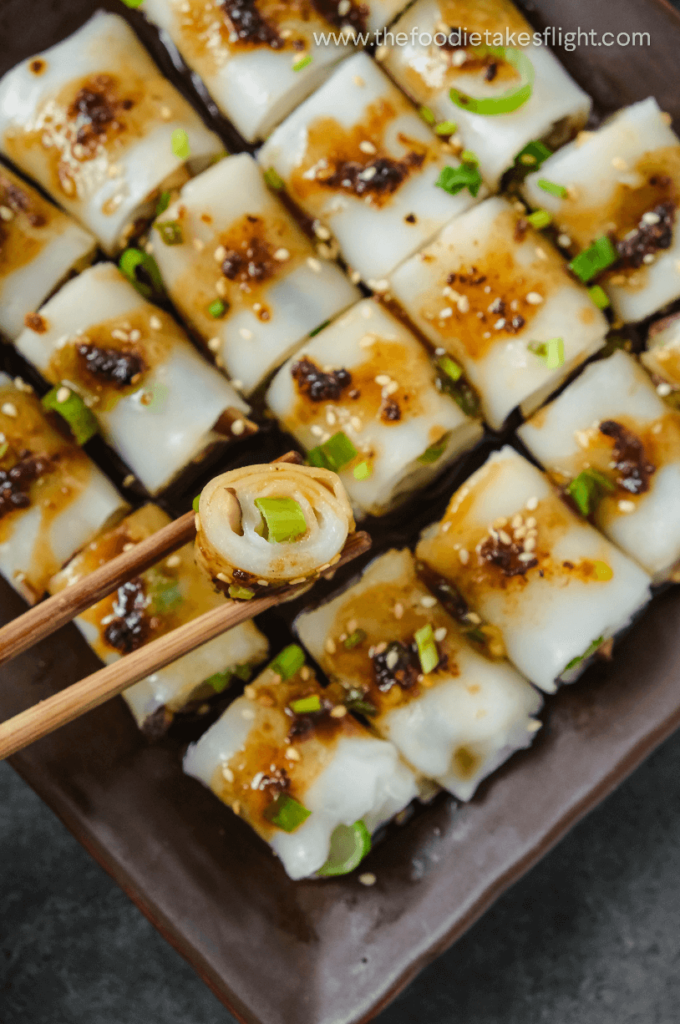
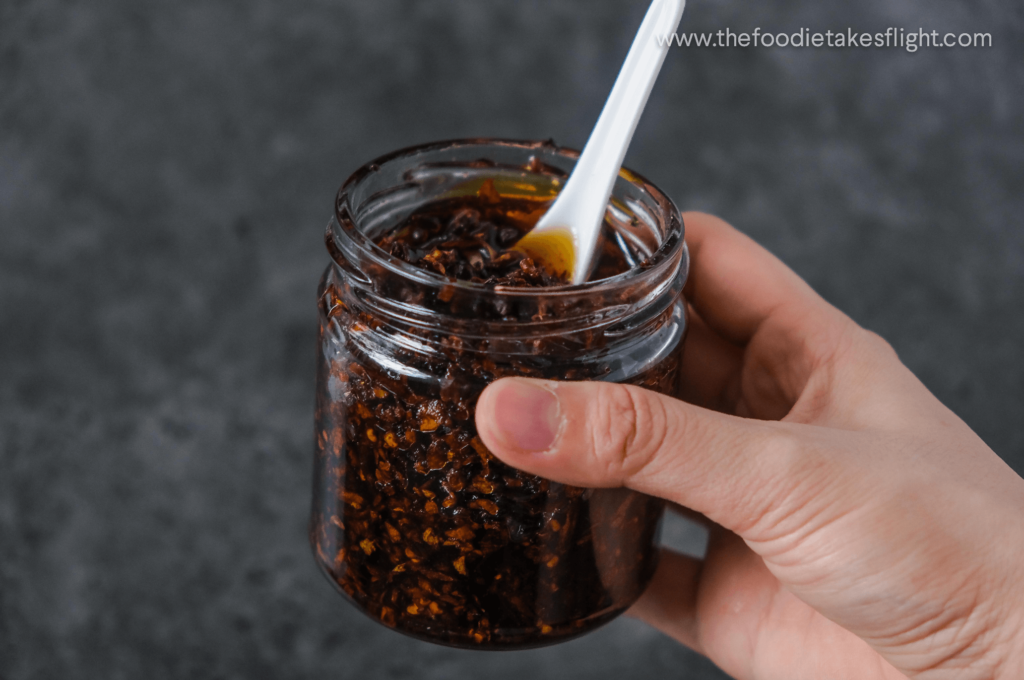
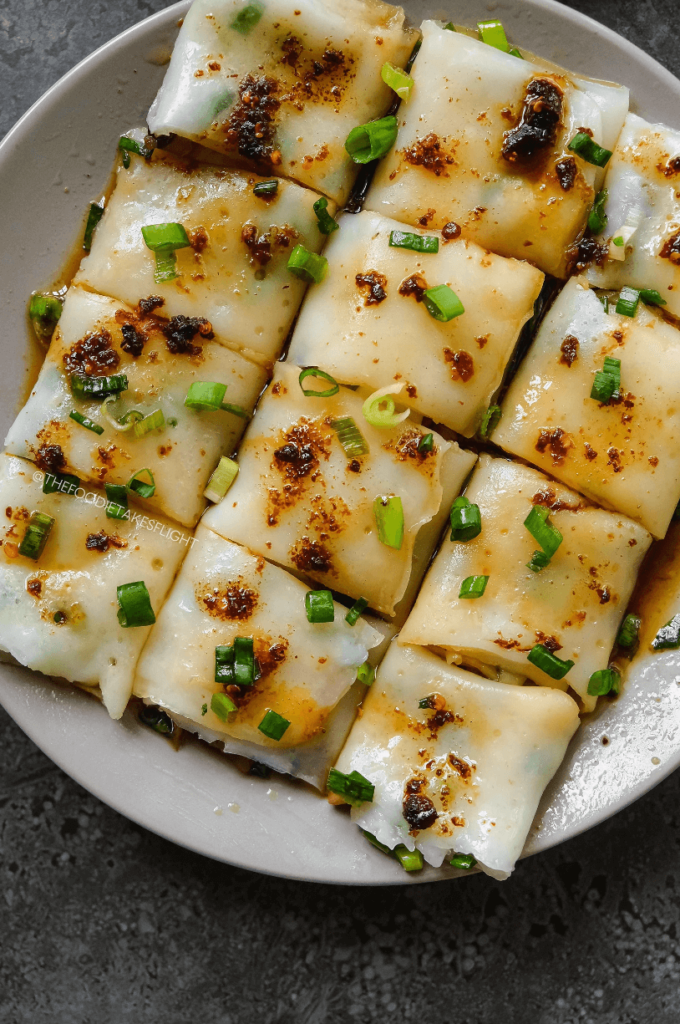
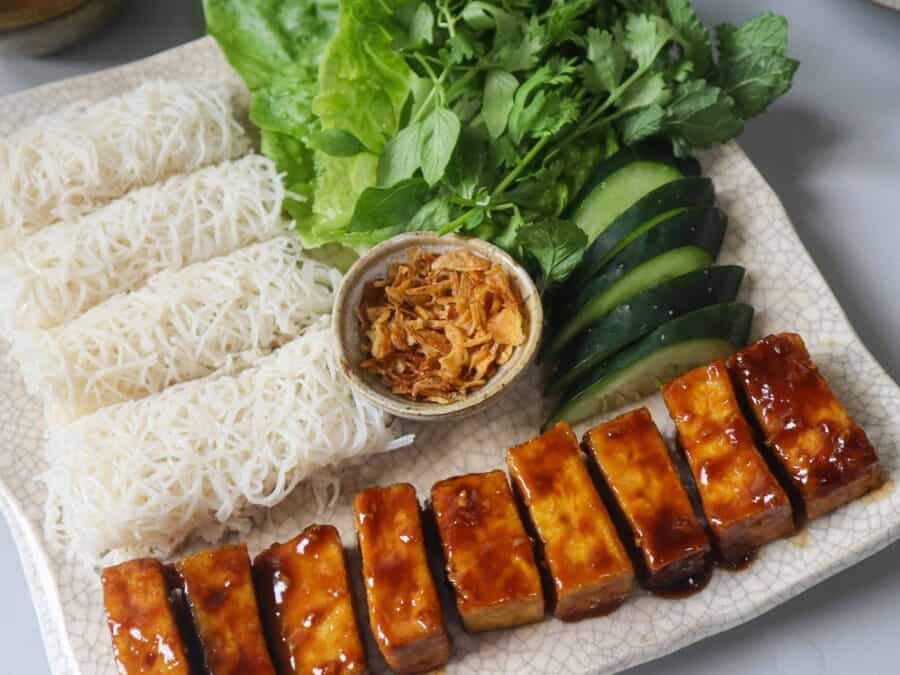
I finished off these rice noodle rolls or cheung fun with chili garlic sauce (homemade recipe here), scallions, and a generous amount of sweet soy sauce (well actually I drowned mine in soy sauce) and an optional hoisin sauce too (as seen in the photo below!)
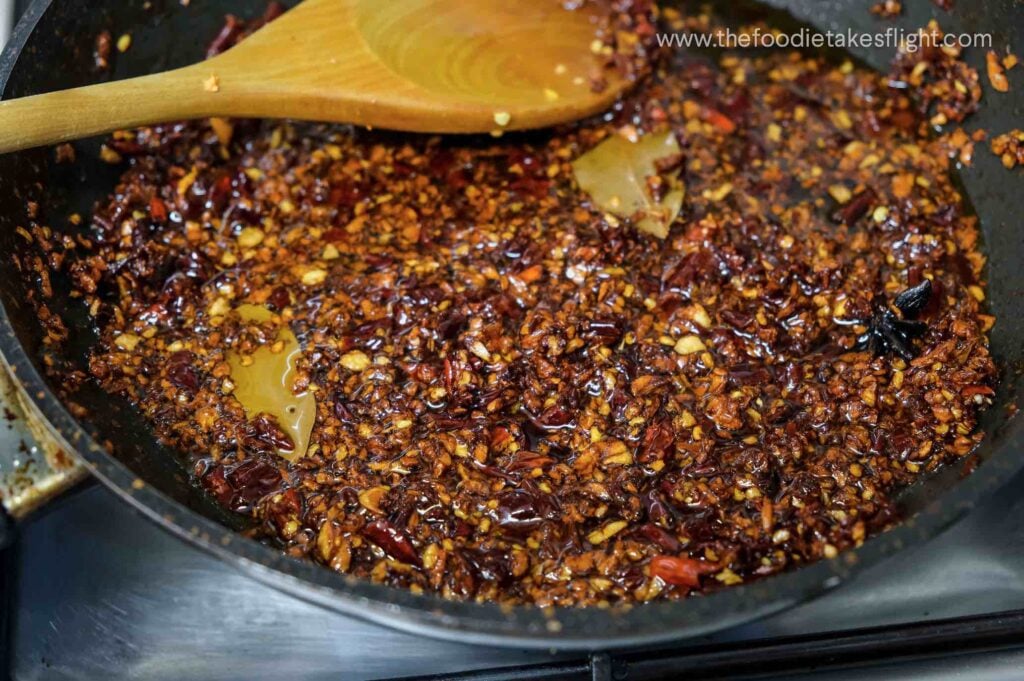
I always have a bottle of this chili garlic sauce in my pantry! It lasts month but I got through it so fast!
The rice noodle rolls with the chili garlic sauce and some chopped scallions!

I then also added in some hoisin sauce, to finish. Along with a sprinkle of sesame seeds.

Anyway, you'll find the full recipe for these noodle rolls below, along with a video to see how it's made!
You might enjoy these other Chinese dumpling, buns, and pie recipes:
- Crispy Wontons
- Vegetable Dumplings
- Chinese Chive Pies
- Pan-Fried Cabbage and Noodle Buns
- Wontons in Chili Broth
- Scallion and Sesame Buns
Enjoy!
If you try out this recipe, I’d appreciate if you leave a rating or simply click on the stars ⭐️⭐️⭐️⭐️⭐️ on my recipe card!
Are you looking for more delicious, vegan recipes?

Check out my latest Vegan Kitchen eBook, that has over 95 recipes (and a whole section for Asian recipes!) that are packed with flavour and made with simple and easily accessible ingredients! Also, two trees (instead of 1!) will be planted for every download of my eBook through non-profit organisation One Tree Planted.?


Microwave Mushroom Cheung Fun (Vegan Rice Noodle Rolls)
Equipment
- 2 large rectangular microwave-safe glass dish/es (mine is a 9.5×7.5” pyrex baking dish) with cover
- Tray to fit the glass dish (for the cold water)
- 2 small spatulas (the silicon ones will do!)
- Large bowl
- Ladle
- Brush for the oil
Ingredients
Dry Ingredients
- 1.5 cups rice flour (1.5 cups),180 g
- 1/2 cup corn starch (1/2 cup) 65 g
- 1/2 cup tapioca starch (1/2 cup) 65 g
- 1/2 tbsp sugar
- 1/2 tsp salt
Wet Ingredients
- 4 cups warm water (950 ml)
- 1 tbsp neutral oil
Filling
- 1/2 lb fresh mushrooms of choice I used a mix of shiitake and oyster, sliced
- Sesame oil for cooking
- Soy sauce to taste
- 1 cup chopped scallions or green onions
Sweet Soy Sauce
Hoisin Sauce
- 1.5 tbsp hoisin sauce (see notes)
- 1/2 tbsp sugar or to sweeten (see notes)
- 2-3 tbsp warm water adjust according to desired consistency
For serving
- Chili garlic sauce , homemade recipe here
- Chopped scallions
Instructions
Preparing the filling
- You can watch the video below for a step-by-step on how to make these rolls.
- Heat a large pan or wok.
- Add in the some sesame oil. Once hot, add in the mushrooms. Season with some soy sauce, to taste. When cooked, turn off heat and set aside.

- Chop scallions or green onions and set aside as well.


Preparing the batter
- Mix all the dry ingredients into the large bowl. Mix well.
- While mixing, carefully pour in the warm water.
- Keep mixing until the starch and flour are diluted.
- Afterwards, mix in the oil. This will be a very thin and runny batter. Set aside.


Cooking the Noodle Rolls in Microwave
- See steps below for a steaming option if you don't have a microwave. You can also see some troubleshooting + tips below!
- Prepare your tray or dish. I highly recommend having 2 dishes. This way you can finish making these rolls faster since one can be in the micrwave while one can be cooling.
- Brush a thin layer of oil on the surface.

- Mix the batter again to make sure the starch isn’t sitting/stuck at the bottom. It's important to mix the batter before each round.
- Scoop around 1/3 cup of the batter (or depending on the size of your dishes) and place it into the oiled baking dish. Add enough mix to evenly cover the surface of your dish.
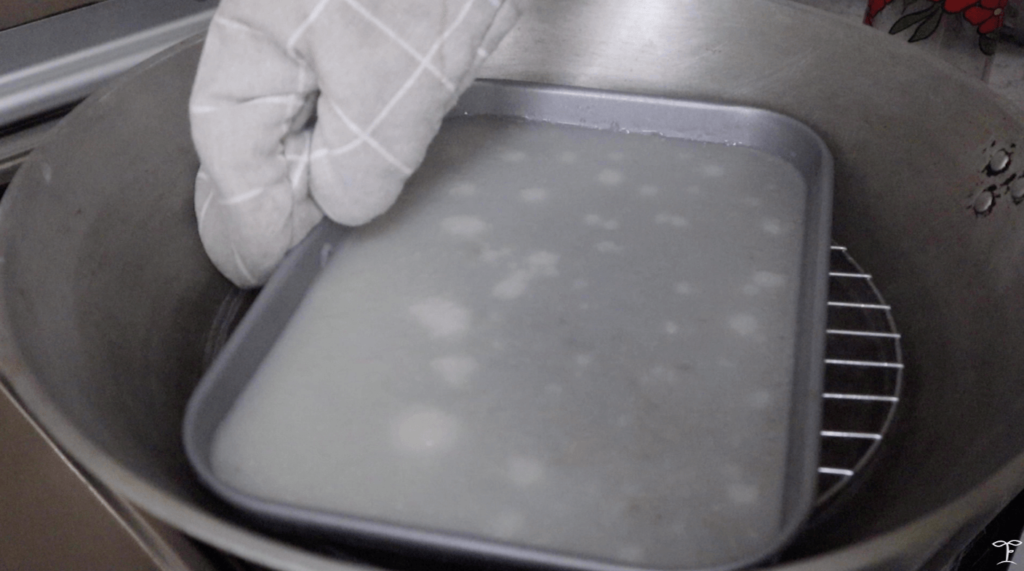
- Cover with a lid then IMMEDIATELY microwave for 1.5 to 2 minutes or even longer (note: the time will depend on your microwave) until the rice mix is translucent throughout and you can lift the edges with the spatula.The reason why you have to immediately cook the mixture is because the starch spearates from the water and sets at the bottom of the dish.
- While the roll is in the microwave, prepare the tray and pour in cold water.
- After mircrowaving, place the container into the tray with water. Leave to cool for 2-3 minutes. Do not remove the lid.
- Carefully scrape the sides with a spatula.
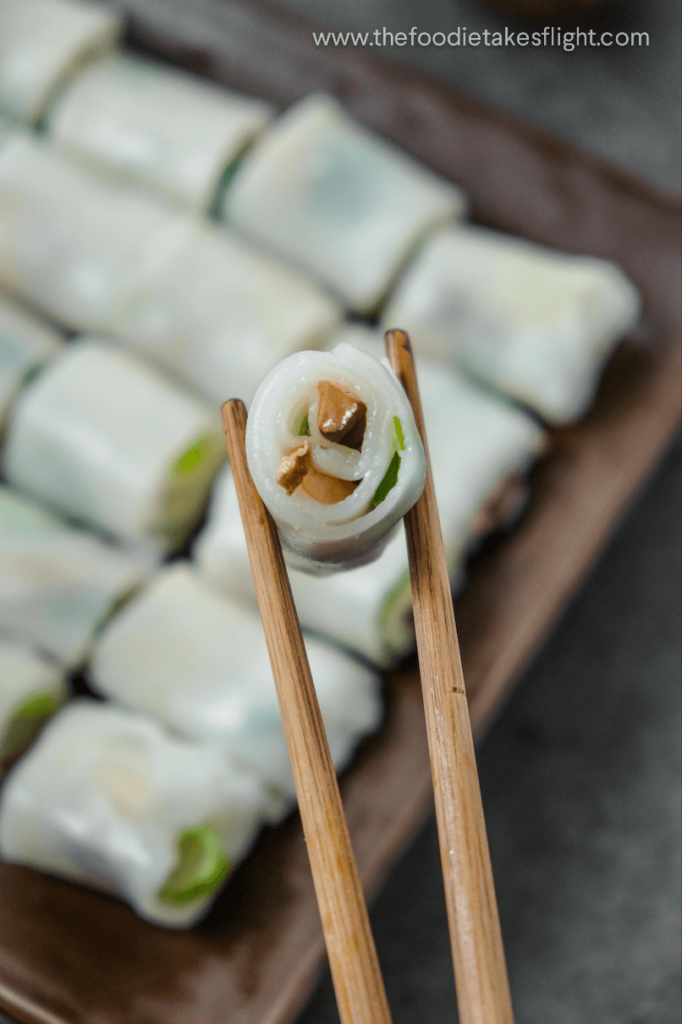
- Place some of the the mushroom and chopped scallions. You can scatter it around the rice sheet.
- From one end, carefully roll the rice sheet until you have a log.
- Transfer to a plate and repeat for the rest of the batter.


Don't have a Microwave?
- If you don't have a microwave, you can opt to steam these by setting up a large wok or pan with a base to hold your tray/dish. Make sure that your steamer is already set and the water is in a rolling boil before you place the dish with the batter mix in the steamer.

- Cover the wok and leave the rice noodle to cook for 1-2 minutes.

- It'll turn transluscent as well and you'll see the bottom of your tray.

- You can check out my fresh rice noodle recipe here (that I steamed) or watch the video here for the steamer set-up I made using a wok.


Serving the rolls
- Prepare the sweet soy sauce by mixing everything together. Feel free to adjust according to your desired taste.If using some hoisin sauce, mix everything together too.

- Slice each roll. into 3-4 pieces. Add some chili garlic sauce and scallions onto your rolls (if desired). Pour over some of each sauce and enjoy! I tend to drown my rolls in sauce but it’s totally up to you!

Troubleshooting + Tips
- Figuring out the cooking time can be tricky at first since this will depend on your microwave so the first few batches may turn out dry and crack when you roll them.
- What to do? If you encounter a dry base that cracks when you roll it, this means that your mix wasn't cooked through enough. You can splash some water, cover the container, and then micrwave it again for 30 seconds until cooked through.
- From here, you can adjust the cooking time and see what works with your microwave since each one can differ in terms of heat and cooking settings.


WATCH Video
Notes
- I also made a version of these rolls with some sweet hoisin sauce, which greatly complimented the chili garlic sauce and sweet soy sauce. You can opt to use a hoisin sauce/condiment that's usually already run down and sweetened. But if you're using purer hoisin sauce that's on the saltier side, you can run it down with a little water and then add some sugar to sweeten it.
NUTRITIONAL INFO
Pin these images:


I made them for dinner a few nights ago for a dim sum night and they were very good. I didn’t have mushrooms so I only used scallions, but it was tasty nonetheless. I have to try it again with mushrooms !
It indeed took me a few tries to find the right amount of dough and cooking time but once I had the hang of it, it went very smoothly.
I strongly advise to have at least 2 cooking dishes, otherwise it take quite some time to make.
Also I found easier to sprinkle the scallion on the dough before cooking, so that they stick to the roll.
Can’t wait to make them again !
Hi Nina! Thanks so much for your feedback and sharing all your tips. Appreciate it!
Took me 2 tries to get the timing right on the microwave but then they were great!! The flavour and texture was really good and just like the restaurants. I used a plastic microwaveable tub since I didn’t have a glass one and it also worked fine. I also didn’t need to oil the tub, it made them too greasy.
Hi Cynthia! Glad you liked it ◡̈ and thanks for sharing your tips!
Are you supposed to eat these cold? Or can you reheat after finishing the entire batch?
Hi Ben, they’re best eaten warm. Since this is a big batch, I usually store some in the oven to keep them warm and just reheat these in the microwave in batches when ready to eat. 🙂
I halved this recipe as I was only cooking for 1. It worked really well! I used a mix of shitake and enoki mushrooms + scallions and served with the sweet soy and chili garlic oil. I used a 9.5 x 7.5 Pyrex and had to go about 2 minutes 25 seconds in the microwave. I found that if I didn’t shake the container once I added the batter, the batter kind of pooled in the middle and the middle ended up thicker than the edges. One issue I had was the edges/ends of the batter were kind of mushy – I didn’t know if this meant it was undercooked or overcooked. When I added more time, the middle kind of dried out a bit but the ends weren’t as mushy. Overall, I don’t think mine were as thin as the ones pictured – when I tried using less batter (less than 1/3 cup), it wasn’t enough to cover the bottom of the dish.
I also kept some leftover batter in the fridge and used it the next day – it worked great, just needed a very thorough stir since all the starch sinks. This was really fun to make and I will definitely make it again!
Hi Emily! The starch really does sink as it sits in the bowl so it’s a must to mix it well. As for the mushiness, I’m not entirely sure what’s causing this but it might be because the ones at the edge of the container don’t get an even distribution of the starch especially if the starches tend to focus at the centre of the dish (especially if the dish isn’t as flat or somewhat rounded at the edges). It’s also important to cover your pyrex dish so the batter mix cooks in the steam. And thanks so much for leaving your feedback, highly appreciated!! ◡̈
Thanks for the reply, Jeeca! Maybe I’ll try a different dish next time to see if that helps with the mushy ends at all. I’ll let you know how it goes if I do.
Thanks for sharing this recipe Jeeca! It was so good and easy to make! I love how I usually have all the items in my pantry already. Definitely comfort food and satisfies the dim sum craving.
Thanks Christeen, glad to hear this curbed your dim sum cravings!! ?