A personal favourite of mine growing up was Sweet and Sour Pork that we’d order at Chinese restaurants.

WHAT IS CHINESE SWEET AND SOUR PORK?
It's a very popular dish in Chinese restaurants across the world with the distinct pieces of crispy pork cooked down in a delicious sauce with the usual bell peppers, onions, and pineapples.
Growing up Filipino-Chinese, Sweet and Sour Pork was always one of those dishes present at the table whenever we’d have family gatherings or when celebrating a special occasion such as the Lunar New Year.
This dish was always a massive hit among us kids and I remember always sharing a large plate and enjoyed it with Yang Chow Fried Rice with my cousins at the children’s table.

HOW IS SWEET AND SOUR PORK COOKED?
The pieces of pork (vegan soy chunks, in this case) are coated in a generous amount of cornstarch before being fried to a golden brown crisp.
As for the soy chunks, I share a few alternatives below that you can use to instead of the soy chunks.

THE SWEET AND SOUR SAUCE
The sauce is a perfect balance of sweet and sour with a little tanginess from the vinegar and hints of fruitiness from the pineapple.

This was a staple growing up and it’s always a hit among kids at the children’s table during family gatherings. I grew up eating this with a side of yang chow fried rice or a steamed bowl of rice.

You can also make this gluten-free with a simple substitute: use tamari instead of soy sauce for the sauce!

INGREDIENTS YOU'LL NEED FOR THIS VEGAN VERSION
SOY MEAT OR CHUNKS
Here’s the exact soy meat I used! PS. Link is not an affiliate link. I purchased these from Shopee and can be shipped in the Philippines.
For my US-based friends, here are similar meat substitutes that you can find on Amazon:
(these are affiliate links)

To rehydrate the soy chunks or soy meat:
Option 1
- You can soak them in boiling hot water and leave to rehydrate for 15 to 20 minutes or until they're doubled in size.
- It also helps to cover the bowl so the steam from the heat is retained.

Option 2:
- Leave the chunks to soak overnight in room temperature water until doubled in size.

WHAT IF I DON'T HAVE SOY CHUNKS?
THESE ARE SOME GREAT PLANT-BASED SUBSTITUTES FOR SOY CHUNKS:
See below the 4 options I can recommend for this recipe.
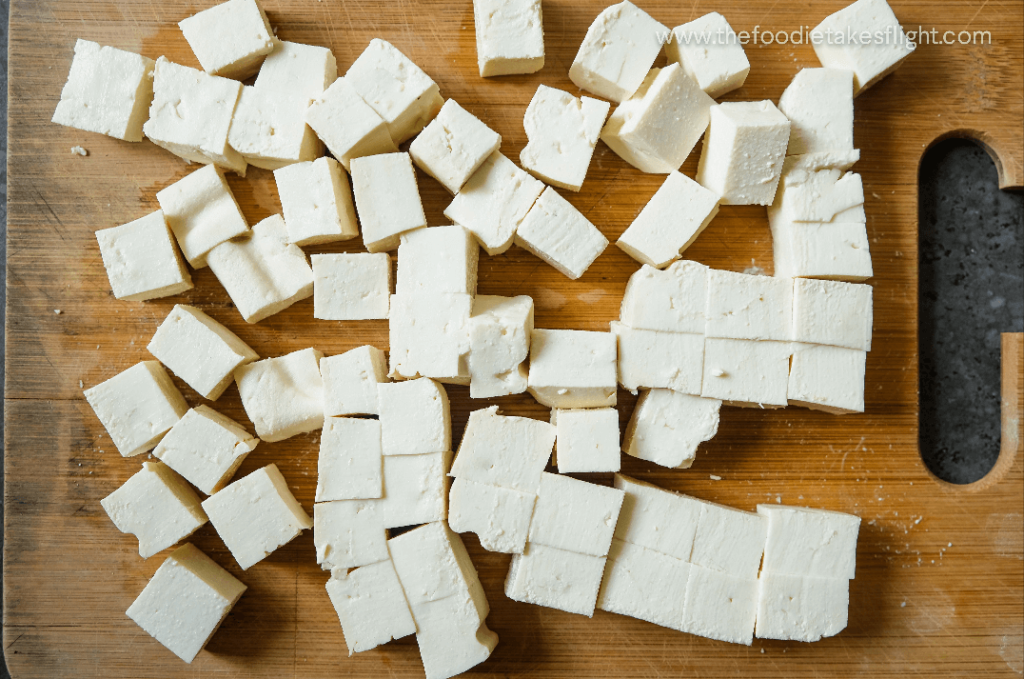
- 1lb (454g) frozen then thawed extra firm tofu
- Before you freeze your tofu, slice them into 1” (2.5 cm) cubes. NO need to squeeze out the liquid from your tofu.
- Place the tofu on a flat surface or container and make sure they’re spaced apart so they do not stick.
- Freeze at least overnight then thaw the next day. When thawed completely at room temperature, carefully squeeze out the liquid from each piece of tofu.
- 1lb (454g) Seitan
- If using seitan, you can slice them into 1” pieces or just break them apart into pieces before marinating and coating the in the starch.

- 1lb (454g) Tempeh
- Make sure your tempeh is fully thawed then slice them into 1” (2.5 cm) cubes. You can opt not to coat your tempeh in cornstarch and just pan-fry these directly.

- Cauliflower Florets
- Another option would be to use cauliflower florets that you can batter and coat before frying to a crisp and mixing in with the sauce.
- You can check out my Crispy Cauliflower Recipe here and use the cauliflower base recipe and cook it in the Sweet and Sour Sauce from this recipe.
HOW TO PREPARE SOY CHUNKS
- Leave the soy chunks to soak to rehydrate.
- Before you marinate the soy chunks, squeeze out the water from each piece. I simple squeezed them with my hand.

Marinating the soy meat/chunks
- I marinated the pieces in soy sauce with some garlic. You can also use garlic powder instead of minced garlic.

THE SWEET AND SOUR SAUCE
This sauce is really what brings this dish to life both in terms of colour and flavour!

INGREDIENTS FOR THE SWEET AND SOUR SAUCE
- 1/4 cup sugar, adjust according to desired sweetness
- 1/3 cup distilled white vinegar
- 1/2 cup pineapple juice from the chunks (see notes)
- 5 tbsp tomato ketchup
- 1 tbsp soy sauce
- 1/2 tsp dark soy sauce, optional for colour
- 1/4 cup water
- 1 1/2 tbsp cornstarch
- Dash of ground pepper
The full recipe is also in the card below!
COATING THE SOY PIECES FOR THE "PORK"
For the coating, I used corn starch but other starches such as potato or arrowroot.

Double coating these in the corn starch also really help achieve that crisp exterior after cooking.
FRYING THE "PORK"
- I fried the pieces in neutral oil. I made sure that the oil was very hot and bubbling to get them to crisp up nicely and not absorb the oil.

The pieces immediately sizzle and bubble in the high heat when you put them in the oil.

You'll need to move the pieces around to cook the other side.

Fry the pieces until golden brown and crisp!

Drain the pieces from the oil and transfer on a strainer or cooling rack.

REUSING THE OIL
Since these were very neutral in flavour, I stored the oil to use for my other deep-fried recipes such as Crispy Taiwanese-Style Popcorn Mushrooms or a bunch of my Cauliflower Recipes and Tofu Recipes as well.
What to do?

You can strain out some of the starch pieces that are left in the oil and leave the oil too cool. I have this oil container with a strainer on top that I use to store my oil. I can still use this oil for another 1-2 times.
Can I pan-fry these instead of deep-frying?
Both options work for an acceptable Sweet & Sour "Pork" but they of course won't be as crispy compared to a deep-fried version.

To pan-fry: use a non-stick pan.
- Heat enough neutral oil to evenly coat the surface of the pan. A thin layer will do.
- Add in the pieces when the oil is hot and then pan-fry on each side until crispy, around 4 to 5 minutes.
- Note: These won't turn out as golden brown compared to the deep fried ones but still good enough.
- Remove them from the oil then set aside.
A rundown: the sauce and the stir-fry ingredients
Stir-fry Ingredients:
- 1 medium onion, sliced
- 1 tsp minced ginger
- 1 tsp minced garlic
- 1 small red bell pepper, seeded and sliced into small squares
- 1 small green bell pepper, seeded and sliced into small squares
- 3/4 cup pineapple chunks in extra light syrup, around 115g

STIR-FRYING AND COOKING THE SAUCE
- First: Sauté the onion, garlic, ginger, and peppers in the same pan used for frying. I simply drained out the excess oil from frying.

- Second: Add in the pineapple

- Third: Add in the sauce and leave it to simmer.

- Fourth: Cook down the sauce until it thickens. Keep mixing to prevent it from sticking to the pan.

- Fifth: the sauce will slowly turn more translucent, and turn into a glaze-like consistency

- Sixth: taste the sauce and feel free to season it more if you'd like.

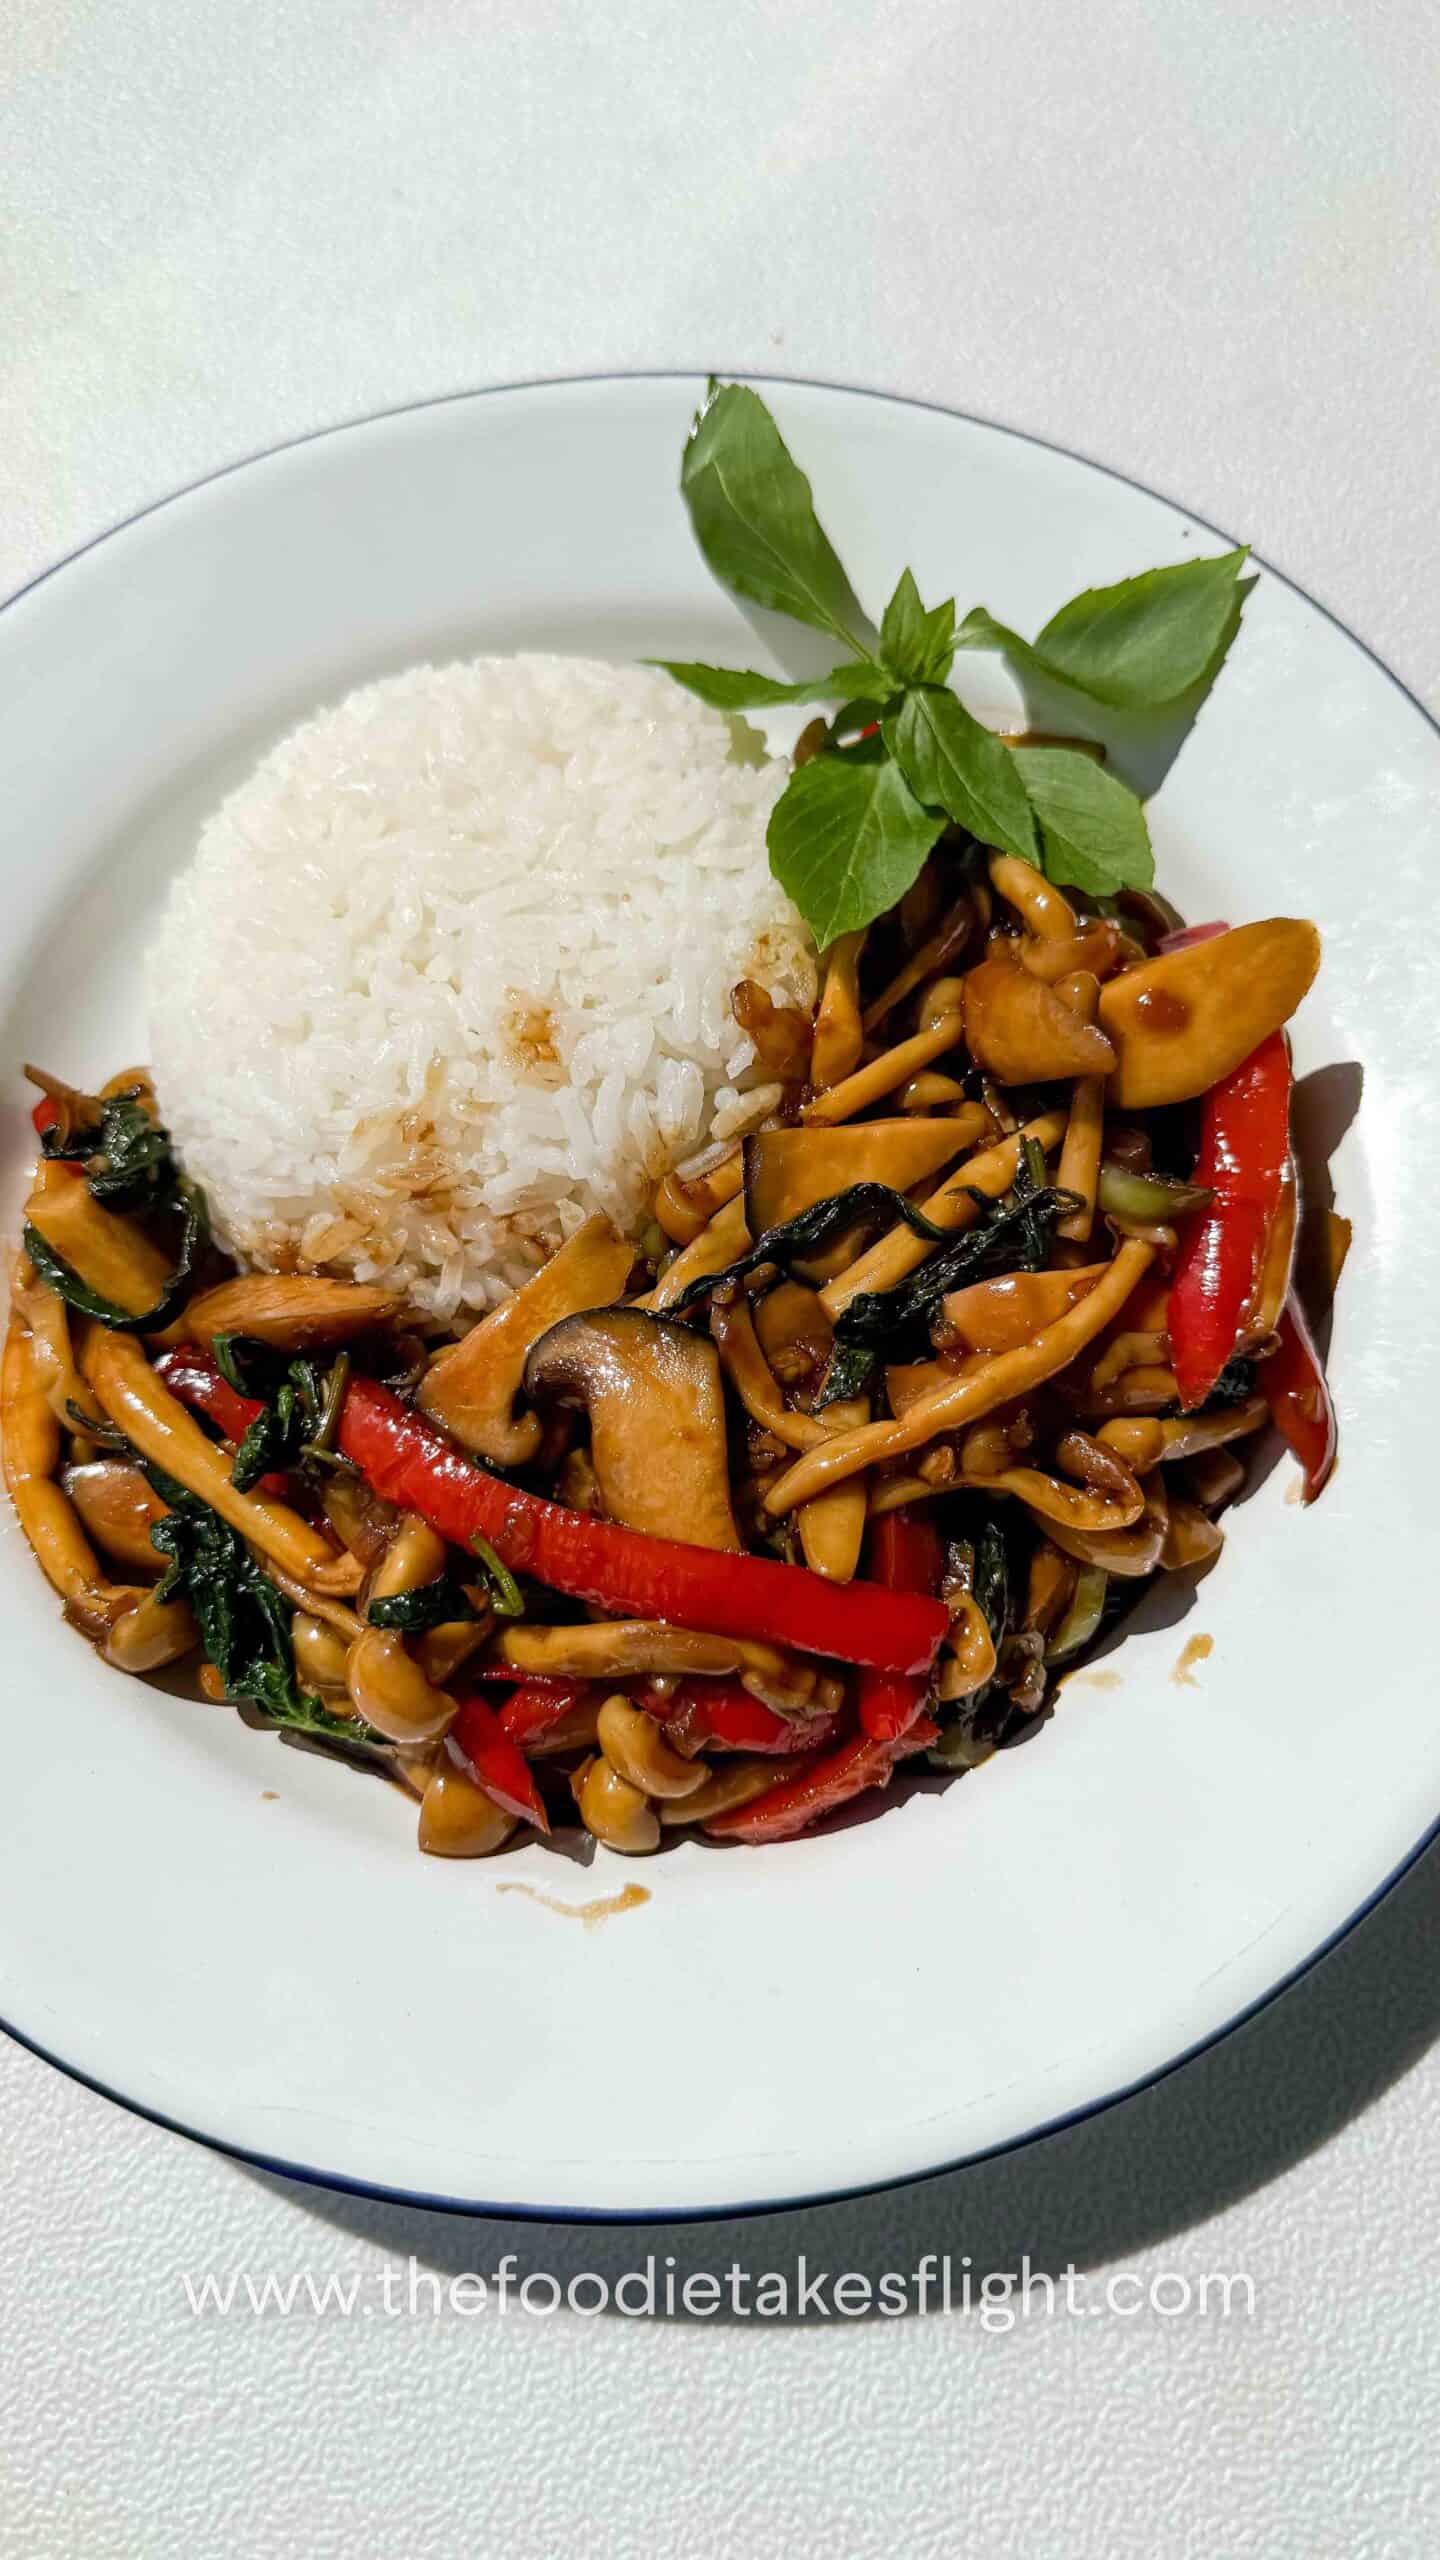
ADDING IN THE "PORK"
For this part, you can aim for 30 seconds or less! This for me is the key to enjoying sweet and sour "pork" that's coating in the sauce but still has that crunchy bite to the pork pieces.

Afterwards, quickly coat the pork in the sauce, turn off the heat, and serve.

It's also important to note that Sweet and Sour "Pork", even at restaurants, don't really stay crispy for long!
Trust me, I grew up eating this stuff. It'll have that little crunch when you bite on it but nothing like the crunch of the "pork" from before you add them in the sauce.

SERVE THESE IMMEDIATELY AND ENJOY!

This Chinese Sweet and Sour "Pork" is of course perfect with some rice. Such a hearty and super satisfying meal, trust me!

You can also check out the video below to see how to make these!
MORE VEGAN CHINESE RECIPES YOU MIGHT LOVE:

Chinese Sweet and Sour “Pork” (Vegan Recipe)
Ingredients
“Pork”
- 120 g dry soy chunks , dry soy meat, or curls--makes around 500g rehydrated (see notes for other alternatives to soy chunks)
“Pork” Marinade
- 1 tsp garlic powder or minced garlic
- 1 1/2 tbsp soy sauce
Sweet and Sour Sauce
- 3 to 4 tbsp sugar adjust according to desired sweetness (see notes)
- 1/3 cup distilled white vinegar or apple cider vinegar
- 1/2 cup pineapple juice or syrup from the pack/jar of pineapples (see notes)
- 5 tbsp tomato ketchup
- 1 tbsp soy sauce sub with tamari for gluten-free
- 1/2 tsp dark soy sauce optional for colour
- 1/4 cup room temp. water
- 1 1/2 tbsp cornstarch
- Dash ground pepper
Coating for the “Pork” and Frying
- Neutral oil for frying
- 6 tbsp corn starch sub potato or arrowroot starch, for first coating
- 2 tbsp cornstarch for second coating, add more if needed to fully coat
For Stir-Fry
- 1 medium onion sliced into small squares
- 1 tsp minced ginger
- 1 tsp minced garlic
- 1 small red bell pepper seeded and sliced into small squares
- 1 small green bell pepper seeded and sliced into small squares
- 3/4 cup pineapple chunks in juice, syrup, or fresh around 120g (see notes)
To Serve
- Steamed Rice
Instructions
- You can watch the video below to see how I made this sweet and sour pork recipe!
“Pork”
- Rehydrate the pieces of soy chunks. You can do this my leaving it to soak in room temperature water overnight in the fridge.

- If you’re pressed for time, you can leave it to soak in hot water for 20 to 25 minutes or until doubled in size.
- Squeeze out the water from each piece of soy chunk then transfer into a large bowl.


“Pork” Marinade
- Add the soy sauce and garlic into the soy chucks.

- Mix well and leave to marinade for 10 minutes while you prepare the other ingredients.


Sweet and Sour Sauce
- Mix all the ingredients for the sauce in a large bowl or measuring cup. Mix until the cornstarch is dissolved. Set aside.

Coating for the Pork and Frying
- Heat a large pan or wok over high heat. Add enough neutral oil to submerge at least half of the soy chunks. Leave the oil to get very hot.
- Meanwhile, prepare a large bowl. Add in 6 tbsp fo the cornstarch.
- Add in the marinated soy chunks into the cornstarch. Mix each piece well into the cornstarch to coat. The pieces will be a solid white at the start because of the starch but the pieces will slowly absorb the starch so they’ll turn a bit brown.
- When the pieces have absorbed some of the starch, you can add 1-2 tbsp more cornstarch to make sure they’re coated very well. The coating is really important to get really crisp pieces of “pork” after frying.
- By this time, you can check your oil if it’s hot enough. There will be small bubbles and you can test the heat of the oil by placing a small piece of the “pork”. If it immediately bubbles when you place it, the oil is hot enough.
- Carefully place the pieces of coated “pork” in the oil. Make sure the pan is not overcrowded. If you’re using a large pan, you can cook everything in one batch. If using a smaller pan, you can cook this in 2-3 batches.

- Leave the “pork” to fry for 6 to 7 minutes or until golden brown throughout. You can move around and flip the pieces (if your oil doesn’t completely submerge the “pork”) to evenly crisp and cook each side until golden brown.
- Once the pieces are golden brown, remove them from the oil and place in a strainer to drain out the excess oil.
- You can also place them on a plate with some paper towels. Set aside. Do not cover to prevent these from sogging.
- Turn off the heat and remove the oil. You can leave around 1-2 tbsp of the oil in the pan, for stir-frying.


To Store and Reuse Oil
- You can strain out some of the starch pieces that are left in the oil and leave the oil to cool. I have this oil container with a strainer on top that I use to store my oil. Since these soy chunks are very neutral, I can still use this for another 1-2 times.

Stir-Frying
- I used the same pan for frying so I simply heated it over high heat with 1-2 tbsp neutral oil.
- Once hot, sauté the onion, garlic, and ginger for 1-2 minutes until the onions are cooked. Add in the bell pepper and cook for 2 minutes.
- Add in the pineapple chunks and cook for 1 minutes.
- Lower the heat to medium. Give the sauce a good mix again since the starch tends to sit at the bottom.
- Over medium heat, pour in the sauce to the pan.
- Mix well and then leave the sauce to boil for 2 to 3 minutes. Continuously mix until the sauce thickens.
- Once the sauce has thickened, add in the fried “pork” pieces and immediately mix well in the sauce. You’ll want to do this very quickly so the pieces of “pork” can retain its crispness (though let’s be real: no sweet and sour “pork” dish is actually that crispy especially after it soaks in the sauce).
- Turn off the heat then serve the sweet and sour pork immediately. Enjoy this while hot with some steamed rice.

WATCH Video
Notes
Substitutes for the Soy Chunks
-
1 lb (454g)frozen then thawed extra firm tofu
- Before you freeze your tofu, slice them into 1” (2.5 cm) cubes. NO need to squeeze out the liquid from your tofu.
- Place the tofu on a flat surface or container and make sure they’re spaced apart so they do not stick.
- Freeze at least overnight then thaw the next day. When thawed completely at room temperature, carefully squeeze out the liquid from each piece of tofu.
-
1 lb (454g) Seitan
- If using seitan, you can slice them into 1” pieces or just break them apart into pieces before marinating and coating the in the starch.
-
Cauliflower Florets
- Another option would be to use cauliflower florets that you can batter and coat before frying to a crisp and mixing in with the sauce.
- You can check out my Crispy Cauliflower Recipe here and use the cauliflower base recipe and cook it in the Sweet and Sour Sauce from this recipe.
-
1 lb (454 g) Tempeh
- Make sure your tempeh is fully thawed then slice them into 1” (2.5 cm) cubes. You can opt not to coat your tempeh in cornstarch and just pan-fry these directly.
Pineapple Chunks in Juice or Light Syrup and Adjusting the Sugar
- Since I used pineapple chunks in juice, the pineapple juice from the pack is already slightly sweetened. If using chunks from syrup, it can be even sweeter so you can adjust the sugar accordingly and start with 3 tbsp. If you'd like it sweeter, you can always add more.
- If you're using fresh pineapple, slice them into small 1" (2.5 cm) cubes then use pineapple juice of your choice.
Tomato Ketchup
- Some ketchup brands have more or less sugar and also vary in acidity so you can also adjust the sugar to suit to your preferred sweetness and acidity for the sauce.
NUTRITIONAL INFO
Pin the images:


I forgot to rate it. I’d give 6 stars, if possible!
Ahh thank you so much Teresa, so happy you liked it!!!
Thank you so much for this recipe. I have made it with tofu 3 times in the past 2 weeks, each time a portion for 3 people which I ate all by myself 😀 It is quick, easy and super delicious.
Thank you Clara, so happy you enjoyed it! ◡̈
Best recipe ever ❤ I’ve been trying to cook more vegan food for my parents lately and they literally loved this one! Thank you Jeeca 🙂
Thank you Guilia! Makes me so happy to hear this ❤️
Definitely the best sweet and sour sauce I’ve ever made.
Yay! Thanks Kristina ◡̈
It is worth the risk! I decided to prepare a vegan meal for me and my grandparents. Before I became vegan, Sweet and Sour pork from Chowking is my go to food. I missed its strong flavors well LUCKILY I saw this recipe on this blog… I have no background in cooking… perhaps only in food tasting HAHAHAH. MY GRANDPARENTS LOVE IT. Thankkk youuu <3
Yaaay so so happy to hear!!!