

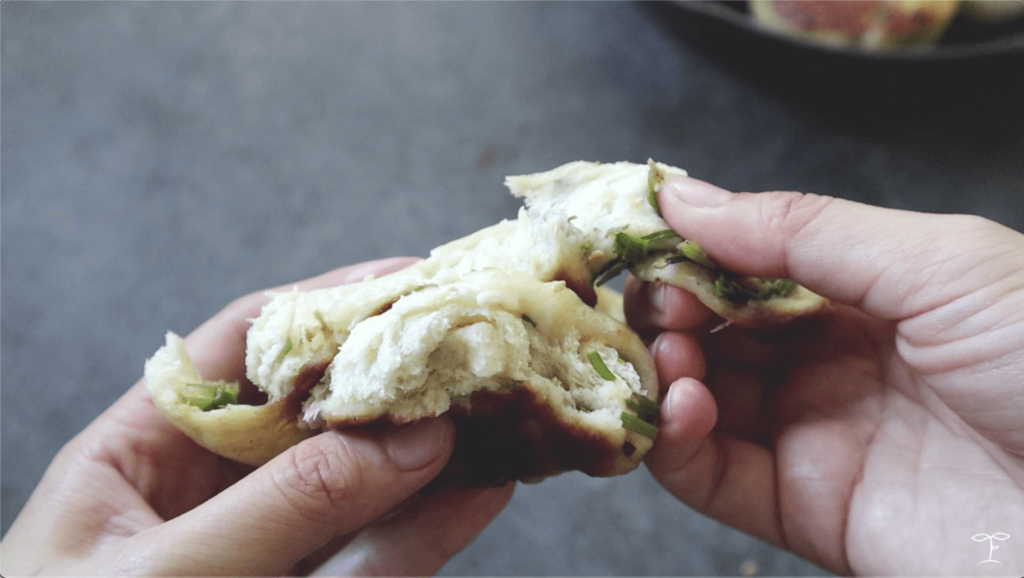
Make your own Vegan Pan-Fried Scallion and Toasted Sesame Buns from scratch! These are light and fluffy buns with a crispy bottom.

In each bite you’ll get an aromatic blend of scallions, sesame seeds, and five spice powder.
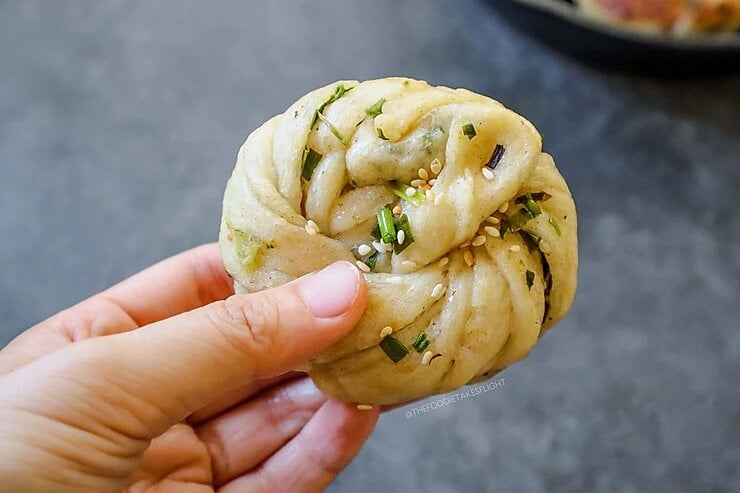
WHAT ARE HUA JUAN (花卷) OR FLOWER BUNS?
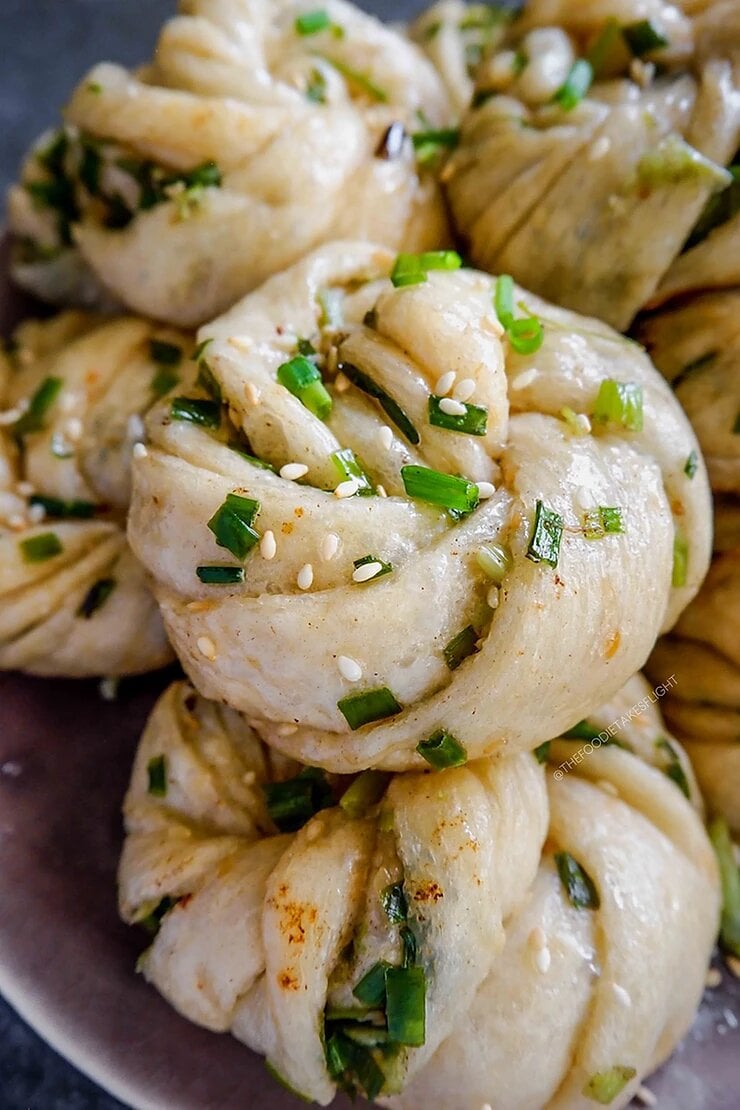
These are also called ‘Hua Juan Bao’, which literally translates to Flower Buns. They get the name ‘flower’ because these kind of look like flowers with the twist!
These buns light and fluffy buns with a crispy bottom and in each bite you’ll get an aromatic blend of scallions, sesame seeds, and five spice powder.
This recipe makes a dozen of these buns and I shared them with my family. They were a hit!
My dad even said these reminded him of the buns from Taiwan, which can possibly be the biggest compliment especially since it’s coming from my dad who can be the biggest critic!
MINI SCALLION BUNS
You can also make mini buns by using around 30 grams of the dough for each pieces!
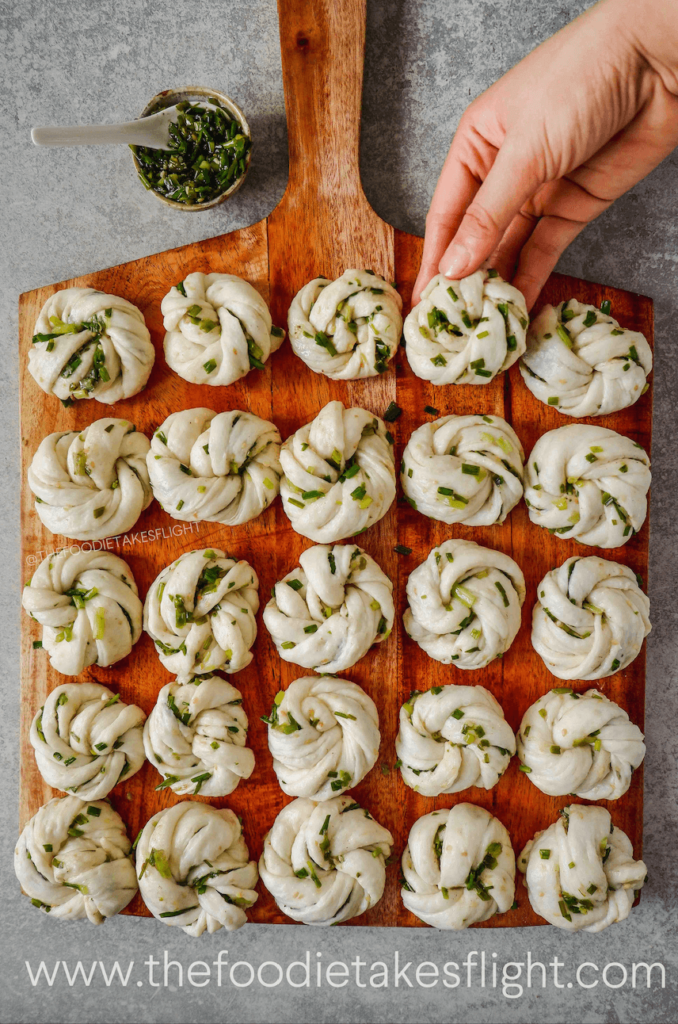
Here I managed to make a total of 25 mini buns and just cooked them the same way as the large ones!
THE FILLING
SO aromatic from the scallion, sesame, and five spice!

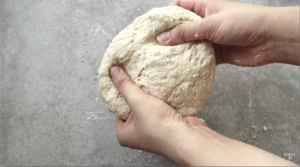
THE DOUGH

I made these from scratch and though it might be intimidating to make your own dough and roll out your dough but it’s actually fairly simple and also very relaxing (in my opinion)!


SHAPING THE BUNS
This is the trickiest part, especially at the beginning but with a little practice, you’ll find a way that works for you!

The dough is also very forgiving and you can basically untwist it if you’d like to re-do the buns and get them to look better.
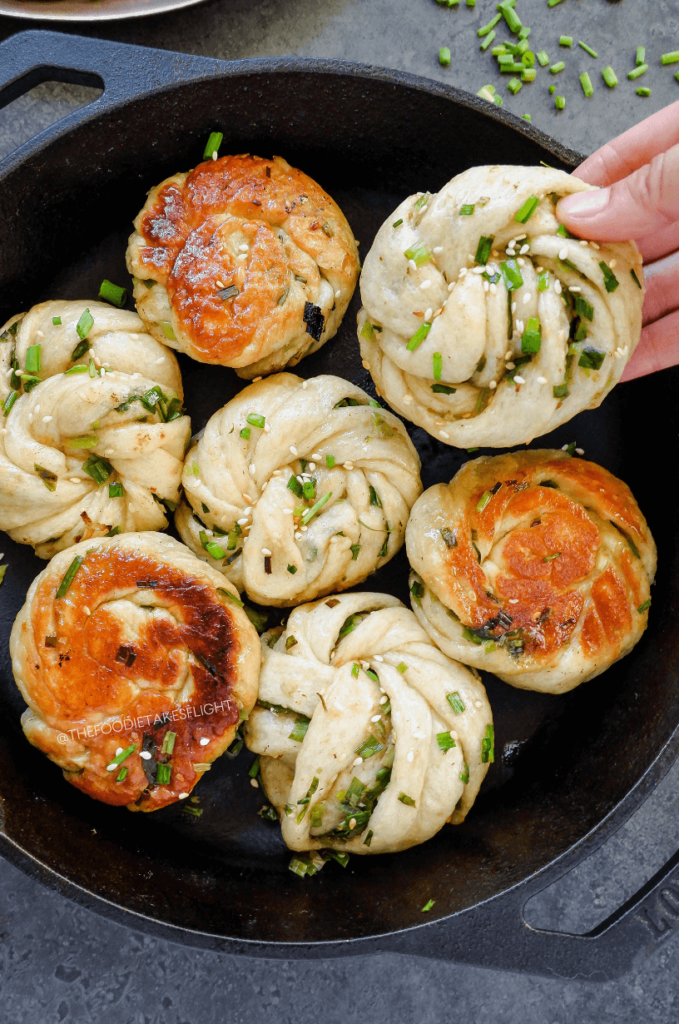
COOKING THE SCALLION BUNS
COVER TO COOK IN THE STEAM


HOW TO ENJOY THESE SCALLION BUNS
These are best enjoyed while hot! I love enjoying them as-is and these are also great as a snack. But you can also enjoy your pan-fried scallion and sesame buns with some soup.
You can find the full recipe for these Pan Fried Scallion and Sesame Buns (Hua Juan) below.
You might enjoy these other Chinese dumpling, buns, and pie recipes:
- Crispy Wontons
- Vegetable Dumplings
- Chinese Chive Pies
- Pan-Fried Cabbage and Noodle Buns
- Wontons in Chili Broth
- Scallion and Sesame Buns

I made my very first recipe video for my YouTube Channel featuring these buns so you can see how I made them. Check it out below!
Please also like and subscribe to my channel, I’d really appreciate it! Can’t wait to share more recipe videos! 🙂
Now let’s have some buns!
It’s so versatile and can be enjoyed with pretty much anything–from rice, noodles, tofu, veggie, and more. Enjoy!
If you make this recipe, please tag me on my Facebook or Instagram and use the hashtag #thefoodietakesflight 🙂

Pan-Fried Scallion and Toasted Sesame Buns (Hua Juan Bao, 花卷)
Equipment
Ingredients
- Neutral oil for cooking
- Water for cooking
- More chopped scallions and sesame seeds for topping
Dough
Wet Ingredients
- 1 cup warm soy milk or other non-dairy milk (105 to 115F or 40-45C), hot to the touch but not scalding
- 1 tbsp sesame oil or neutral oil
Dry Ingredients
- 3 cups all-purpose flour
- 2 tsp instant dry yeast** see notes
- 1/4 cup sugar
- 1 tbsp toasted sesame seeds (you can toast your own! see toasting sesame steps below)
- 1/2 tsp salt
Scallion & Sesame Filling
- 2 cups chopped scallions or green onions
- 1/2 tsp salt
- 1/2 tsp Chinese 5 spice powder can be subbed with 1/4 tsp white pepper
- 2 tsp toasted sesame seeds*** see notes
- 1/3 cup neutral oil sizzling hot
Instructions
Toasting Sesame Seeds
- Heat a pan. Once hot, add in the sesame seeds. Cook over medium heat until lightly brown. Keep moving around to evenly toast. Leave to cool and place in an air-tight container for future use.
Preparing the dough
- You can watch the video below for a complete step-by-step on how to make these buns.
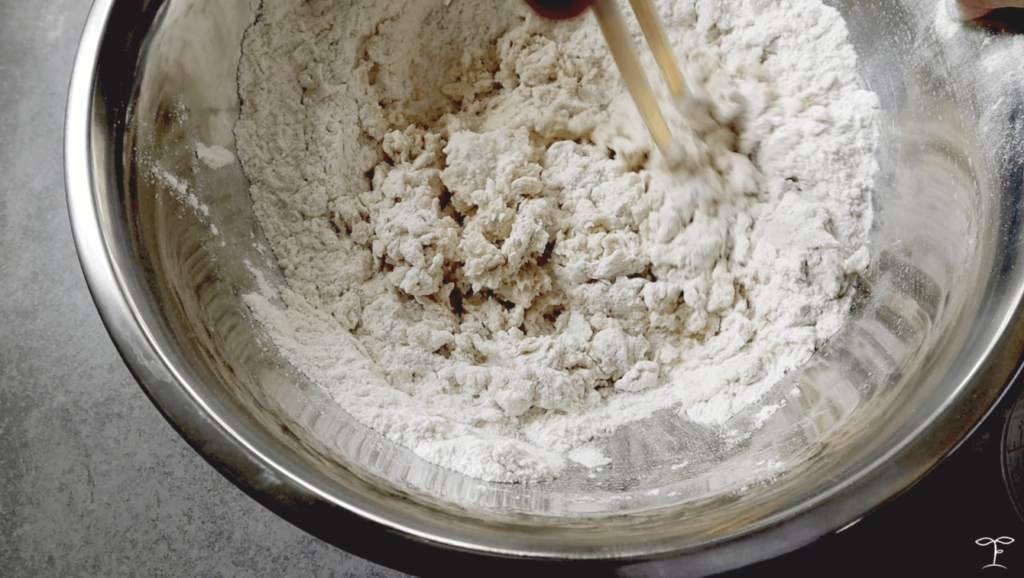
- In a large bowl, mix together all dry ingredients.
- Mix warm soy milk and oil. Pour it in the flour mixture while mixing. I used wooden chocksticks and a spatula to mix everything together. Keep mixing until a dough is formed.

- Shape the dough into a ball. You can use your hands! Knead for a few minutes, around 20-30 times.
- Brush the bowl with some oil then place in the dough. Cover it with a towel and let it rest in a warm place for 45 minutes to 1 hour to let the dough rise until almost doubled in size.


Making the filling
- Place the scallions, salt, five spice powder, and sesame seeds in a bowl. Mix well.
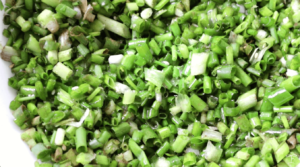
- Heat your oil in a small sauce pan over medium for around 2 minutes or until small bubbles start to appear. You can also microwave your oil at high for around 2.5 minutes. Be sure to use a microwave safe container. Pour the hot oil in the scallion mixture. Mix well then set aside.

Shaping the dough
- Once the dough has risen, flour your work surface. Take the dough out of the bowl.
- Punch a hole in the center of the dough and stretch apart, to make a donut shape. Keep stretching.
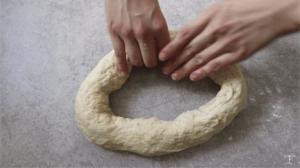
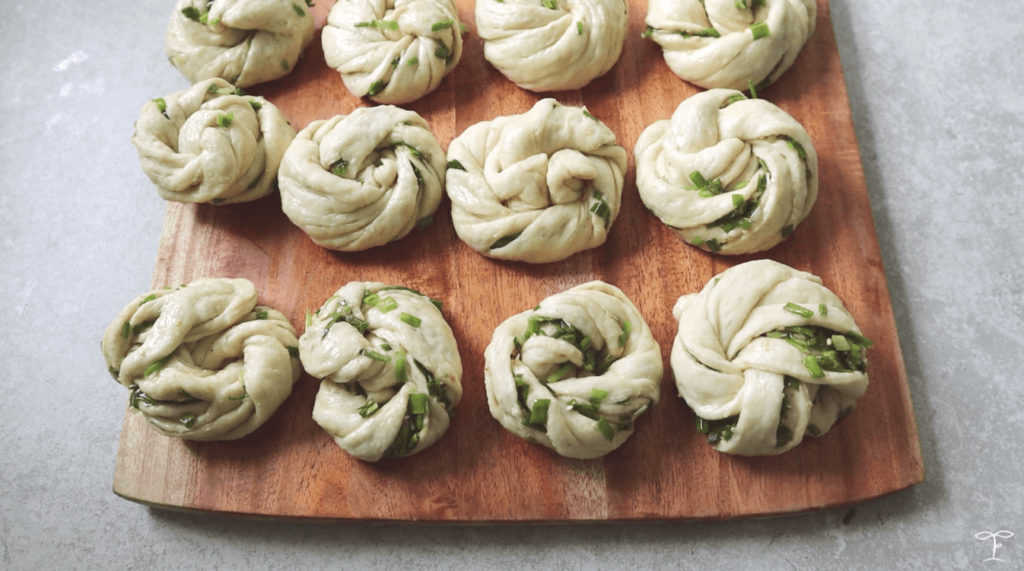
- Divide the dough into 12 pieces. Each piece will be around 55 to 60 grams.
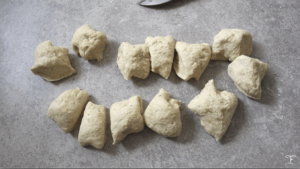
- Roll or shape each piece of dough into a ball. Cover them with a towel so they don’t dry out while your roll them piece-by-piece. To make a wrapper, press down on the ball of dough and lightly flatten it over the surface.
- Sprinkle a little flour on top and lightly coat your rolling pin with some flour as well. While using a rolling pin, roll out the dough by moving the pin forward and backward. Rotate the dough 90 degrees and repeat the movement. Continue to roll out the dough until you have a wrapper that’s around 4 by 6.5″ inches in size.


Making the buns
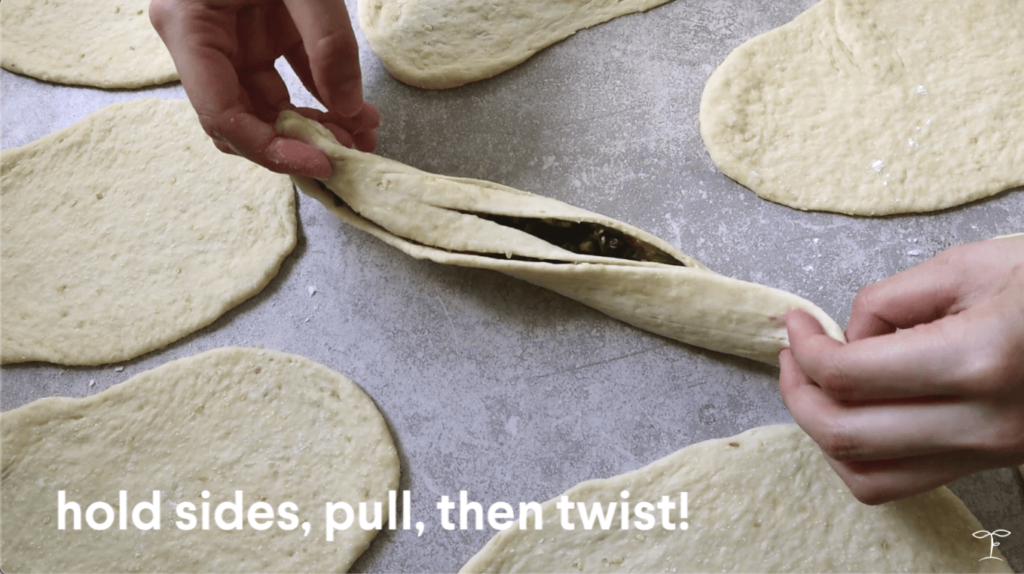
- Get one wrapper. Vertically slice strips on it. Place some of the scallion and sesame filling.
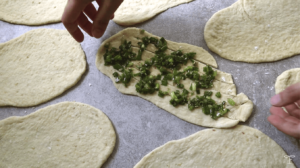
- Grab both ends of the wrapper, pull, and then twist! Shape into a bun. See video above (or here) for a better idea.

- Tuck the ends of the wrapper to seal the bun.

- Cover the buns to prevent these from drying while you prepare the rest.
- Leave the buns to rise for 15-20 minutes in a warm spot before cooking. The buns will rise while you prepare the rest so the first few pieces will be ready to cook by the time you finish twisting and sealing the rest.


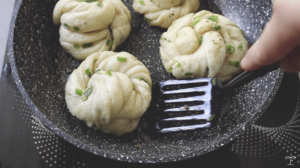
Cooking the buns
- Heat a pan and prepare a lid (I used a non-stick pan), add in 1 tbsp of oil (for every 4 buns). When hot, add in the buns. Leave to cook over medium heat for 4-5 minutes until it has a golden brown crust.*Note: the number of buns per batch will depend on the size of your pan!
- Prepare the lid of your pan. Using the lid as protection, carefully pour 1/3 cup of water (around 1 tbsp for every bun) into the pan and then immediately cover to prevent it from splashing due to the heat.
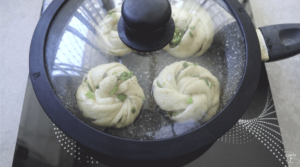
- Leave to cook in the steam, until the water has evaporated. Take out the buns and repeat this step for the remaining ones.
- Enjoy while hot and really fluffy! Feel free to garnish with more scallions and sesame seeds. See storage and reheating tips below.


WATCH Video
Notes
- If you don’t have sesame oil, feel free to use regular neutral oil like canola, rice bran, etc.
- You can store opened packages of yeast in the freezer to make sure they’re still good for future use!
- You can opt to make your own toasted sesame seeds. To toast, simply heat a large non-stick pan over high heat. Once hot and smoking, lower the heat to medium. Place the raw sesame seeds into the pan and then leave to toast for 30 seconds before mixing around to toast the other sides evenly until golden brown throughout, around 3 minutes total. Make sure to keep an eye on your sesame seeds so they don’t burn. Transfer the toasted sesame seeds on a plate or tray and leave to cool completely before storing in a jar until ready to use.
Storage and reheating tips:
- Place the cooked buns in an air-tight container and refrigerate for up to 5 days. To reheat, you can pan fry them again with a splash of water then cover. You can also microwave them with a splash of water then cover.
- You can freeze cooked the buns too and just steam them (from frozen) before enjoying! Alternatively, you can also wrap the buns in a damp paper towel and microwave on high until cooked through.
NUTRITIONAL INFO
You can pin these images:


This Post Has 27 Comments
These were so good! The dough is easy to work with, and rose beautifully. The nutty flavour of the sesame seeds and oil is great. The only thing I did differently was heating peanut oil to pour over the scallions. I heated it for about 2 minutes over medium heat in my smallest frying pan, because I was a bit scared of the idea of heating a bowl of oil in the microwave.
Hi Amanda! I hope you enjoyed your buns and making them, too! And of course, heating the oil in a small frying pan is a great option too (microwaving it is just a lazy hack i love to do haha). Thanks so much for your feedback!
Could I steam these instead of pan frying? If so, how long would you recommend?
Hi Heidi! Yes you can. I’d suggest steaming them for 10-12 minutes. 🙂
Yummy! I made these with white whole wheat flour (used about 2.5 cups) and cut down on oil to about 1/4 cup to pour onto scallions. Delicious!
Hi Jessica! Thanks so much for your feedback and hope you enjoyed making these!! 🙂
Hi! Would love to make these – does the milk have to be non dairy?
Hi beth! Not necessarily, dairy milk will do 🙂
Okay you made the twisting to form a bun part look super easy!! Haha. I had a difficult time doing that with mine so they weren’t as pretty but they tasted amazing!!
Haha the twisting part takes a bit of practice ?but really hope you enjoyed making them!!
What would you recommend for baking them time-wise?
Hi Ash, I haven’t baked these myself but some have and they’ve baked these at 350F for 25-30 minutes or until the top of the buns are lightly brown. Hope this helps!
Hi Jeeca! Wonder if it is appropriate to use black instead of white sesame seeds? Would the flavour be affected a lot?
Hi Leong, not really so feel free to use black sesame seeds ◡̈ toasting them on a pan would be great!
These look amazing. I am trying to go gluten free..could you recommend an alternate to the all purpose flower?
Hi Maeesha, I’m afraid I’ve never tried this with any GF flour. 🙁 might be best to get a 1:1 GF flour blend substitute for the all-purpose flour 🙂
so good and easy to make! I’ve tried so many of your recipes and they always turn out delicious!! Will definitely make these again
These look amazing! Can’t wait to try. Is it possible to let the buns rise in the fridge before the cooking step?
Hi Ella, I’m afraid the buns won’t rise if it’s in a cold place like a fridge. It’d be best to let it rise in room temp (if you live somewhere with a warm room temp) or place it in an oven and set at the ‘warm’ setting. Hope this helps!
Hi there – these look great! At what point should I be freezing them if I want to prepare a few days before cooking 🙂
You can refrigerate/freeze them after cooking! Then just pan-fry again wit ha splash of water (to steam) to reheat ◡̈
I just made these today- it was like Ratatouille, where the first bite took me back to my week solo vacation in Taiwan, just such good food and memories. I definitely need more green onions for next time, lol, but everything was great and easy to follow, love the video that shows the process too.
Yay, thanks so much for giving it a try Erica and glad you liked it!! ◡̈
I’ve had this recipe saved on my ”cooking to-do list” for years now but I finally did it and… I immediately regretted not making it sooner ! Surprisingly easy to do, not too long, and absolutely delicious. Well explained. I only made a small batch of 4 buns but I will do it again for sure, thank you for the recipe!
Hey Morgane,so happy you finally gave these a try! I love making them too and they actually store well in case you decide to make more next time! 🙂
What is the best soup options to serve these with?
Hi Sam, it’s very versatile so can go well with a variety 🙂 I’d say it’d be good with a Chinese corn soup or even with a bowl or ramen 🙂