
Sushi sandwiches and rolls, anyone? Check out the recipe below to see how I made these!
I'm a huge fan of Japanese food, most especially these sushi sandwiches (onigirazu) and sushi rolls (maki).

I've been making Japanese sushi rolls for much longer than onigirazu (sushi sandwiches) but once you get a hang of sushi sandwiches, they're so much easier to make than sushi rolls from my experience!

THE SUSHI SANDWICHES OR ONIGRAZU

You can also check out my tofu katsu recipe which I used as filling.
SUSHI SANDWICHES: PERFECT ON-THE-GO
One of my fondest memories of enjoying an onigirazu was when I was in university. I'd prepare a few to enjoy throughout the week. I'd pack one to school and eat one while walking from one class to the next. It was hearty and so filling!
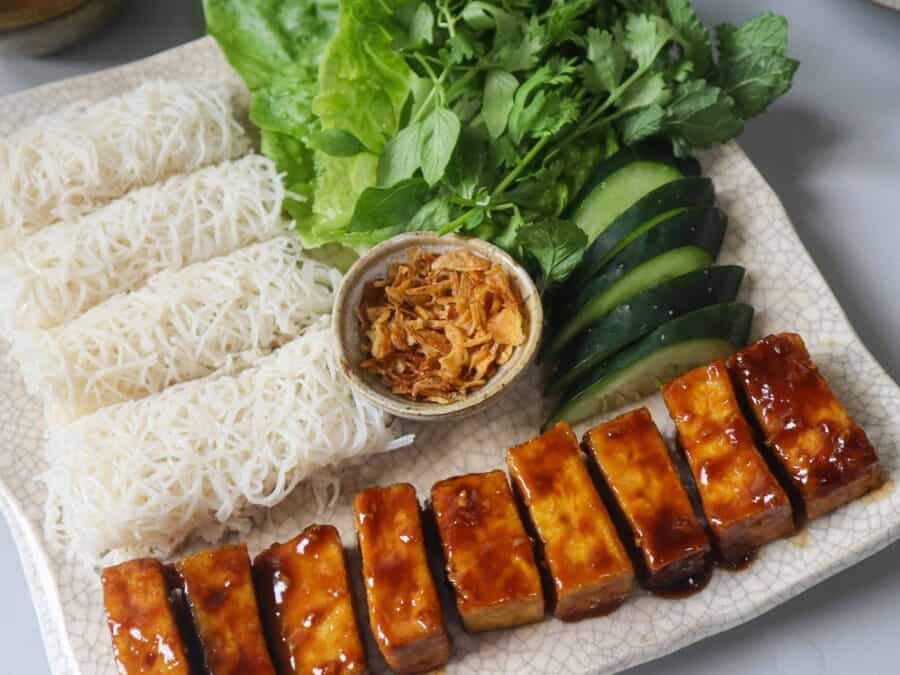
You can also get creative with your fillings! For these, I made my own vegan tofu "katsu" and drizzled some homemade teriyaki sauce.

OTHER ONIGRAZU FILLING OPTIONS:
Instead of using tofu katsu, you can opt to use other tofu such as my teriyaki tofu or black pepper tofu!

Here's a version I made with baked tofu:


HOW TO MAKE THESE SANDWICHES
These are usually wrapped in plastic cling wrap to be able to really seal them well but I realized that it's possible to make them without the need for any plastics!
A STEP-BY-STEP:

Add the rice:

Veggies:

The tofu katsu (or other tofu!):

More veggies:

Add the second layer of rice:


Time to fold!


Flip over and compress to seal your sushi sandwich!
You can also watch my video below for a step-by-step and some tips and tricks!

Slice in half:

It also helps to use a very sharp knife to slice your onigirazu!

I finished my sushi sandwiches off with some homemade teriyaki glaze.
You can check out my homemade teriyaki sauce recipe here.
LEFTOVERS OR MAKING AHEAD?
STORE YOUR SUSHI SANDWICHES IN THE FRIDGE!
To enjoy the following day, wrap sushi sandwiches (preferably unsliced) and rolls in some plastic or paper wrap to keep them from drying out before placing them in an airtight container in the refrigerator.
Anyway, check out the recipes below. Enjoy!
You can also check out my other tofu recipes here or down below:

Vegan Tofu “Katsu” Sushi Sandwiches and Rolls (Onigirazu and Maki)
Equipment
- Bamboo rolling mat (for the rolls)
- A bowl of water
- A sharp knife
- A damp towel
Ingredients
- Whole nori sheets
- Prepared Japanese sushi rice (recipe below)
Tofu Filling (choose one!)
- Prepared tofu katsu some sliced into strips for the rolls
- Other prepared tofu of choice (teriyaki tofu, black pepper tofu, smoked tofu, etc.)
Other Filling/Veggies (totally up to you!)
- Thinly sliced carrots
- Lettuce
- Pickled radish store-bought
- Pickled burdock root store-bought
- Homemade teriyaki sauce or store-bought
- Sesame seeds for sprinkling
Japanese Sushi Rice (Good for 1 serving)
- 1 1/2 cups uncooked Japanese rice or short grain rice
- 1/8 to 1/4 cup rice vinegar this type of vinegar is essential (see notes)
- 1 1/2 tbsp cane sugar feel free to adjust accordingly
- 3/4 tsp salt
Instructions
Japanese Sushi Rice
- Wash the Japanese rice 2-3 times with water or until water runs clear.
- Cook in a rice cooker. (1 cup rice = 1 cup water)
- While the rice is cooking, pour rice vinegar, sugar and salt into a large wooden or ceramic bowl. Mix well.
- Once rice is cooked, add into the vinegar mixture and mix well. The hot rice will easily absorb the mixture.
- Cover the rice with a damp towel. Refrigerate for at least 1 hour. Cover with a towel or cling wrap then refrigerate.
Sushi Sandwiches (Onigirazu)
- In a flat surface, place the nori sheet. Prepare a bowl of water to dip your fingers. This is to prevent rice fro sticking to your fingers.

- Add a generous amount of the sushi rice to make a square shape the same size as the tofu katsu or tofu of choice.

- Add the lettuce and then the tofu.
- Add other toppings of choice, all the same size as the tofu and rice. I used a mix of carrots and pickled radish.
- Add another layer of rice and press down.
- Fold each side of the nori sheet to the center while holding together the filling to ensure the sandwich will be held together well.
- Fold the sheet up while tucking in the sides.
- Flip over.
- Wipe your knife with a damp towel to prevent rice from sticking then slice in half.
- Feel free to add some sesame seeds and teriyaki sauce to your liking! If you intend to store these in the refrigerator, you can wrap them in some cling wrap or place them in an air tight container to avoid them drying out.


Sushi Rolls (Maki)
- You can check out the video below on how to roll the maki.Prepare a bowl of water t dip your fingers. This is to prevent rice fro sticking to your fingers.
- On a flat surface, place your bamboo mat. Place a sheet of nori.
- Wet your hands. Thinly spread out rice. Leave at least a 1/2" border at the other end of the nori sheet.
- Add in the fillings of choice.
- Roll the nori sheet and tuck the filling with your fingers. Squeeze tightly together and roll another time, to seal the edges. Roll the finished maki into the bamboo mat again to make sure it's tightly packed.
- Slice the whole maki into 8 pieces with a sharp knife. Wipe your knife with a damp towel to prevent rice from sticking.
WATCH Video
Notes
- You can start with 1/8 cup or 2 tbsp of the rice vinegar depending on your desired preference for sushi rice. I personally prefer my rice on the sour side and with a strong vinegar flavour, but if you like a more subtle vinegar taste, you can use less vinegar.
- You can also adjust the sweetness and add more sugar, to counter the vinegar taste.
- To enjoy the following day, wrap sushi sandwiches (preferably unsliced) and rolls in some plastic or paper wrap to keep them from drying out before placing them in an airtight container in the refrigerator.
NUTRITIONAL INFO
You can pin these images:


Tasty and fun to eat! 好吃,好玩.
Thank you Niklas! ◡̈
Delicious and fun to make.
Thanks Maryann ◡̈