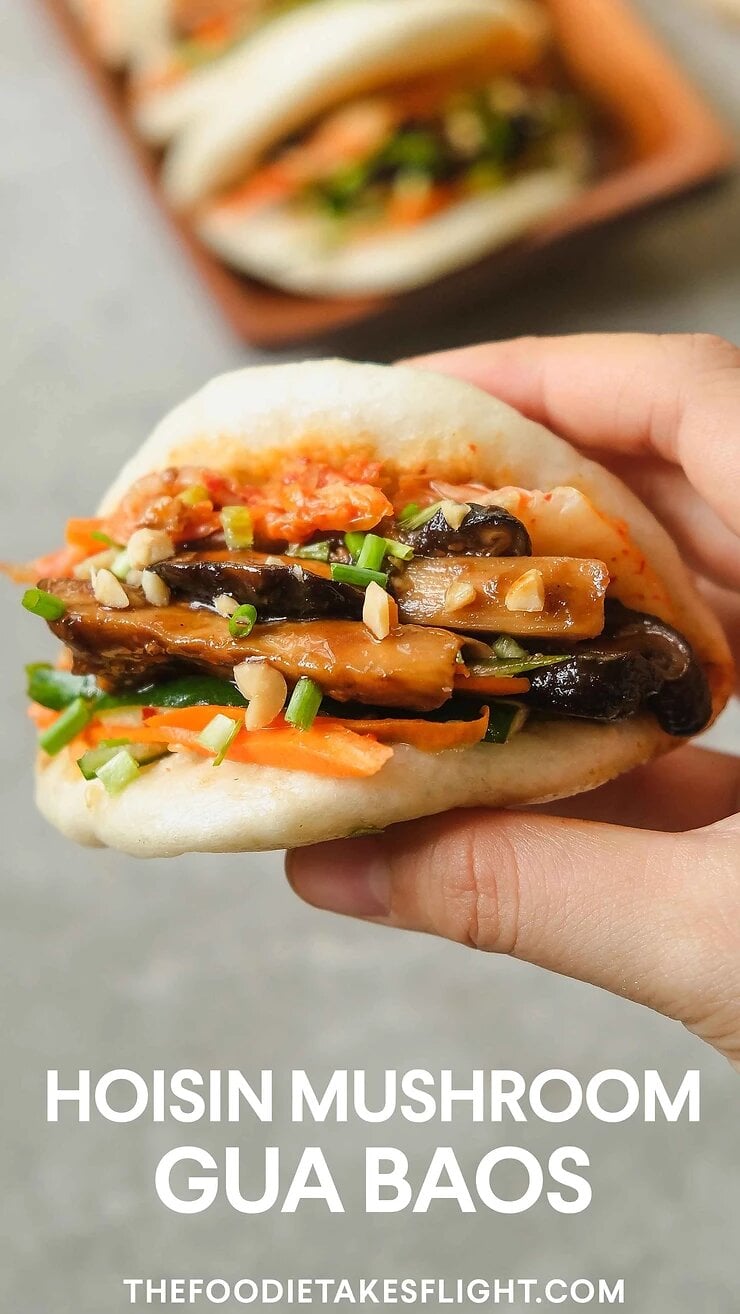
Facebook-f Pinterest Instagram Youtube Tiktok
  • HOME
  • COOKBOOKS
    • ‘VEGAN ASIAN’ COOKBOOK
    • FREE BONUS EBOOK
    • ‘VEGAN KITCHEN’ EBOOK (2019)
  • RECIPES & BLOG
    • All Recipes
    • 30 Minute Recipes
    • Salads and Starters
    • Soups and Stews
    • Easy Stir-Fries
    • Rice Recipes
    • Pasta and Noodle Recipes
      • Ramen and Noodle Soups
    • Asian Recipes
      • East Asian
        • Japanese Food
        • Korean Food
        • Chinese Food
      • Southeast Asian
        • Thai Food
        • Filipino Food
        • Vietnamese Food
        • Indonesian Food
      • Fusion
    • Tofu Dishes
    • Dumplings, Buns, and Pies
    • Finger Food
    • Cauliflower Recipes
    • Sauces and Dips
    • Holiday Recipes
  • COOKING ESSENTIALS
  • ABOUT
  • WORK WITH ME
    • Brand Collaborations
    • Food Photography
Menu
  • HOME
  • COOKBOOKS
    • ‘VEGAN ASIAN’ COOKBOOK
    • FREE BONUS EBOOK
    • ‘VEGAN KITCHEN’ EBOOK (2019)
  • RECIPES & BLOG
    • All Recipes
    • 30 Minute Recipes
    • Salads and Starters
    • Soups and Stews
    • Easy Stir-Fries
    • Rice Recipes
    • Pasta and Noodle Recipes
      • Ramen and Noodle Soups
    • Asian Recipes
      • East Asian
        • Japanese Food
        • Korean Food
        • Chinese Food
      • Southeast Asian
        • Thai Food
        • Filipino Food
        • Vietnamese Food
        • Indonesian Food
      • Fusion
    • Tofu Dishes
    • Dumplings, Buns, and Pies
    • Finger Food
    • Cauliflower Recipes
    • Sauces and Dips
    • Holiday Recipes
  • COOKING ESSENTIALS
  • ABOUT
  • WORK WITH ME
    • Brand Collaborations
    • Food Photography
Menu
  • HOME
  • COOKBOOKS
    • ‘VEGAN ASIAN’ COOKBOOK
    • FREE BONUS EBOOK
    • ‘VEGAN KITCHEN’ EBOOK (2019)
  • RECIPES & BLOG
    • All Recipes
    • 30 Minute Recipes
    • Salads and Starters
    • Soups and Stews
    • Easy Stir-Fries
    • Rice Recipes
    • Pasta and Noodle Recipes
      • Ramen and Noodle Soups
    • Asian Recipes
      • East Asian
        • Japanese Food
        • Korean Food
        • Chinese Food
      • Southeast Asian
        • Thai Food
        • Filipino Food
        • Vietnamese Food
        • Indonesian Food
      • Fusion
    • Tofu Dishes
    • Dumplings, Buns, and Pies
    • Finger Food
    • Cauliflower Recipes
    • Sauces and Dips
    • Holiday Recipes
  • COOKING ESSENTIALS
  • ABOUT
  • WORK WITH ME
    • Brand Collaborations
    • Food Photography
  • All Posts
  • All Recipes
    • Salads and Starters
    • Soups and Stews
    • 30 Minute Recipes
    • Easy Stir-Fries
    • Rice Recipes
  • Asian Recipes
    • Southeast Asian
      • Thai Food
      • Filipino Food
      • Vietnamese Food
      • Indonesian Food
    • East Asian
      • Korean Food
      • Japanese Food
      • Chinese Food
    • Fusion
  • Tofu Recipes
    • Favorite Tofu Recipes
  • Pasta and Noodle Recipes
    • Ramen and Noodle Soups
  • Sauces and Dips
  • Sides and Snacks
  • Sweets and Desserts
  • More
    • Finger Food
    • Dumplings, Buns, and Pies
    • Savoury Dishes
    • Cauliflower Recipes
    • Holiday Recipes
    • Pantry Recipes
    • Pantry-Friendly Recipes
    • Lifestyle and Travel
Menu
  • All Posts
  • All Recipes
    • Salads and Starters
    • Soups and Stews
    • 30 Minute Recipes
    • Easy Stir-Fries
    • Rice Recipes
  • Asian Recipes
    • Southeast Asian
      • Thai Food
      • Filipino Food
      • Vietnamese Food
      • Indonesian Food
    • East Asian
      • Korean Food
      • Japanese Food
      • Chinese Food
    • Fusion
  • Tofu Recipes
    • Favorite Tofu Recipes
  • Pasta and Noodle Recipes
    • Ramen and Noodle Soups
  • Sauces and Dips
  • Sides and Snacks
  • Sweets and Desserts
  • More
    • Finger Food
    • Dumplings, Buns, and Pies
    • Savoury Dishes
    • Cauliflower Recipes
    • Holiday Recipes
    • Pantry Recipes
    • Pantry-Friendly Recipes
    • Lifestyle and Travel
Categories
  • Jeeca Jeeca
  • - July 14, 2020
  • - 11:11 am

Hoisin Mushroom Gua Baos (Vegan Recipe)

Sharing is caring!

  • Facebook
  • Twitter
Jump to Recipe Jump to Video

Vegan Hoisin Mushroom Gua Baos – homemade fluffy steamed buns filled with hoisin mushrooms. Another option is to fill these with maple hoisin tofu for those of you who’d prefer tofu instead!

The mushrooms are cooked in hoisin sauce which makes them super tasty and umami and paired them with some pickled carrots and cucumber.

I also added some homemade vegan kimchi for that extra flavour and bite.

I finished off these buns with some chopped spring onion and peanuts for that extra crunch.

WHAT ARE GUA BAOS?

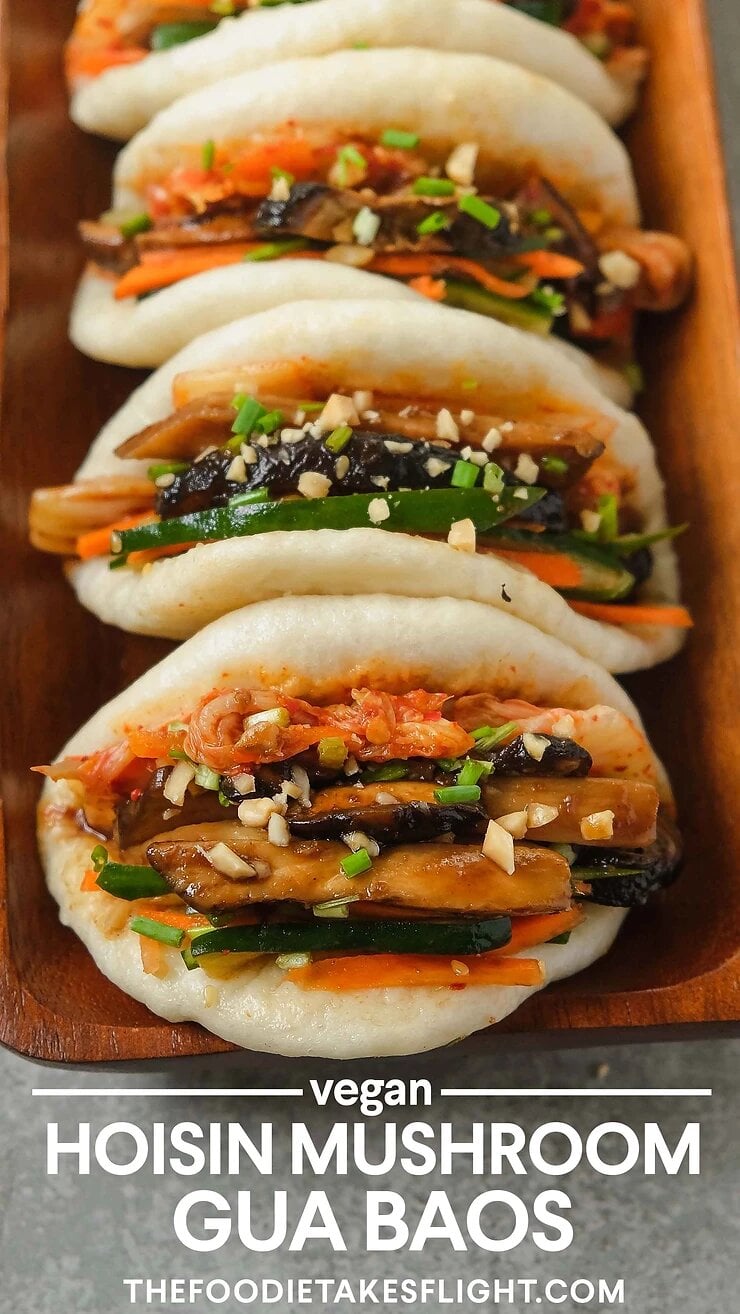
Gua baos are steamed stuffed buns or bao buns. I think what makes these really distinct is how they face open (like a tacos) unlike the usual steamed pork buns you may see that are twisted and sealed at the top throughout.

The gua baos I grew up with were filled with pork belly and usually mustard greens along with some peanuts. They were these fluffy steamed buns that we’d open up and stuff with the pork belly, greens, and mustard greens and we’d enjoy these like a sandwich. Here at home, my mom would actually have frozen steamed buns or gua bao buns for whenever we’d have pork belly or other pork stew dishes that my dad would like to stuff in these buns.

This vegan version is instead filled with mushrooms (or tofu) that I cooked with a hoisin sauce. It’s a slightly different take and I guess what I love about these buns is how you can customise the fillings to your liking!

MAKING THE STEAMED BUNS FROM SCRATCH

I made the buns from scratch and they’re actually really simple. You’ll just of course need time to let them rise and proof before rolling out, folding, and then steaming them!

PREPARING THE DOUGH IN A BOWL

Knead until smooth

Leave to rise

HOW TO MAKE THE BUNS

You can also watch the video below on how to make the steamed buns!

Divide the dough

Roll out each piece:

Brush with oil then fold in half:

PROOF THE BUNS AND THEN STEAM

Proof the buns in batches and then steam!

FILLING THE STEAMED BAO BUNS

ADD YOUR FILLINGS OF CHOICE

I grew up eating gua baos that were usually filled with braised pork belly and pickled mustard greens with some peanuts and sugar. I also love a gua bao I get from a local vegetarian restaurant that makes it with crispy tofu skin with pickled mustard greens, chili, and some sugary chopped peanuts.

My version is filled with deliciously savoury and sweet mushrooms that I cooked down in some hoisin sauce and maple syrup.

The mushrooms are well complemented by the acidity of the pickled carrots and cucumber while the kimchi adds that nice crunch and spice too.

OTHER GUA BAO FILLING OPTIONS:

YOU CAN GET VERY CREATIVE WITH YOUR CHOICE OF FILLING

HERE ARE OTHER FILLING SUGGESTIONS:

  • Maple Hoisin Tofu
  • Black Pepper Tofu
  • Tofu Katsu

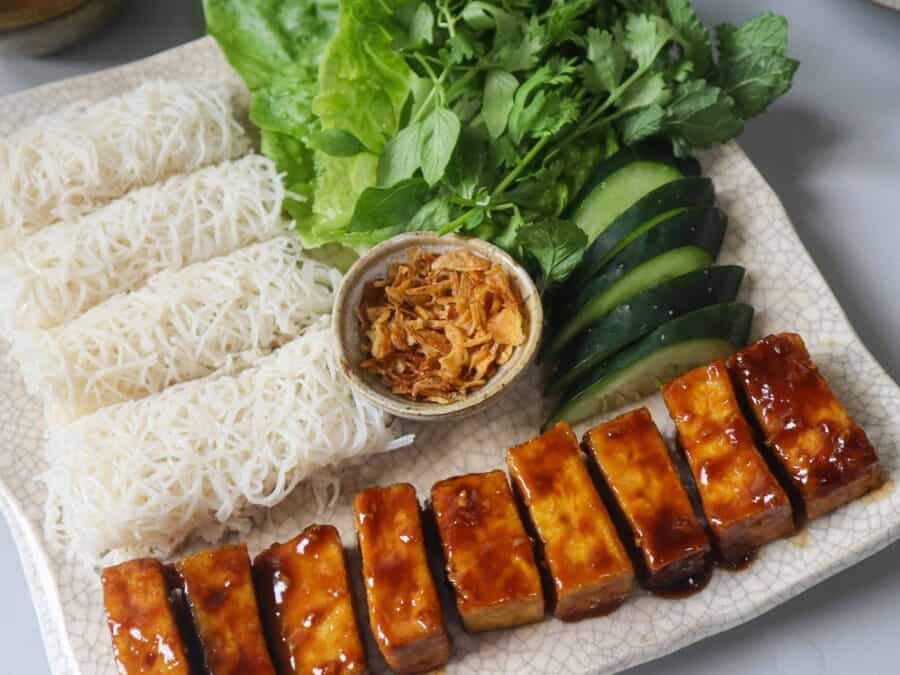
Below is a photo of maple hoisin tofu that I also used as filling for my gua baos! They’re similar to how I prepare my mushrooms but using extra firm tofu in a really savoury and sweet glaze.

This is my other version of gua baos filled with the maple hoisin tofu!

STORING THE STEAMED BUNS

These were so fun to put together, and also kind of reminded me of tacos when I ate them.You can also prepare the steamed buns in advanced and just refrigerate or even freeze them.

You can find the full recipe for these gua baos, pickled veg, and hoisin mushrooms below!

OTHER VEGAN RECIPES YOU MIGHT ENJOY:

  • Sundubu Jjigae (Korean Soft Tofu Stew)
  • Kimchi Pancakes or Kimchi Jeon
  • Filipino Kaldereta or ‘Meat’ Stew
  • Tantanmen (Vegan Ramen)
  • Kimchi Noodle Soup with Dumplings
  • Thai Tom Yum Soup
  • Filipino Lumpiang Gulay or Fried Vegetable Spring Rolls
  • Filipino “Pork” Barbecue
  • Japanese Chahan or Fried Rice
  • Crispy Eggplant Katsu
  • Chinese-Style Bolognese
  • Ginger and Scallion Noodles
  • Chili Garlic Oil Noodles
  • Mie Goreng (Indonesian Fried Noodles)

Are you looking for more delicious, vegan recipes?

You can get a copy of my cookbook, Vegan Asian!

If you crave vegan-friendly versions of classic Asian dishes, this cookbook is packed with Southeast and East Asian dishes inspired by those I grew up enjoying at home and those I’ve tried from my travels. From iconic Thai dishes to piping-hot Japanese fare and everything in between, the recipes in this will take your palate on a delicious food trip across Asia, and hopefully keep you coming back for more!

If you try out this recipe, I’d appreciate if you leave a rating or simply click on the stars ⭐️⭐️⭐️⭐️⭐️ on my recipe card!

Hoisin Mushroom Gua Baos

Jeeca
5 from 19 votes
Homemade fluffy steamed buns filled with mushrooms cooked in hoisin sauce. Enjoyed with some pickled carrots and cucumber plus some kimchi for extra texture and flavour! You can also opt to fill your gua bao with maple hoisin tofu instead of the mushrooms!
Print Recipe Pin this Recipe Rate this Recipe
Prep Time 1 hr
Cook Time 30 mins
Inactive Dough Rise Time 1 hr
Total Time 2 hrs 30 mins
Course Appetizer, Main Course, Side Dish, Snack
Cuisine Chinese
Servings 12 gua baos
Calories 131 kcal

Equipment

  • Bamboo Steamer (see notes if you don't have one)
  • Parchment paper, for lining
  • Rolling pin, I used a small dumpling rolling pin

Ingredients


Steamed Buns

    Dry Ingredients

    • 2 cups + 1 tbsp all-purpose flour (275 g)
    • 1 tbsp corn starch
    • 1/4 tsp salt

    Yeast Mixture

    • 3/4 cup warm soy milk
    • 3 tsp sugar
    • 1 tsp instant dry yeast
    • 1 tbsp neutral oil plus more for brushing

    Pickled Carrots and Cucumber

    • 1/3 cup thinly sliced carrot
    • 1/3 cup thinly sliced cucumber
    • 1/2 tbsp coarse salt, optional (see steps)
    • 3 tbsp rice vinegar
    • 1 tbsp sugar or adjust according to desired sweetness
    • 1 tsp roasted sesame seeds
    • Pinch of salt

    Hoisin Mushrooms

    • 1 lb fresh mushrooms of choice I used a mix of king oyster and shiitake
    • Alternative filing: maple hoisin tofu
    • 1 tsp minced garlic
    • Oil for cooking
    • 2 tbsp hoisin sauce
    • 4 tbsp maple syrup or other liquid sweetener or sugar (adjust according to desired sweetness)
    • 1/4 tsp chinese 5 spice powder

    Other Fillings and Toppings

    • Vegan Kimchi homemade recipe here
    • Chopped roasted peanuts
    • Chopped spring onions

    Instructions
     

    Pickled Carrots and Cucumber

    • Discard the seeds and pit of the cucumber. Peel the carrot. Very thinly slice the cucumber and carrots.
    • You can skip the following step and jump immediately to placing the veggies in the vinegar mix. But I find that draining the liquid yields better tasting pickled veg since they're drained of their liquid!
      Place the carrot and cucumber in a colander. Place a bowl under to catch the liquid. Add the coarse salt and mix into the carrot and cucumber mixture. Leave to sit for at least 10 minutes. Squeeze out the excess water. Wash the cucumber and carrot through running water to wash off the salt and then squeeze out to drain excess liquid.
    • While the veggies are being soaked in the salt (if doing so), mix together the rice vinegar, sugar, and salt in a bowl. Mix well until the sugar dissolves. Adjust seasoning based on desired sweetness and sourness.
    • Add in the cucumber and carrots. Mix well and leave to sit for 10-15 minutes. You can prepare this the day before and refrigerate it until ready to use. This way it’s also more flavourful!

    Hoisin Mushrooms

    • Slice the mushrooms into strips or batons.
    • Heat a non-stick pan. Heat some oil over medium heat. Once hot, add in the garlic. Sauté until lightly brown and then add in the mushrooms. Pour in the hoisin sauce and maple syrup or other sweetener. Mix well and cook over medium heat for 5-6 minutes or until the mushrooms are cooked through and release some water. Sprinkle chinese five spice or pepper and mix well. Turn off heat and set aside.
      Alternatively, you can also try out my maple hoisin tofu for the filling!

    Buns

      Preparing the Dough

      • Mix the dry ingredients together in a large bowl.
      • Place the soy milk in a microwave safe bowl. Microwave at high for 25-30 seconds (note that this can vary depending on your microwave) until the milk is around 42C/110F. It should be warm to the touch but will not burn you. If it’s too hot, leave to cool for a few minutes.
      • Mix in the sugar and yeast into the warm milk. Leave to sit for 10-15 minutes until it foams up. When it’s foamy, mix in the oil.
      • Make a well in the center of the dry ingredients. While mixing, pour in the yeast and milk mixture.
      • Keep mixing until a dough is formed. Knead for 5-10 minutes until dough is smooth. You can opt to knead it in the bowl if your bowl is large enough to minimise the mess, or you can place it on a lightly floured surface.
      • Scrape off the flour on the sides of the bowl if needed. I like to use my hands to knead everything together. Keep kneading until the dough is stretchy and no longer sticks to your hands. You'll have a smooth ball of dough. The gluten bonds will strengthen as the dough is kneaded.
      • Shape the dough into a ball, then place it back in the bowl. Cover it with a damp towel and let it rest for at least 1 hour or until doubled in size.

      Forming the Buns

      • Once the dough has risen, transfer it to a lightly floured surface. Punch your thumb into the center to create a hole. Slowly pinch and form the sides to create a larger hole before slowly pulling apart the sides to create a large ring (see video).
      • Slice the ring of dough into 12 pieces, each around 40 grams.
      • Place the pieces in a bowl and cover with a damp towel to prevent them from drying out while you work on each piece.
      • Only 4 pieces fit in my bamboo steamer so I only prepare 4 pieces at a time.
      • Roll a piece of dough into a ball and then lightly flatten on a floured surface. With a rolling pin or small dumpling rolling pin (which I used), roll the dough until you have an oval that’s around 3 by 4 to 4.5”.
      • Brush the dough with some oil then fold into half. Transfer on a sheet of parchment paper and into the bamboo basket. Cover the dough and leave to proof for another 15-20 minutes.
      • Repeat this step for the rest of the dough and work in batches as needed, depending on how many can fit your steamer.

      Cooking the Buns

      • If you don't have a bamboo steamer, see the notes below.
      • Heat a large pan or wok, enough to fit the bamboo steamer. Add enough water that it touches the bottom edge of the steamer. Make sure the water doesn’t reach the parchment paper and buns!
      • Place the steamer on the pan. Leave the water to boil over medium high heat. Once it boils, lower the heat to medium and leave the buns to steam for 8-10 minutes.
        Note: I highly recommend to keep your heat at medium to medium low. Anything too hot may cause the buns to inflate too fast and then deflate. While too low of a heat can yield raw/uncooked buns. This may take some trial and error depending on the type of cooking stove you have.
      • Afterwards, DO NOT open the steamer immediately. Leave it to sit for 10 minutes before taking the cooked buns out of the steamer.
        If you open it too soon, the buns can deflate from the sudden change in temperature. When you do transfer the buns from the steamer after 10 minutes, cover the cooked buns with a towel so it doesn’t quickly cool and dry out.
      • Shape more buns and then leave to proof in the bamboo basket. Steam the next batch. Repeat this for the rest.

      Storing the Buns

      • Place the buns in a freezer-safe container. Line each one with the used parchment paper to avoid them from sticking.
      • You can freeze the buns and reheat them by steaming from frozen until fluffy. No need to thaw from frozen.

      Assembling the Gua Bao

      • Carefully open a bun. Add in the pickled veggies, mushrooms, and kimchi (if using). Finish off with some chopped green onions and peanuts if desired. Enjoy!

      WATCH Video

      Notes

      Bamboo steamer:
      I highly suggest using a Bamboo Steamer because it has a bamboo lid that’ll absorb the moisture from the steam as it goes up. Using a different steamer with a glass/steel lid will cause the moisture to build up, that’ll eventually drip down on to the steamed buns and case them to be really moist and easily deflate.
      If you only have a metal/glass lid for your steamer, you can wrap a large cloth around your lid for it to be able to absorb some of the moisture when cooking.

      NUTRITIONAL INFO

      Serving: 1bun | Calories: 131kcal | Carbohydrates: 26g | Protein: 3g | Fat: 2g | Saturated Fat: 1g | Polyunsaturated Fat: 1g | Monounsaturated Fat: 1g | Trans Fat: 1g | Cholesterol: 1mg | Sodium: 95mg | Potassium: 164mg | Fiber: 1g | Sugar: 8g | Vitamin A: 1IU | Vitamin C: 1mg | Calcium: 15mg | Iron: 1mg
      DID YOU MAKE THIS RECIPE?Please leave a rating or comment and share a photo on Instagram, and tag me @thefoodietakesflight or use #thefoodietakesflight 🙂

      You can pin these images:

      This Post Has 23 Comments

      1. Asha 8 Feb 2021 Reply

        5 stars
        Never eaten or made bao buns before but I kept seeing them online and decided to give it a shot- these were absolutely worth the effort- amazing!!!!! ? Used a mix of tempeh and mushrooms with the maple hoisin sauce, also added some avocado into the buns along with the kimchi, pickled veg, cilantro and scallion. A+

      2. Kate 15 Feb 2021 Reply

        5 stars
        First time making these and the instructions, videos and pictures were SO helpful. The most amazing, tasty recipe!

        1. Jeeca 15 Feb 2021 Reply

          Hi Kate! Thank you so much, really glad it helped. I hope you enjoyed making them too! 🙂

      3. Lisa 20 Feb 2021 Reply

        Hi! Can you make the dough a day ahead and leave it in the fridge before rolling it out and steaming it?

        1. Jeeca 21 Feb 2021 Reply

          Hi Lisa! Yes that shouldn’t be a problem. I recommend letting the dough rise a bit first before and placing it in an oiled bowl so it won’t stick. Then you can bring it out at room temp before kneading and shaping the next day. 🙂

      4. Corinne guez-touboul 27 Feb 2021 Reply

        5 stars
        Hello and thank you for sharing.
        You suggest to prepare them and to store them in the fridge but then how do you were them up again in the steamer or in the microwave?

        1. Jeeca 1 Mar 2021 Reply

          Hi Corinne! Most welcome! For the storage and reheating, I refrigerate them then just steam them again the next day to reheat them. You can also microwave them if you’d like. I recommend placing the buns on a plate and splash a bit of water before covering with a microwave safe lid, just so it’s not too dry when you microwave. Hope this helps!

      5. Vikki 21 Mar 2021 Reply

        5 stars
        What a clear and well written recipe. I have made these today and absolutely loved them. Delicious thank you.

        1. Jeeca 22 Mar 2021 Reply

          Thank you so much, Vikki! Hope you enjoyed!! ❤️

      6. Caroline 13 Apr 2021 Reply

        5 stars
        This was so good! Recommend starting the dough making process first and do all the rest during the 1st rise. The sauce is so good! I made a second batch after I tasted the 1st and browned up some tofu for it. Family loved it. The bao were so soft and light. Absolutely perfect! Will need to find some vegan kimchi for next time.

        1. Jeeca 13 Apr 2021 Reply

          Hi Caroline, glad you enjoyed it 🙂

      7. Lizz 2 Oct 2021 Reply

        Hi! I would love to make this however I am allergic to soy. Do you know if I can use some other type of milk? Like almond?

        1. Jeeca 6 Oct 2021 Reply

          Hi Lizz, yes other milk will do. Oat would work great too! ◡̈

      8. Catherine 6 Mar 2022 Reply

        I was intimidated making these but I’m glad I challenged myself. They came out so good! The buns were so soft. My husband doesn’t like mushrooms so I substituted jackfruit.

        1. Jeeca 7 Mar 2022 Reply

          Glad you gave it a try!! Thanks so much Catherine ◡̈

        2. Mitzi 21 May 2022 Reply

          5 stars
          I made the fillings and substituted a a flat bread for boa bun. I was so impressed with the hoisin, mushroom, picked veggies and kimchi that I decided that I had to do the buns. Today I did the buns and they came out so puffy. I did peek in on the the first batch in the steamer and they were less than perfect but when I followed the instructions, the others turned out perfectly! I will be making this for friends and family in the future. I cannot wait to impress them!
          Thank you Jeeca!

          1. Jeeca 23 May 2022 Reply

            Thanks Mitzi! Hope they enjoy these too! ◡̈

      9. Aarushi 4 Aug 2022 Reply

        5 stars
        Just one word to describe this recipe: WOW! This has easily became my new favorite dish, it was so beautifully flavorful, and all the different flavors harmonized so wonderfully. The bao buns felt like clouds! I made the tofu version, and added avocado, wild garlic and a little bit of kimchi when assembling the gua baos.

        1. Jeeca 5 Aug 2022 Reply

          Soo happy you enjoyed these! And adding avocado adds that nice creaminess! I can imagine how good all the flavours went together. Thanks so much for trying it out ◡̈

      10. Mel 9 Feb 2023 Reply

        5 stars
        I thought the bao buns would be super hard to make but they were actually really easy, great instructions! Very impressive dish to present to guests so I’m sure these will become a regular for us.

        1. Jeeca 10 Feb 2023 Reply

          Thank you so much Mel! And hope the instructions were easy to follow ◡̈

      11. Alice 10 Feb 2023 Reply

        5 stars
        This is delicious. I was worried at first, because my dough didn’t rise at all during the resting and proofing periods. But when I steamed them they ended up very nice and puffy anyway. I made the Hoisin and Maple Tofu as a filling and my 9yo daughter and I LOVED them.

        1. Jeeca 11 Feb 2023 Reply

          Hi Alice, really glad it turned out well at the end! And so happy to hear your daughter enjoyed these too. Thanks for giving them a try!! ◡̈

      Leave a Reply Cancel reply

      Recipe Rating


      Noodles The Foodie Takes Flight

      Hello there!

      I’m Jeeca, a food content creator and recipe developer passionate about creating easy yet tasty and flavour-packed vegan recipes. I share a lot of Asian recipes inspired by my travels and those I grew up enjoying.

      ​ MORE ABOUT TFTF >

      MY COOKBOOK

      Vegan Asian Cookbook

      Subscribe for recipes and updates

      Search for a recipe:

      Search
      PrevStir-Fried Tofu and Basil Noodles (Vegan Recipe)
      Maple Hoisin TofuNext

      Latest Recipes

      No Bake Vegan Roasted Garlic, Miso & Cheese Flatbread

      Roasted Garlic Miso & Cheese Flatbread

      GET THE RECIPE »
      roasted garlic gochujang udon in a wok

      Roasted Garlic Gochujang Udon

      GET THE RECIPE »
      Soy Garlic Tofu Balls Vegan Recipe

      Soy Garlic Tofu Balls

      GET THE RECIPE »
      Vegan Bang Bang Broccoli Recipe

      Bang Bang Broccoli (Vegan)

      GET THE RECIPE »
      Filipino Tofu Curry with coconut milk, potatoes, carrots, bell peppers

      Filipino Tofu Curry

      GET THE RECIPE »
      vegan rodic's style tapa with garlic rice

      Rodic’s Tapa (Vegan Filipino Recipe)

      GET THE RECIPE »
      Page1 Page2 Page3 … Page10
      Search
      TFTF ICON LOGO 2021

      RECIPES

      SHOP MY ESSENTIALS

      ABOUT

      COOKBOOKS

      FOLLOW ME ON SOCIAL MEDIA:

      Youtube Facebook Instagram Pinterest Tiktok

      PRIVACY POLICY